
1. Introduction
1.1. What is Proxmox Mail Gateway?
Email security begins at the gateway, by controlling all incoming and outgoing email messages. Proxmox Mail Gateway addresses the full spectrum of unwanted email traffic, focusing on spam and virus detection. Proxmox Mail Gateway provides a powerful and affordable server solution to eliminate spam and viruses, and block undesirable content from your email system. All products are self-installing and can be used without deep knowledge of Linux.

1.2. Features
1.2.1. Spam detection
Proxmox Mail Gateway uses a wide variety of local and network tests to identify spam mail. Here is a short list of used filtering methods:
- Receiver Verification
-
Many of the junk messages reaching your network are emails to non-existent users. Proxmox Mail Gateway detects these emails on the SMTP level, before they are transferred to your network. This reduces the traffic to be analyzed for spam and viruses by up to 90% and reduces the working load on your mail servers and scanners.
- Sender policy framework (SPF)
-
Sender Policy Framework (SPF) is an open standard for validating emails and preventing sender IP address forgery. SPF allows the administrator of an internet domain to specify which computers are authorized to send emails with a given domain, by creating a specific SPF record in the Domain Name System (DNS).
- DNS-based Blackhole List
-
A DNS-based Blackhole List (DNSBL) is a means by which an internet site may publish a list of IP addresses, in a format which can be easily queried by computer programs on the Internet. The technology is built on top of the Domain Name System. DNSBLs are used to publish lists of addresses linked to spamming.
- SMTP Welcomelist
-
Exclude senders from SMTP blocking. To prevent all SMTP checks (Greylisting, Receiver Verification, SPF and DNSBL) and accept all emails for analysis in the filter rule system, you can add the following to this list: Domains (Sender/Receiver), Mail address (Sender/Receiver), Regular Expression (Sender/Receiver), IP address (Sender), IP network (Sender).
- Bayesian Filter - Automatically trained statistical filters
-
Certain words have a higher probability of occurring in spam emails than in legitimate emails. By being trained to recognize those words, the Bayesian filter checks every email and adjusts the probabilities of it being a spam word or not in its database. This is done automatically.
- Block- and Welcomelists
-
Block- and Welcomelists are an access control mechanism to accept, block, or quarantine emails to recipients. This allows you to tune the rule-system by applying different objects like domains, email address, regular expression, IP Network, LDAP Group, and others.
- Auto-learning algorithm
-
Proxmox Mail Gateway gathers statistical information about spam emails. This information is used by an auto-learning algorithm, meaning the system becomes smarter over time.
- Spam URI Real-time Block List (SURBL)
-
SURBLs are used to detect spam, based on the URIs in the message body (usually websites). This makes them different from most other Real-time Blocklists, because SURBLs are not used to block spam senders. SURBLs allow you to block messages that have spam hosts which are mentioned in message bodies.
- Greylisting
-
Greylisting an email means that unknown senders are intentionally temporarily rejected. Since temporary failures are part of the specifications for mail delivery, a legitimate server will try to resend the email later on. Spammers, on the other hand, do not queue and reattempt mail delivery. A greylisted email never reaches your mail server and thus your mail server will not send useless "Non Delivery Reports" to spammers. Additionally, greylisted mail is not analyzed by the antivirus and spam-detector engines, which saves resources.
A mail is greylisted if it is the first mail from a sender to a receiver coming from a particular IP network. You can configure which IP addresses belong to the same network, by setting an appropriate netmask for greylisting.
- SMTP Protocol Tests
-
Postfix is able to do some sophisticated SMTP protocol tests (see man postscreen). Most spam is sent out by zombies (malware on compromised end-user computers), and those zombies often try to maximize the amount of mails delivered. In order to do that, many of them violate the SMTP protocol specification and thus can be detected by these tests.
- Before and After Queue Filtering
-
Proxmox Mail Gateway can be configured to either accept the mail, by sending a response of 250 OK, and scan it afterwards, or alternatively inspect the mail directly after it has the content and respond with a reject 554 if the mail is blocked by the rule system. These options are known as After Queue and Before Queue filtering respectively (see Before and After Queue Scanning).
- Configurable NDR policy
-
In certain environments, it can be unacceptable to discard an email, without informing the sender about that decision. You can decide whether you want to inform the senders of blocked emails or not.
1.2.2. Virus detection
Proxmox Mail Gateway integrates ClamAV®, which is an open-source (GPL) antivirus engine, designed for detecting Trojans, viruses, malware, and other malicious threats.
It provides a high performance, multi-threaded scanning daemon, command-line utilities for on demand file scanning, and an intelligent tool for automatic signature updates.
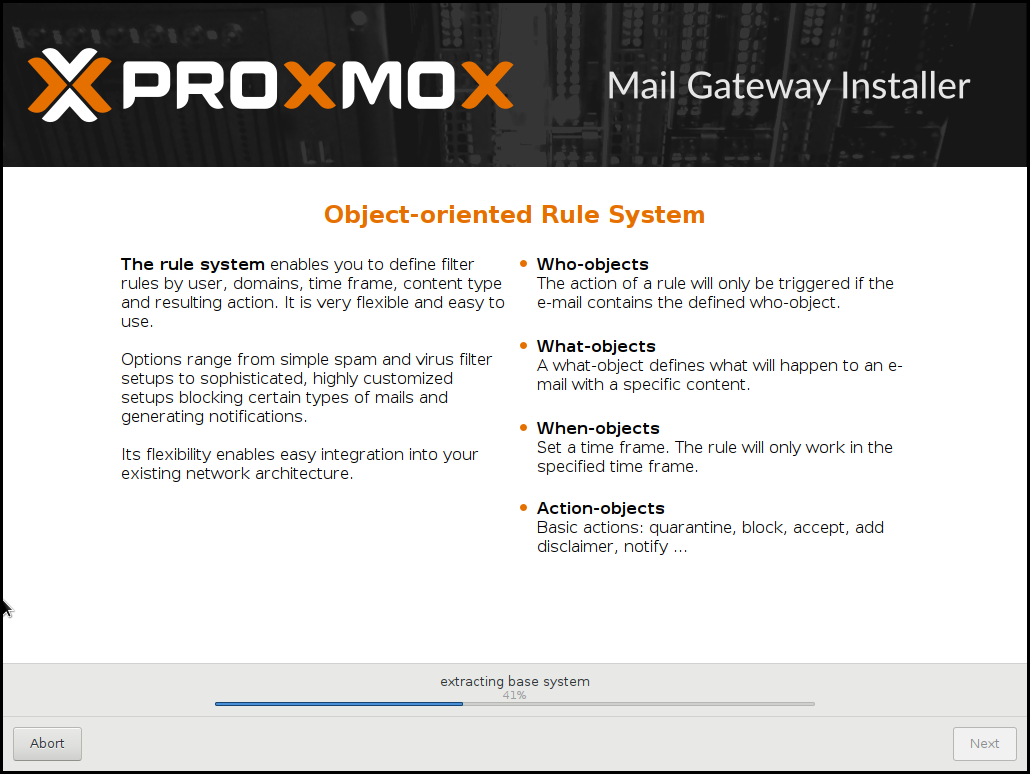
1.2.3. Object-Oriented Rule System
The object-oriented rule system enables custom rules for your domains. It’s an easy but very powerful way to define filter rules by user, domains, time frame, content type and resulting action. Proxmox Mail Gateway offers a lot of powerful objects to configure your own custom system.
- WHO - objects
-
Who is the sender or receiver of the email?
- WHAT - objects
-
What is in the email?
- WHEN - objects
-
When was the email received by Proxmox Mail Gateway?
- ACTIONS - objects
-
Defines the final actions.
Every rule has five categories FROM, TO, WHEN, WHAT and ACTION. Each of these categories can contain several objects and a direction (in, out or both).
Options range from simple spam and virus filter setups to sophisticated, highly customized configurations, blocking certain types of emails and generating notifications.
1.2.4. Web-based Management Interface
Proxmox Mail Gateway makes email security and filtering simple to manage. The web-based management interface allows you to set up and maintain even a complex mail system with ease.
There is no need to install a separate management tool. Any modern internet browser is sufficient.
1.2.5. Spam Quarantine
Identified spam mails can be stored in the user-accessible Spam Quarantine. Thus, users can view and manage their spam mails by themselves.
1.2.6. Tracking and Logging
The innovative Proxmox Message Tracking Center tracks and summarizes all available logs. With the web-based and user-friendly management interface, IT admins can easily view and control all functions from a single screen.
The Message Tracking Center is fast and powerful. It has been tested on Proxmox Mail Gateway sites which process over a million emails per day. All log files from the last 7 days can be queried, and the results are summarized by an intelligent algorithm.
The logged information includes:
-
Arrival of the email
-
Proxmox filter processing with results
-
Internal queue to your email server
-
Status of final delivery
1.2.7. DKIM Signing
Proxmox Mail Gateway offers the possibility to optionally sign outgoing emails with DKIM.
1.2.8. High Availability with Proxmox HA Cluster
To provide a 100% secure email system for your business, we developed Proxmox High Availability (HA) Cluster. The Proxmox HA Cluster uses a unique application-level clustering scheme, which provides extremely good performance. It is quick to set-up and the simple, intuitive management interface keeps resource requirements low. After temporary failures, nodes automatically reintegrate without any operator interaction.
1.2.9. LDAP Integration
It is possible to query user and group data from LDAP servers. This may be used to build special filter rules, or simply to provide authentication services for the Spam Quarantine GUI.
1.2.10. Fetchmail Integration
Proxmox Mail Gateway allows you to fetch mail from other IMAP or POP3 servers.
1.2.11. Flexible User Management
The administration interface uses a role-based access control scheme, using the following roles:
- Superuser
-
This role is allowed to do everything (reserved for user root).
- Administrator
-
Full access to the mail filter setup, but not allowed to alter the network setup.
- Quarantine Manager
-
Is able to view and manage the Spam Quarantine.
- Auditor
-
Has read-only access to the whole configuration, can access logs and view statistics.
- Helpdesk
-
Combines permissions of the Auditor and the Quarantine Manager role.
1.3. Your benefit with Proxmox Mail Gateway
-
Open-source software
-
No vendor lock-in
-
Linux kernel
-
Fast installation and easy-to-use
-
Web-based management interface
-
REST API
-
Huge, active community
-
Low administration costs and simple deployment
1.4. Getting Help
1.4.1. Community Support Forum
Proxmox Mail Gateway itself is fully open source, so we always encourage our users to discuss and share their knowledge using the Proxmox Community Forum. The forum is moderated by the Proxmox support team, and has a large user base from all around the world. Needless to say, such a large forum is a great place to get information.
1.4.2. Mailing Lists
Proxmox Mail Gateway is fully open source and contributions are welcome! The primary communication channel for developers is the:
-
Mailing list for developers: Proxmox Mail Gateway development discussion
1.4.3. Commercial Support
Proxmox Server Solutions GmbH also offers enterprise support available as Proxmox Mail Gateway Subscription Service Plans. All users with a subscription get access to the Proxmox Mail Gateway Enterprise Repository, and—with a Basic, Standard or Premium subscription—also to the Proxmox Customer Portal. The customer portal provides help and support with guaranteed response times from the Proxmox Mail Gateway developers.
For volume discounts, or more information in general, please contact sales@proxmox.com.
1.4.4. Bug Tracker
Proxmox runs a public bug tracker at https://bugzilla.proxmox.com. If an issue appears, file your report there. An issue can be a bug as well as a request for a new feature or enhancement. The bug tracker helps to keep track of the issue and will send a notification once it has been solved.
2. Planning for Deployment
2.1. Easy Integration into Existing Email Server Architecture
In this sample configuration, your email traffic (SMTP) arrives on the firewall and will be directly forwarded to your email server.

By using Proxmox Mail Gateway, all your email traffic is forwarded to the Proxmox Mail Gateway instance, which filters the email traffic and removes unwanted emails. This allows you to manage incoming and outgoing mail traffic.

2.2. Filtering Outgoing Emails
Many email filtering solutions do not scan outgoing mails. In contrast, Proxmox Mail Gateway is designed to scan both incoming and outgoing emails. This has two major advantages:
-
Proxmox Mail Gateway is able to detect viruses sent from an internal host. In many countries, you are liable for sending viruses to other people. The outgoing email scanning feature is an additional protection to avoid that.
-
Proxmox Mail Gateway can gather statistics about outgoing emails too. Statistics about incoming emails may look nice, but they aren’t necessarily helpful. Consider two users; user-1 receives 10 emails from news portals and writes 1 email to an unknown individual, while user-2 receives 5 emails from customers and sends 5 emails in return. With this information, user-2 can be considered as the more active user, because they communicate more with your customers. Proxmox Mail Gateway advanced address statistics can show you this important information, whereas a solution which does not scan outgoing email cannot do this.
To enable outgoing email filtering, you simply need to send all outgoing emails through your Proxmox Mail Gateway (usually by specifying Proxmox Mail Gateway as "smarthost" on your email server).
2.3. Firewall Settings
In order to pass email traffic to Proxmox Mail Gateway, you need to allow traffic on the SMTP port. Our software uses the Network Time Protocol (NTP), RAZOR, DNS, SSH, and HTTP, as well as port 8006 for the web-based management interface.
| Service | Port | Protocol | From | To |
|---|---|---|---|---|
SMTP |
25 |
TCP |
Proxmox |
Internet |
SMTP |
25 |
TCP |
Internet |
Proxmox |
SMTP |
26 |
TCP |
Mailserver |
Proxmox |
NTP |
123 |
TCP/UDP |
Proxmox |
Internet |
RAZOR |
2703 |
TCP |
Proxmox |
Internet |
DNS |
53 |
TCP/UDP |
Proxmox |
DNS Server |
HTTP |
80 |
TCP |
Proxmox |
Internet |
HTTPS |
443 |
TCP |
Proxmox |
Internet |
GUI/API |
8006 |
TCP |
Intranet |
Proxmox |

|
It is recommended to restrict access to the GUI/API port as far as possible. |
The outgoing HTTP connection is mainly used by virus pattern updates, and can be configured to use a proxy instead of a direct internet connection.
You can use the nmap utility to test your firewall settings (see section port scans).
2.4. System Requirements
Proxmox Mail Gateway can run on dedicated server hardware or inside a virtual machine on any of the following platforms:
-
Proxmox VE (KVM)
-
VMWare vSphere™ (open-vm tools are integrated in the ISO)
-
Hyper-V™ (Hyper-V Linux integration tools are integrated in the ISO)
-
KVM (virtio drivers are integrated, great performance)
-
VirtualBox™
-
Citrix Hypervisor™ (former XenServer™)
-
LXC container
-
and others that support Debian Linux as a guest OS
Please see https://www.proxmox.com for details.
To benchmark your hardware, run pmgperf after installation.
2.4.1. Minimum System Requirements
-
CPU: 64bit (Intel 64 or AMD64)
-
2.5 GiB RAM
-
Bootable CD-ROM-drive or USB boot support
-
Monitor with a minimum resolution of 1024x768 for the installation
-
Hard disk with at least 8 GB of disk space
-
Ethernet network interface card (NIC)
2.4.2. Recommended System Requirements
-
Multi-core CPU: 64bit (Intel 64 or AMD64),
-
for use in a virtual machine, activate Intel VT/AMD-V CPU flag
-
-
4 GiB RAM
Memory requirements can increase significantly with heavy email traffic, many filter rules, enabling additional signatures or third-party tools.
-
Bootable CD-ROM-drive or USB boot support
-
Monitor with a minimum resolution of 1024x768 for the installation
-
1 Gbps Ethernet network interface card (NIC)
-
Storage: at least 8 GB free disk space, best set up with redundancy, using a hardware RAID controller with battery backed write cache (“BBU”) or ZFS. ZFS is not compatible with hardware RAID controllers. For best performance, use enterprise-class SSDs with power loss protection.
2.4.3. Supported web browsers for accessing the web interface
To use the web interface, you need a modern browser. This includes:
-
Firefox, a release from the current year, or the latest Extended Support Release
-
Chrome, a release from the current year
-
Microsoft’s currently supported version of Edge
-
Safari, a release from the current year
3. Installing Proxmox Mail Gateway
Proxmox Mail Gateway is based on Debian. This is why the install disk images (ISO files) provided by Proxmox include a complete Debian system as well as all necessary Proxmox Mail Gateway packages.

|
See the support table in the FAQ for the relationship between Proxmox Mail Gateway releases and Debian releases. |
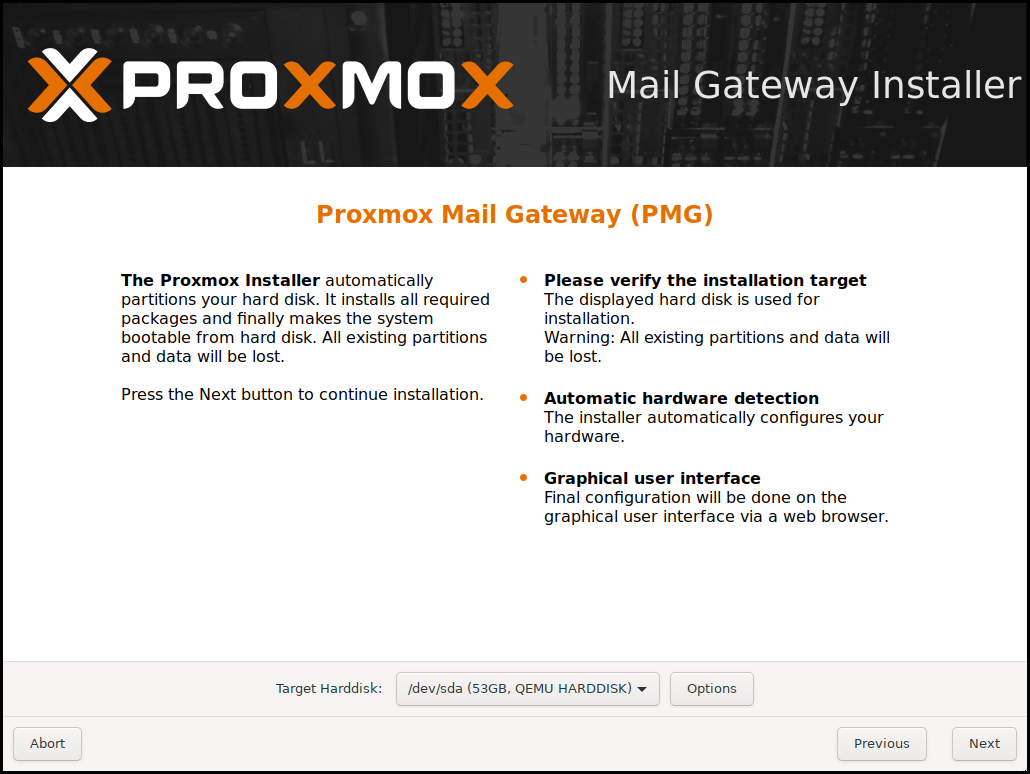
The installer will guide you through the setup, allowing you to partition the local disk(s), apply basic system configurations (for example, time zone, language, network) and install all required packages. This process should not take more than a few minutes. Installing with the provided ISO is the recommended method for new and existing users.
Alternatively, Proxmox Mail Gateway can be installed on top of an existing Debian system. This option is only recommended for advanced users because detailed knowledge about Proxmox Mail Gateway is required.
3.1. Prepare Installation Media
Download the installer ISO image from: https://www.proxmox.com/en/downloads/category/proxmox-mail-gateway
The Proxmox Mail Gateway installation media is a hybrid ISO image. It works in two ways:
-
An ISO image file ready to burn to a CD or DVD.
-
A raw sector (IMG) image file ready to copy to a USB flash drive (USB stick).
Using a USB flash drive to install Proxmox Mail Gateway is the recommended way, because it is the faster option.
3.1.1. Prepare a USB Flash Drive as an Installation Medium
The flash drive needs to have at least 1 GB of storage available.

|
Do not use UNetbootin. It does not work with the Proxmox Mail Gateway installation image. |

|
Make sure that the USB flash drive is not mounted and does not contain any important data. |
3.1.2. Instructions for GNU/Linux
On a Unix-like operating system, you can use the dd command to copy the ISO image to the USB flash drive. To do this, find the device name of the USB flash drive (see below), then run the dd command.
# dd bs=1M conv=fdatasync if=./proxmox-mailgateway_*.iso of=/dev/XYZ
|
|
Be sure to replace /dev/XYZ with the correct device name and adapt the input filename (if) path. |
|
|
Be very careful, and do not overwrite the wrong disk! |
Find the USB Device Name
There are multiple ways to find out the name of the USB flash drive. One is to compare the last lines of the dmesg command output before and after plugging in the flash drive. Another way is to compare the output of the lsblk command. Open a terminal and run:
# lsblk
Then plug in your USB flash drive and run the command again:
# lsblk
A new device will appear. This is the one you want to use. As an additional precaution, check that the reported size matches your USB flash drive.
3.1.3. Instructions for macOS
Open the terminal (query Terminal in Spotlight).
Convert the .iso file to .img using the convert option of hdiutil, for example:
# hdiutil convert -format UDRW -o proxmox-mailgateway_*.dmg proxmox-ve_*.iso
|
|
macOS tends to automatically add .dmg to the output filename. |
To get the current list of devices, run the command:
# diskutil list
Now insert the USB flash drive and run this command again to determine which device node has been assigned to it. (e.g., /dev/diskX).
# diskutil list
# diskutil unmountDisk /dev/diskX
|
|
replace X with the disk number from the last command. |
# sudo dd if=proxmox-mailgateway_*.dmg of=/dev/rdiskX bs=1m
|
|
rdiskX, instead of diskX, in the last command is intended. This will increase the write speed. |
3.1.4. Instructions for Windows
Using Etcher
Etcher works out of the box. Download Etcher from https://etcher.io. It will guide you through the process of selecting the ISO and your USB flash drive.
Using Rufus
Rufus is a more lightweight alternative, but you need to use the DD mode to make it work. Download Rufus from https://rufus.ie/. Either install it or use the portable version. Select the destination drive and the Proxmox Mail Gateway ISO file.
|
|
After you Start, you have to click No on the dialog asking to download a different version of GRUB. In the next dialog select the DD mode. |
3.2. Using the Proxmox Mail Gateway Installer
The installer ISO image includes the following:
-
Complete operating system (Debian Linux, 64-bit)
-
The Proxmox Mail Gateway installer, which partitions the hard drive(s) with ext4, XFS or ZFS and installs the operating system
-
Proxmox Mail Gateway Linux kernel
-
Postfix MTA, ClamAV, Spamassassin and the Proxmox Mail Gateway toolset
-
Web-based management interface for using the toolset
|
|
All existing data on the selected drives will be removed during the installation process. The installer does not add boot menu entries for other operating systems. |
Please insert the prepared installation media (for example, USB flash drive or CD-ROM) and boot from it.
|
|
Make sure that booting from the installation medium (for example, USB) is enabled in your server’s firmware settings. Secure boot needs to be disabled when booting an installer prior to Proxmox Mail Gateway version 8.1. |
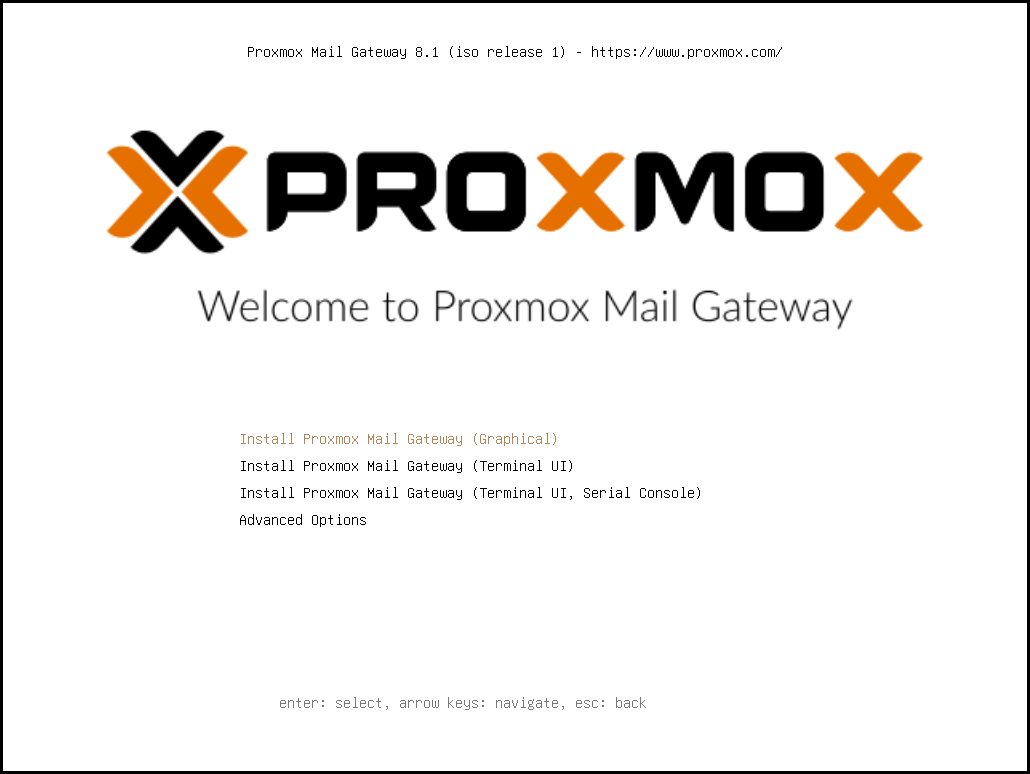
After choosing the correct entry (for example, Boot from USB) the Proxmox Mail Gateway menu will be displayed, and one of the following options can be selected:
- Install Proxmox Mail Gateway (Graphical)
-
Starts the normal installation.
|
|
It’s possible to use the installation wizard with a keyboard only. Buttons can be clicked by pressing the ALT key combined with the underlined character from the respective button. For example, ALT + N to press a Next button. |
- Install Proxmox Mail Gateway (Terminal UI)
-
Starts the terminal-mode installation wizard. It provides the same overall installation experience as the graphical installer, but has generally better compatibility with very old and very new hardware.
Both modes use the same code base for the actual installation process to benefit from more than a decade of bug fixes and ensure feature parity.
|
|
The Terminal UI option can be used in case the graphical installer does not work correctly, due to e.g. driver issues. |
- Install Proxmox Mail Gateway (Terminal UI, Serial Console)
-
Starts the terminal-mode installation wizard, additionally setting up the Linux kernel to use the (first) serial port of the machine for in- and output. This can be used if the machine is completely headless and only has a serial console available.
- Advanced Options: Install Proxmox Mail Gateway (Graphical, Debug Mode)
-
Starts the installation in debug mode. A console will be opened at several installation steps. This helps to debug the situation if something goes wrong. To exit a debug console, press CTRL-D. This option can be used to boot a live system with all basic tools available. You can use it, for example, to repair a degraded ZFS rpool or fix the bootloader for an existing Proxmox Mail Gateway setup.
- Advanced Options: Install Proxmox Mail Gateway (Terminal UI, Debug Mode)
-
Same as the graphical debug mode, but preparing the system to run the terminal-based installer instead.
- Advanced Options: Install Proxmox Mail Gateway (Serial Console Debug Mode)
-
Same the terminal-based debug mode, but additionally sets up the Linux kernel to use the (first) serial port of the machine for in- and output.
- Advanced Options: Rescue Boot
-
With this option you can boot an existing installation. It searches all attached hard disks. If it finds an existing installation, it boots directly into that disk using the Linux kernel from the ISO. This can be useful if there are problems with the bootloader (GRUB/systemd-boot) or the BIOS/UEFI is unable to read the boot block from the disk.
- Advanced Options: Test Memory (memtest86+)
-
Runs memtest86+. This is useful to check if the memory is functional and free of errors. Secure Boot must be turned off in the UEFI firmware setup utility to run this option.
You normally select Install Proxmox Mail Gateway (Graphical) to start the installation.
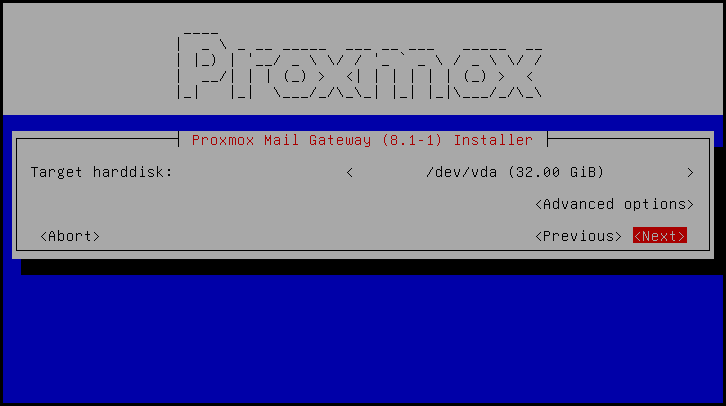
The first step is to read our EULA (End User License Agreement). Following this, you can select the target hard disk(s) for the installation.
|
|
By default, the whole server is used and all existing data is removed. Make sure there is no important data on the server before proceeding with the installation. |
The Options button lets you select the target file system, which defaults to ext4. The installer uses LVM if you select ext4 or xfs as a file system, and offers additional options to restrict LVM space (see below).
Proxmox Mail Gateway can also be installed on ZFS. As ZFS offers several software RAID levels, this is an option for systems that don’t have a hardware RAID controller. The target disks must be selected in the Options dialog. More ZFS specific settings can be changed under Advanced Options.

|
ZFS on top of any hardware RAID is not supported and can result in data loss. |
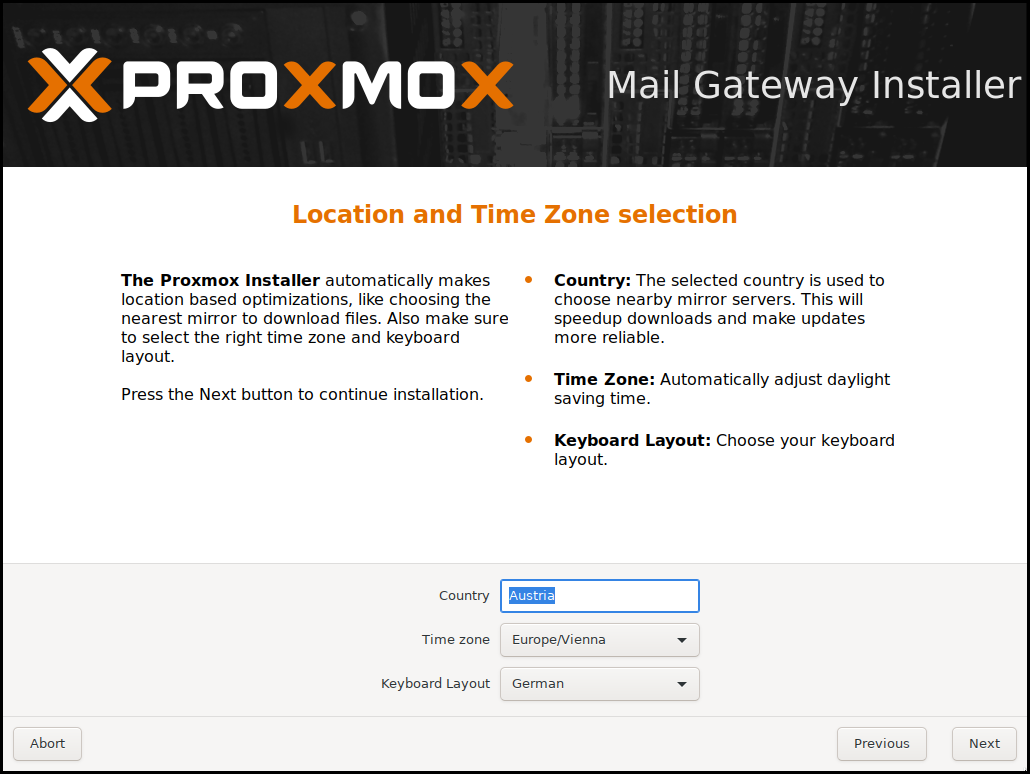
The next page asks for basic configuration options like your location, time zone, and keyboard layout. The location is used to select a nearby download server, in order to increase the speed of updates. The installer is usually able to auto-detect these settings, so you only need to change them in rare situations when auto-detection fails, or when you want to use a keyboard layout not commonly used in your country.
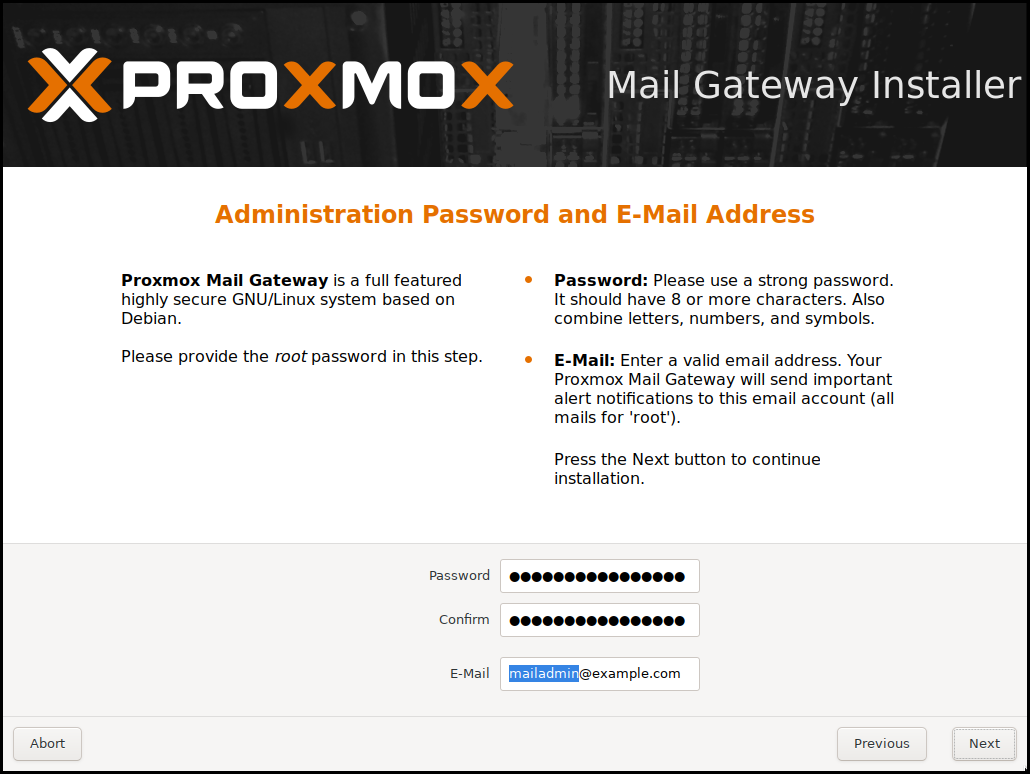
Next the password of the superuser (root) and an email address needs to be specified. The password must consist of at least 8 characters. It’s highly recommended to use a stronger password. Some guidelines are:
-
Use a minimum password length of at least 12 characters.
-
Include lowercase and uppercase alphabetic characters, numbers and symbols.
-
Avoid character repetition, keyboard patterns, common dictionary words, letter or number sequences, usernames, relative or pet names, romantic links (current or past), and biographical information (for example ID numbers, ancestors' names or dates).
The email address is used to send notifications to the system administrator. For example:
-
Information about available package updates.
-
Error messages from periodic cron jobs.
All those notification mails will be sent to the specified email address.
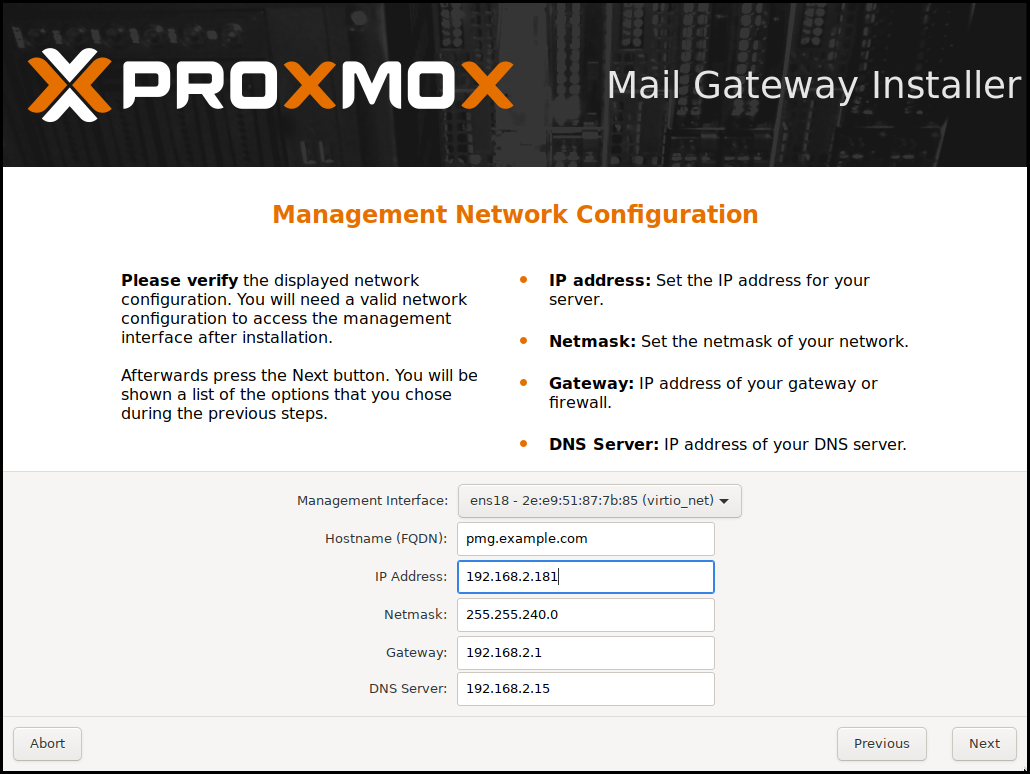
The last step is the network configuration. Network interfaces that are UP show a filled circle in front of their name in the drop down menu. Please note that during installation you can either specify an IPv4 or IPv6 address, but not both. To configure a dual stack node, add additional IP addresses after the installation.
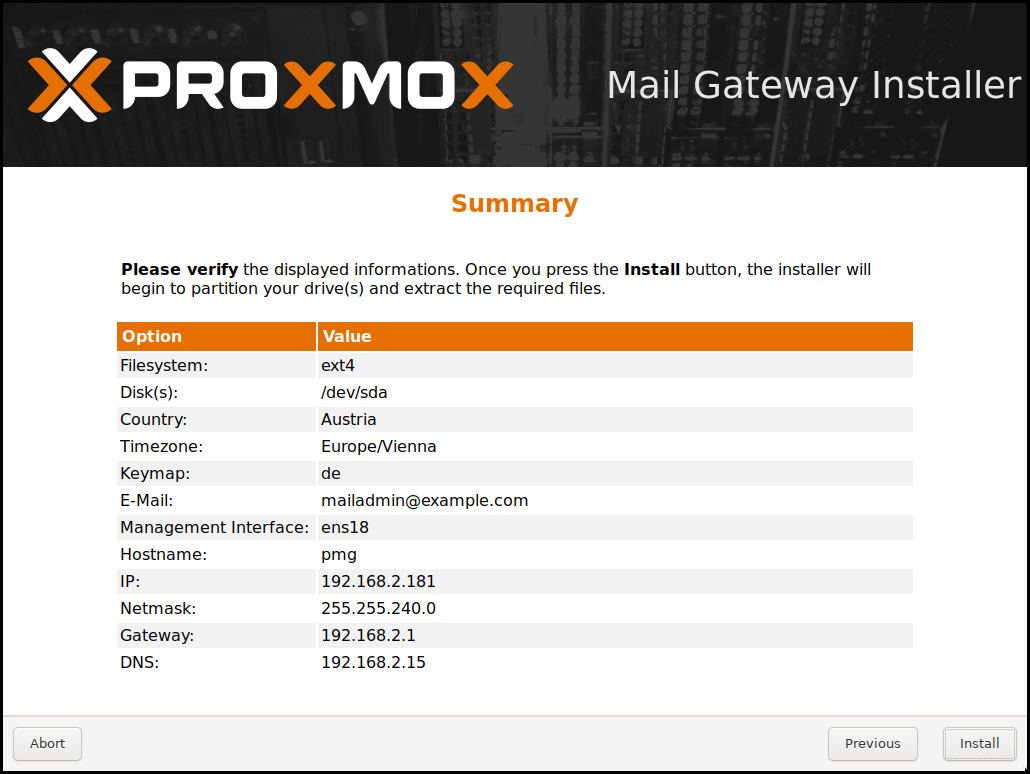
The next step shows a summary of the previously selected options. Please re-check every setting and use the Previous button if a setting needs to be changed.
After clicking Install, the installer will begin to format the disks and copy packages to the target disk(s). Please wait until this step has finished; then remove the installation medium and restart your system.
Copying the packages usually takes several minutes, mostly depending on the speed of the installation medium and the target disk performance.
When copying and setting up the packages has finished, you can reboot the server. This will be done automatically after a few seconds by default.
If the installation failed, check out specific errors on the second TTY (CTRL + ALT + F2) and ensure that the systems meets the minimum requirements.
If the installation is still not working, look at the how to get help chapter.
3.2.1. Accessing the Management Interface Post-Installation
After a successful installation and reboot of the system you can use the Proxmox Mail Gateway web interface for further configuration.
-
Point your browser to the IP address given during the installation and port 8006, for example: https://youripaddress:8006
-
Log in using the root (realm PAM) username and the password chosen during installation.
-
Upload your subscription key to gain access to the Enterprise repository. Otherwise, you will need to set up one of the public, less tested package repositories to get updates for security fixes, bug fixes, and new features.
-
Check the IP configuration and hostname.
-
Check the timezone.
-
Check your Firewall settings.
-
Configure Proxmox Mail Gateway to forward the incoming SMTP traffic to your mail server (Configuration/Mail Proxy/Default Relay) - Default Relay is your email server.
-
Configure your email server to send all outgoing messages through your Proxmox Mail Gateway (Smart Host, port 26 by default).
For detailed deployment scenarios see chapter Planning for Deployment.
After the installation, you have to route all your incoming and outgoing email traffic to Proxmox Mail Gateway. For incoming traffic, you have to configure your firewall and/or DNS settings. For outgoing traffic you need to change the existing email server configuration.
3.2.2. Advanced LVM Configuration Options
The installer creates a Volume Group (VG) called pmg, and additional Logical Volumes (LVs) called root, data, and swap, if ext4 or xfs is used. To control the size of these volumes use:
- hdsize
-
Defines the total hard disk size to be used. This way you can reserve free space on the hard disk for further partitioning (for example for an additional PV and VG on the same hard disk that can be used for LVM storage).
- swapsize
-
Defines the size of the swap volume. The default is the size of the installed memory. The minimum is 4 GB and the maximum is 8 GB. The resulting value cannot be greater than hdsize/8.
If set to 0, no swap volume will be created. - minfree
-
Defines the amount of free space that should be left in the LVM volume group pmg. With more than 128GB storage available, the default is 16GB, otherwise hdsize/8 will be used.
LVM requires free space in the VG for snapshot creation (not required for lvmthin snapshots).
3.2.3. Advanced ZFS Configuration Options
The installer creates the ZFS pool rpool, if ZFS is used. No swap space is created but you can reserve some unpartitioned space on the install disks for swap. You can also create a swap zvol after the installation, although this can lead to problems.
- ashift
-
Defines the ashift value for the created pool. The ashift needs to be set at least to the sector-size of the underlying disks (2 to the power of ashift is the sector-size), or any disk which might be put in the pool (for example the replacement of a defective disk).
- compress
-
Defines whether compression is enabled for rpool.
- checksum
-
Defines which checksumming algorithm should be used for rpool.
- copies
-
Defines the copies parameter for rpool. Check the zfs(8) manpage for the semantics, and why this does not replace redundancy on disk-level.
- hdsize
-
Defines the total hard disk size to be used. This is useful to save free space on the hard disk(s) for further partitioning (for example to create a swap-partition). hdsize is only honored for bootable disks, that is only the first disk or mirror for RAID0, RAID1 or RAID10, and all disks in RAID-Z[123].
3.2.4. ZFS Performance Tips
ZFS works best with a lot of memory. If you intend to use ZFS make sure to have enough RAM available for it. A good calculation is 4GB plus 1GB RAM for each TB RAW disk space.
ZFS can use a dedicated drive as write cache, called the ZFS Intent Log (ZIL). Use a fast drive (SSD) for it. It can be added after installation with the following command:
# zpool add <pool-name> log </dev/path_to_fast_ssd>
3.2.5. Adding the nomodeset Kernel Parameter
Problems may arise on very old or very new hardware due to graphics drivers. If the installation hangs during the boot, you can try adding the nomodeset parameter. This prevents the Linux kernel from loading any graphics drivers and forces it to continue using the BIOS/UEFI-provided framebuffer.
On the Proxmox Mail Gateway bootloader menu, navigate to Install Proxmox Mail Gateway (Terminal UI) and press e to edit the entry. Using the arrow keys, navigate to the line starting with linux, move the cursor to the end of that line and add the parameter nomodeset, separated by a space from the pre-existing last parameter.
Then press Ctrl-X or F10 to boot the configuration.
3.3. Unattended Installation
It is possible to install Proxmox Mail Gateway automatically in an unattended manner. This enables you to fully automate the setup process with the ISO. Once the installation is complete and the host has booted up, automation tools like Ansible can be used to further configure the installation.
The necessary options for the installer must be provided in an answer file. This file allows the use of filter rules to determine which disks and network cards should be used.
To use the automated installation, it is first necessary to prepare an installation ISO. Visit our wiki for more details and information on the unattended installation.
3.4. Install Proxmox Mail Gateway on Debian
Proxmox Mail Gateway ships as a set of Debian packages and can be installed on top of a standard Debian installation. After configuring the repositories, you need to run the following commands:
apt update
apt install proxmox-mailgateway
Installing on top of an existing Debian installation looks easy, but it presumes that the base system has been installed correctly and that you know how you want to configure and use the local storage. You also need to configure the network manually.
|
|
In general, this is not trivial, especially when LVM or ZFS is used. |
3.5. Install Proxmox Mail Gateway as a Linux Container Appliance
Proxmox Mail Gateway can also run inside a Debian-based LXC instance. In order to keep the set of installed software, and thus the necessary updates minimal, you can use the proxmox-mailgateway-container meta-package. This does not depend on any Linux kernel, firmware, or components used for booting from bare-metal, like GRUB.
A ready-to-use appliance template is available through the mail section of the Proxmox VE appliance manager, so if you already use Proxmox VE, you can set up a Proxmox Mail Gateway instance in minutes.
|
|
It’s recommended to use a static network configuration. If DHCP must be used, ensure that the container always leases the same IP, for example, by reserving one with the container’s network MAC address. |
Additionally, you can install this on top of a container-based Debian installation. After configuring the repositories, you need to run:
apt update
apt install proxmox-mailgateway-container
3.6. Package Repositories
Proxmox Mail Gateway uses APT as its package management tool like any other Debian-based system.
3.6.1. Repositories in Proxmox Mail Gateway
Repositories are a collection of software packages. They can be used to install new software, but are also important to get new updates.
|
|
You need valid Debian and Proxmox repositories to get the latest security updates, bug fixes and new features. |
APT Repositories are defined in the file /etc/apt/sources.list in the legacy single-line format and in .sources files placed in /etc/apt/sources.list.d/ for the modern deb822 multi-line format, see Repository Formats for details.
Repository Management
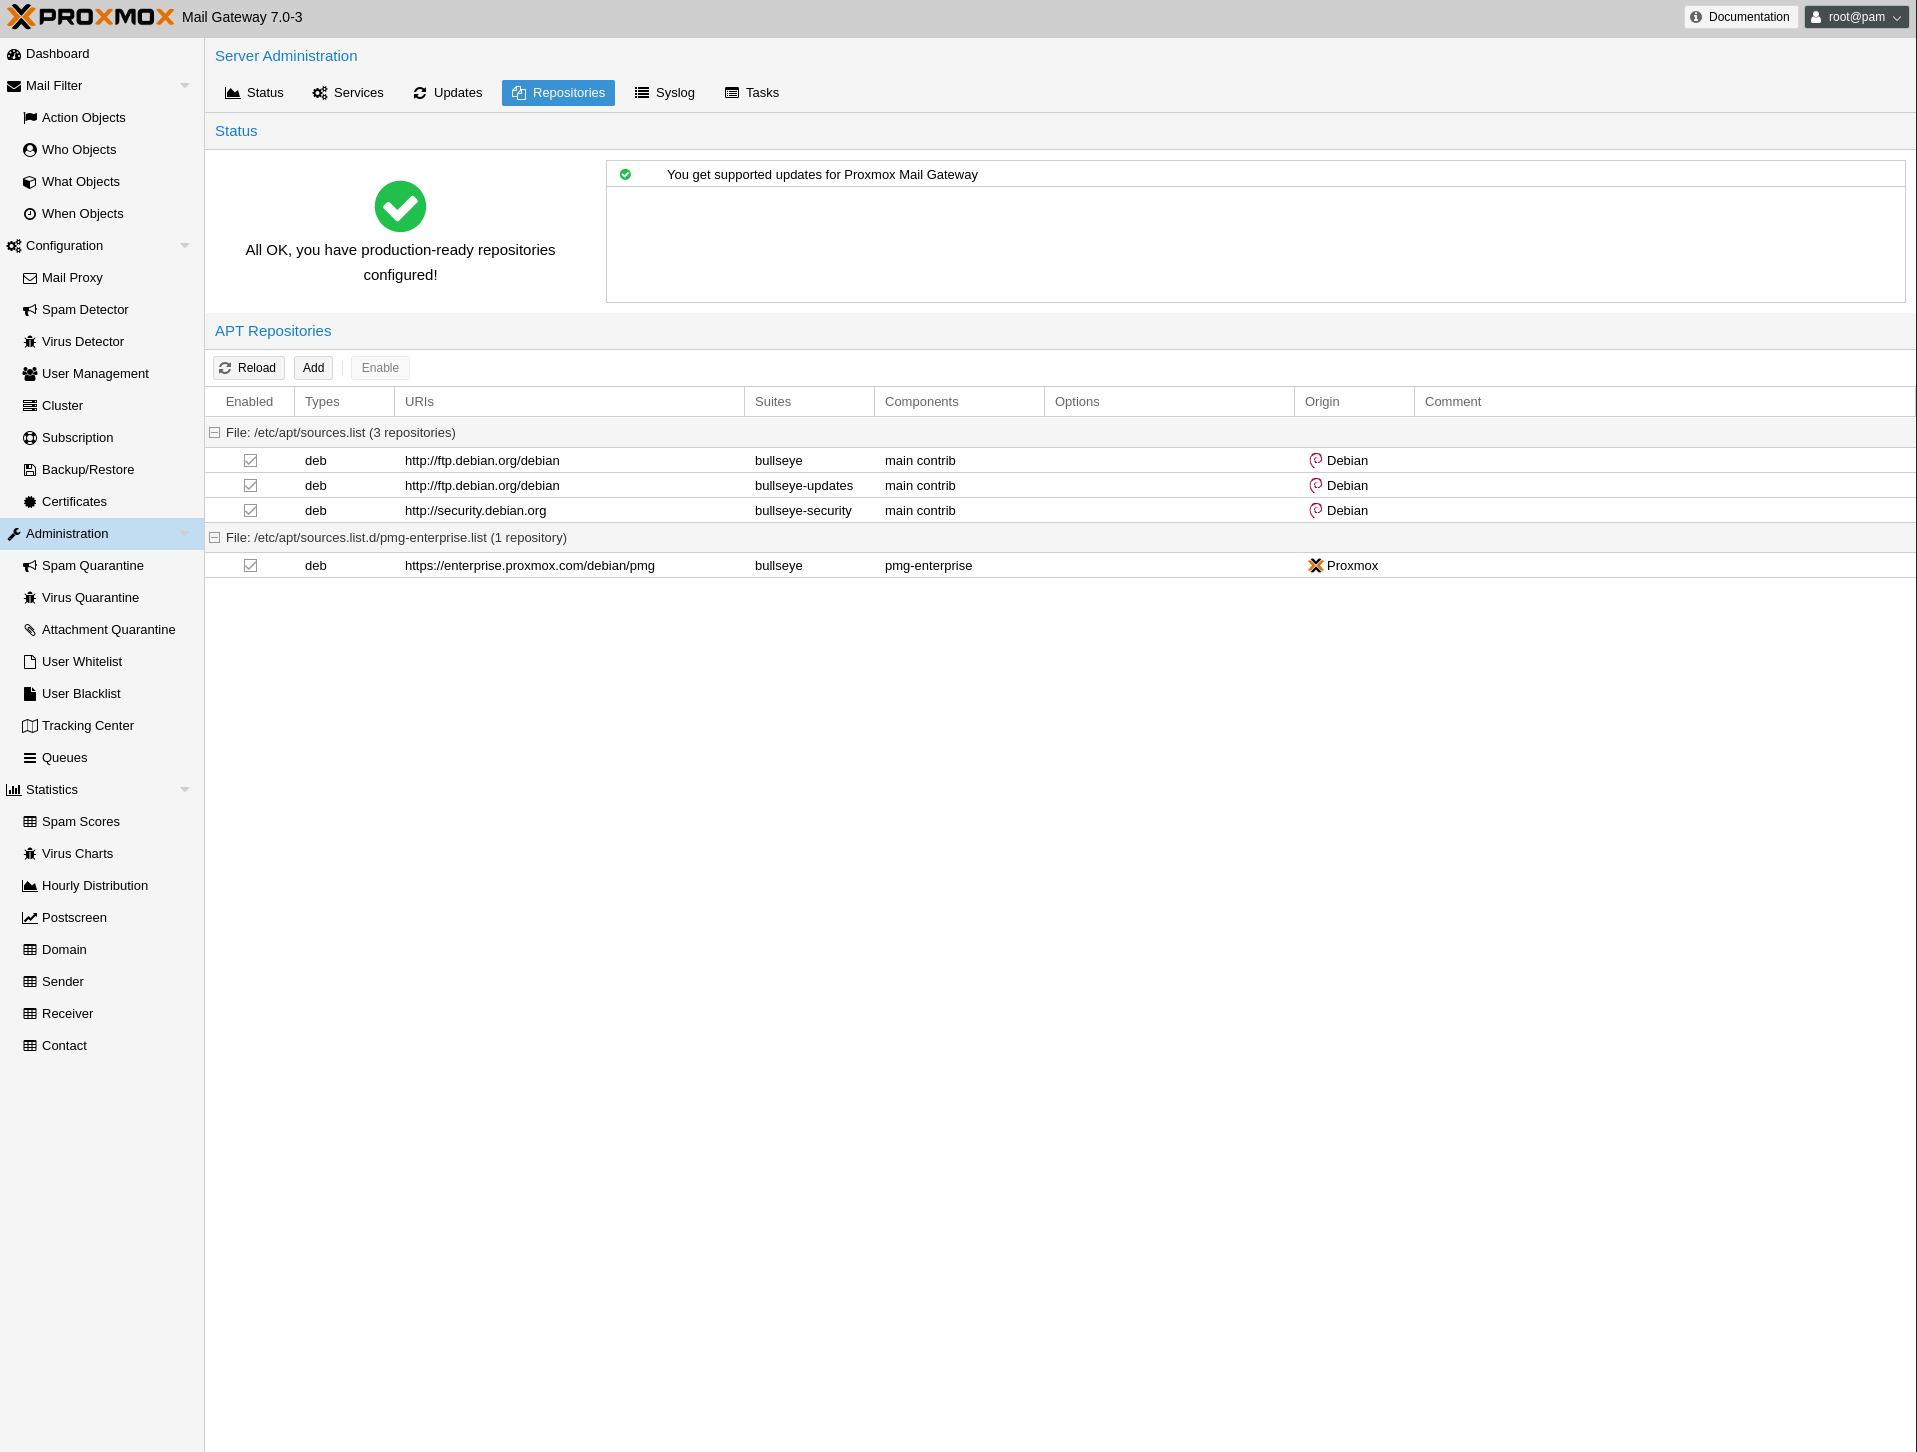
Since Proxmox Mail Gateway 7.0 you can check the repository state in the web interface. The Dashboard shows a high level status overview, while the separate Repository panel (accessible via Administration) shows in-depth status and list of all configured repositories.
Basic repository management, for example, activating or deactivating a repository, is also supported.
Repository Formats
Package repositories can be configured in the source list /etc/apt/sources.list and the files contained in /etc/apt/sources.list.d/.
There are two formats supported:
- single line
-
In a single-line sources.list file, each line defines a package repository. Empty lines are ignored. A # character anywhere on a line marks the remainder of that line as a comment. This is the legacy format. Since Debian 13 Trixie apt will complain about using this format. You can automatically migrate most repositories using the apt modernize-sources command.
- deb822
-
In the multi-line format repo.sources file each entry consists of multiple lines of key-value pairs. A file can include multiple entries by separating each group with a blank line. This is the modern format.
Available Repositories
Proxmox Mail Gateway provides three different package repositories in addition to requiring the base Debian repositories.
3.6.2. Debian Base Repositories
Types: deb deb-src
URIs: http://deb.debian.org/debian/
Suites: trixie trixie-updates
Components: main non-free-firmware
Signed-By: /usr/share/keyrings/debian-archive-keyring.gpg

Types: deb deb-src
URIs: http://security.debian.org/debian-security/
Suites: trixie-security
Components: main non-free-firmware
Signed-By: /usr/share/keyrings/debian-archive-keyring.gpg
3.6.3. Proxmox Mail Gateway Enterprise Repository
This is the default, stable and recommended repository, available for all Proxmox Mail Gateway subscription users. It contains the most stable packages, and is suitable for production use. The pmg-enterprise repository is enabled by default:
Types: deb
URIs: https://enterprise.proxmox.com/debian/pmg
Suites: trixie
Components: pmg-enterprise
Signed-By: /usr/share/keyrings/proxmox-archive-keyring.gpg
As soon as updates are available, the root@pam user is notified via email about the newly available packages. From the GUI, the Changelog button in the GUI can be used to see more details about the selected update. Thus, you will never miss important security fixes.
Please note that you need a valid subscription key to access the pmg-enterprise repository. We offer different support levels, which you can find further details about at https://www.proxmox.com/en/proxmox-mail-gateway/pricing.
|
|
You can disable this repository by adding an Enabled: no line to the relevant entry in the file. This will prevent error messages if your host does not have a subscription key. In that case, please configure the pmg-no-subscription repository. |
3.6.4. Proxmox Mail Gateway No-Subscription Repository
As the name suggests, you do not need a subscription key to access this repository. It can be used for testing and non-production use. It’s not recommended to use this on production servers, as these packages are not always heavily tested and validated.
We recommend to configure this repository in /etc/apt/sources.list.d/proxmox.sources.
Types: deb
URIs: http://download.proxmox.com/debian/pmg
Suites: trixie
Components: pmg-no-subscription
Signed-By: /usr/share/keyrings/proxmox-archive-keyring.gpg
|
|
Remember that you will always need the base Debian repositories in addition to a Proxmox Mail Gateway Proxmox repository. |
3.6.5. Proxmox Mail Gateway Test Repository
This repository contains the latest packages and is primarily used by developers to test new features. To configure it, add the following stanza to the file /etc/apt/sources.list.d/proxmox.sources:
Types: deb
URIs: http://download.proxmox.com/debian/pmg
Suites: trixie
Components: pmg-test
Signed-By: /usr/share/keyrings/proxmox-archive-keyring.gpg
|
|
The pmg-test repository should (as the name implies) only be used for testing new features or bug fixes. |
3.6.6. SecureApt
The Release files in the repositories are signed with GnuPG. APT is using these signatures to verify that all packages are from a trusted source.
If you install Proxmox Mail Gateway from an official ISO image, the key for verification is already installed.
If you install Proxmox Mail Gateway on top of Debian, download and install the key with the following commands:
# wget https://enterprise.proxmox.com/debian/proxmox-archive-keyring-trixie.gpg -O /usr/share/keyrings/proxmox-archive-keyring.gpg
|
|
The wget command above adds the keyring for Proxmox releases based on Debian Trixie. Once the proxmox-archive-keyring package is installed, it will manage this file. At that point, the hashes below may no longer match the hashes of this file, as keys for new Proxmox releases get added or removed. This is intended, apt will ensure that only trusted keys are being used. Modifying this file is discouraged once proxmox-archive-keyring is installed. |
Verify the checksum afterwards with the sha256sum CLI tool:
# sha256sum /usr/share/keyrings/proxmox-archive-keyring.gpg
 136673be77aba35dcce385b28737689ad64fd785a797e57897589aed08db6e45 /usr/share/keyrings/proxmox-archive-keyring.gpg
or the md5sum CLI tool:
# md5sum /usr/share/keyrings/proxmox-archive-keyring.gpg
77c8b1166d15ce8350102ab1bca2fcbf /usr/share/keyrings/proxmox-archive-keyring.gpg
|
|
Make sure the path you install the key to matches the Signed-By: lines in your repository stanzas. |
3.6.7. Debian Non-Free Repository
Certain software cannot be made available in the main and contrib areas of the Debian archives, since it does not adhere to the Debian Free Software Guidelines (DFSG). These are distributed in the Debian’s non-free archive area. For Proxmox Mail Gateway two packages from the non-free area are needed in order to support the RAR archive format:
-
p7zip-rar for matching Archive Objects in the Rule system
-
libclamunrar for detecting viruses in RAR archives.
To enable the non-free component, run editor /etc/apt/sources.list.d/debian.sources and append non-free to the end of each .debian.org repository line.
Following this, you can install the required packages with:
apt update
apt install libclamunrar p7zip-rar
3.6.8. Debian Firmware Repository
Starting with Debian Bookworm (Proxmox Mail Gateway 8) non-free firmware (as defined by DFSG) has been moved to the newly created Debian repository component non-free-firmware.
Enable this repository if you want to set up Early OS Microcode Updates or need additional Runtime Firmware Files not already included in the pre-installed package pve-firmware.
To be able to install packages from this component, run editor /etc/apt/sources.list.d/debian.sources, append non-free-firmware to the end of each .debian.org repository line and run apt update.
4. Configuration Management
Proxmox Mail Gateway is usually configured using the web-based Graphical User Interface (GUI), but it is also possible to directly edit the configuration files, using the REST API over https or the command-line tool pmgsh.
The command-line tool pmgconfig is used to simplify some common configuration tasks, such as generating certificates and rewriting service configuration files.
|
|
We use a Postgres database to store mail filter rules and statistical data. See chapter Database Management for more information. |
4.1. Configuration files overview
- /etc/network/interfaces
-
Network setup. We never modify this file directly. Instead, we write changes to /etc/network/interfaces.new. When you reboot, Proxmox Mail Gateway renames the file to /etc/network/interfaces, thus applying the changes.
- /etc/resolv.conf
-
DNS search domain and nameserver setup. Proxmox Mail Gateway uses the search domain setting to create the FQDN and domain name used in the postfix configuration.
- /etc/hostname
-
The system’s hostname. Proxmox Mail Gateway uses the hostname to create the FQDN used in the postfix configuration.
- /etc/hosts
-
Static table lookup for hostnames.
- /etc/pmg/pmg.conf
-
Stores common administration options, such as the spam and mail proxy configuration.
- /etc/pmg/cluster.conf
-
The cluster setup.
- /etc/pmg/domains
-
The list of relay domains.
- /etc/pmg/dkim/domains
-
The list of domains for outbound DKIM signing.
- /etc/pmg/fetchmailrc
-
Fetchmail configuration (POP3 and IMAP setup).
- /etc/pmg/ldap.conf
-
LDAP configuration.
- /etc/pmg/mynetworks
-
List of local (trusted) networks.
- /etc/pmg/subscription
-
Stores your subscription key and status.
- /etc/pmg/tls_policy
-
TLS policy for outbound connections.
- /etc/pmg/tls_inbound_domains
-
Sender domains for which TLS is enforced on inbound connections.
- /etc/pmg/transport
-
Message delivery transport setup.
- /etc/pmg/user.conf
-
GUI user configuration.
- /etc/pmg/realms.conf
-
Login realm configuration.
- /etc/mail/spamassassin/custom.cf
-
Custom SpamAssassin™ setup.
- /etc/mail/spamassassin/pmg-scores.cf
-
Custom SpamAssassin™ rule scores.
4.2. Keys and Certificates
- /etc/pmg/pmg-api.pem
-
Key and certificate (combined) used by the HTTPS server (API).
- /etc/pmg/pmg-authkey.key
-
Private key used to generate authentication tickets.
- /etc/pmg/pmg-authkey.pub
-
Public key used to verify authentication tickets.
- /etc/pmg/pmg-csrf.key
-
Internally used to generate CSRF tokens.
- /etc/pmg/pmg-tls.pem
-
Key and certificate (combined) to encrypt mail traffic (TLS).
- /etc/pmg/dkim/<selector>.private
-
Key for DKIM signing mails with selector <selector>.
4.3. Service Configuration Templates
Proxmox Mail Gateway uses various services to implement mail filtering, for example, the Postfix Mail Transport Agent (MTA), the ClamAV® antivirus engine, and the Apache SpamAssassin™ project. These services use separate configuration files, so we need to rewrite those files when the configuration is changed.
Proxmox Mail Gateway also features support for customizing the email-based reports and notifications it can send to administrators and users. These can be adjusted in the same way as configuration files. For some reports and notifications, both HTML and plain-text variants exist, which will be sent together as multi-part mail. These can be recognized by being suffixed using .tt, for the html part for historic reasons or .plain.tt, for the plain-text part respectively, and should be modified together if available to present a consistent experience to users. Dropping either part to get a single-part mail can be done by creating an empty file as override.
We use a template-based approach to generate these files. The Template Toolkit is a well known, fast and flexible template processing system. You can find the default templates in /var/lib/pmg/templates/. Please do not modify these directly, otherwise your modifications will be lost on the next update. Instead, copy the template you wish to change to /etc/pmg/templates/, then apply your changes there.
Templates can access any configuration settings, and you can use the pmgconfig dump command to get a list of all variable names:
# pmgconfig dump
...
dns.domain = yourdomain.tld
dns.hostname = pmg
ipconfig.int_ip = 192.168.2.127
pmg.admin.advfilter = 1
...
The same tool is used to force the regeneration of all template-based configuration files. You need to run the following after modifying a template, or when you directly edit configuration files:
# pmgconfig sync --restart 1
The above command also restarts services if the underlying configuration files are changed. Please note that this is automatically done when you change the configuration using the GUI or API.
|
|
Modified templates from /etc/pmg/templates/ are automatically synced from the master node to all cluster members. |
4.4. Welcome- and Blocklists
Proxmox Mail Gateway has multiple welcome- and blocklists. It differentiates between the SMTP Welcomelist, the rule-based welcomelist and the user welcomelist. In addition to the welcomelists, there are two separate blocklists: the rule-based blocklist and the user blocklist.
4.4.1. SMTP Welcomelist
The SMTP Welcomelist is responsible for disabling greylisting, as well as SPF and DNSBL checks. These are done during the SMTP dialogue.
4.4.2. Rule-based Welcome-/Blocklist
The rule-based welcome- and blocklists are predefined rules. They work by checking the attached Who objects, containing, for example, a domain or a mail address for a match. If it matches, the assigned action is used, which by default is Accept for the welcomelist rule and Block for the blocklist rule. In the default setup, the blocklist rule has priority over the welcomelist rule and spam checks.
4.4.3. User Welcome-/Blocklist
The user welcome- and blocklist are user specific. Every user can add mail addresses to their welcome- and blocklist. When a user adds a mail address to the welcomelist, the result of the spam analysis will be discarded for that recipient. This can help in the mail being accepted, but what happens next still depends on the other rules. In the default setup, this results in the mail being accepted for this recipient.
For mail addresses on a user’s blocklist, the spam score will be increased by 100. What happens when a high spam score is encountered still depends on the rule system. In the default setup, it will be recognized as spam and quarantined (spam score of 3 or higher).
4.5. System Configuration
4.5.1. Network and Time
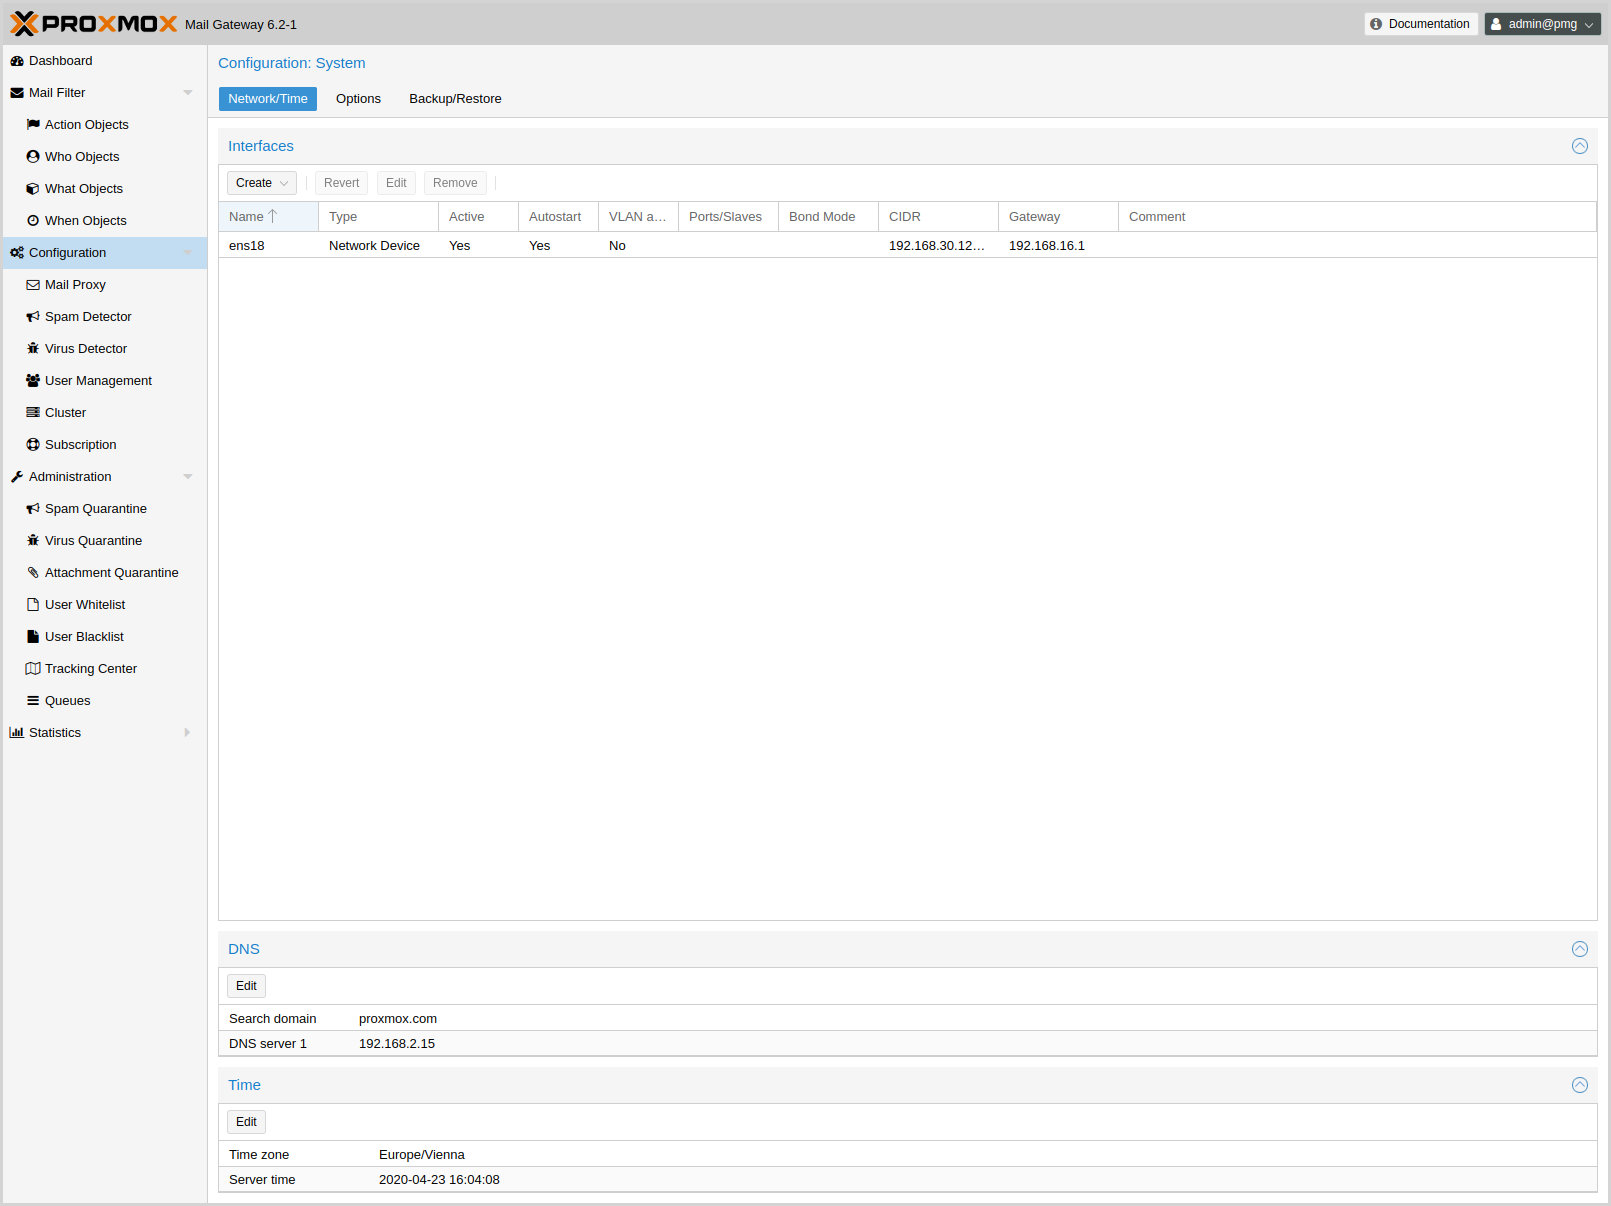
As network and time are configured in the installer, these generally do not need to be configured again in the GUI.
The default setup uses a single Ethernet adapter and static IP assignment. The configuration is stored at /etc/network/interfaces, and the actual network setup is done the standard Debian way, using the package ifupdown.
source /etc/network/interfaces.d/*

auto lo
iface lo inet loopback

auto ens18
iface ens18 inet static
        address  192.168.2.127
        netmask  255.255.240.0
        gateway  192.168.2.1
Overriding network device names
When upgrading kernels, adding PCIe devices or updating your BIOS, automatically generated network interface names can change. To alleviate this issues, Proxmox Mail Gateway provides a tool for automatically generating systemd .link files for overriding the name of network devices. It also automatically replaces the occurrences of the old interface name in /etc/network/interfaces.
|
|
Pinning network interfaces in many container environments, including Proxmox VE is not supported, as the container stack handles network configuration. |
The generated link files are stored in /usr/local/lib/systemd/network. For the interfaces file a new file will be generated in the same place with a .new suffix. This way you can inspect the changes made to the configuration by using diff (or another diff viewer of your choice):
diff -y /etc/network/interfaces /etc/network/interfaces.new
If you see any problematic changes or want to revert the changes made by the pinning tool before rebooting, simply delete all .new files and the respective link files from /usr/local/lib/systemd/network.
The following command will generate a .link file for all physical network interfaces that do not yet have a .link file and update selected Proxmox VE configuration files (see above). The generated names will use the default prefix nic, so the resulting interface names will be nic1, nic2, …
proxmox-network-interface-pinning generate
You can override the default prefix with the --prefix flag:
proxmox-network-interface-pinning generate --prefix myprefix
It is also possible to pin only a specific interface:
proxmox-network-interface-pinning generate --interface enp1s0
When pinning a specific interface, you can specify the exact name that the interface should be pinned to:
proxmox-network-interface-pinning generate --interface enp1s0 --target-name if42
In order to apply the changes made by proxmox-network-interface-pinning to the network configuration, the host needs to be rebooted.
Many tests to detect SPAM mails use DNS queries, so it is important to have a fast and reliable DNS server. We also query some publicly available DNS Blackholelists. Most of them apply rate limits for clients, so they simply will not work if you use a public DNS server (because they are usually blocked). We recommend to use your own DNS server, which needs to be configured in recursive mode.
4.5.2. Options
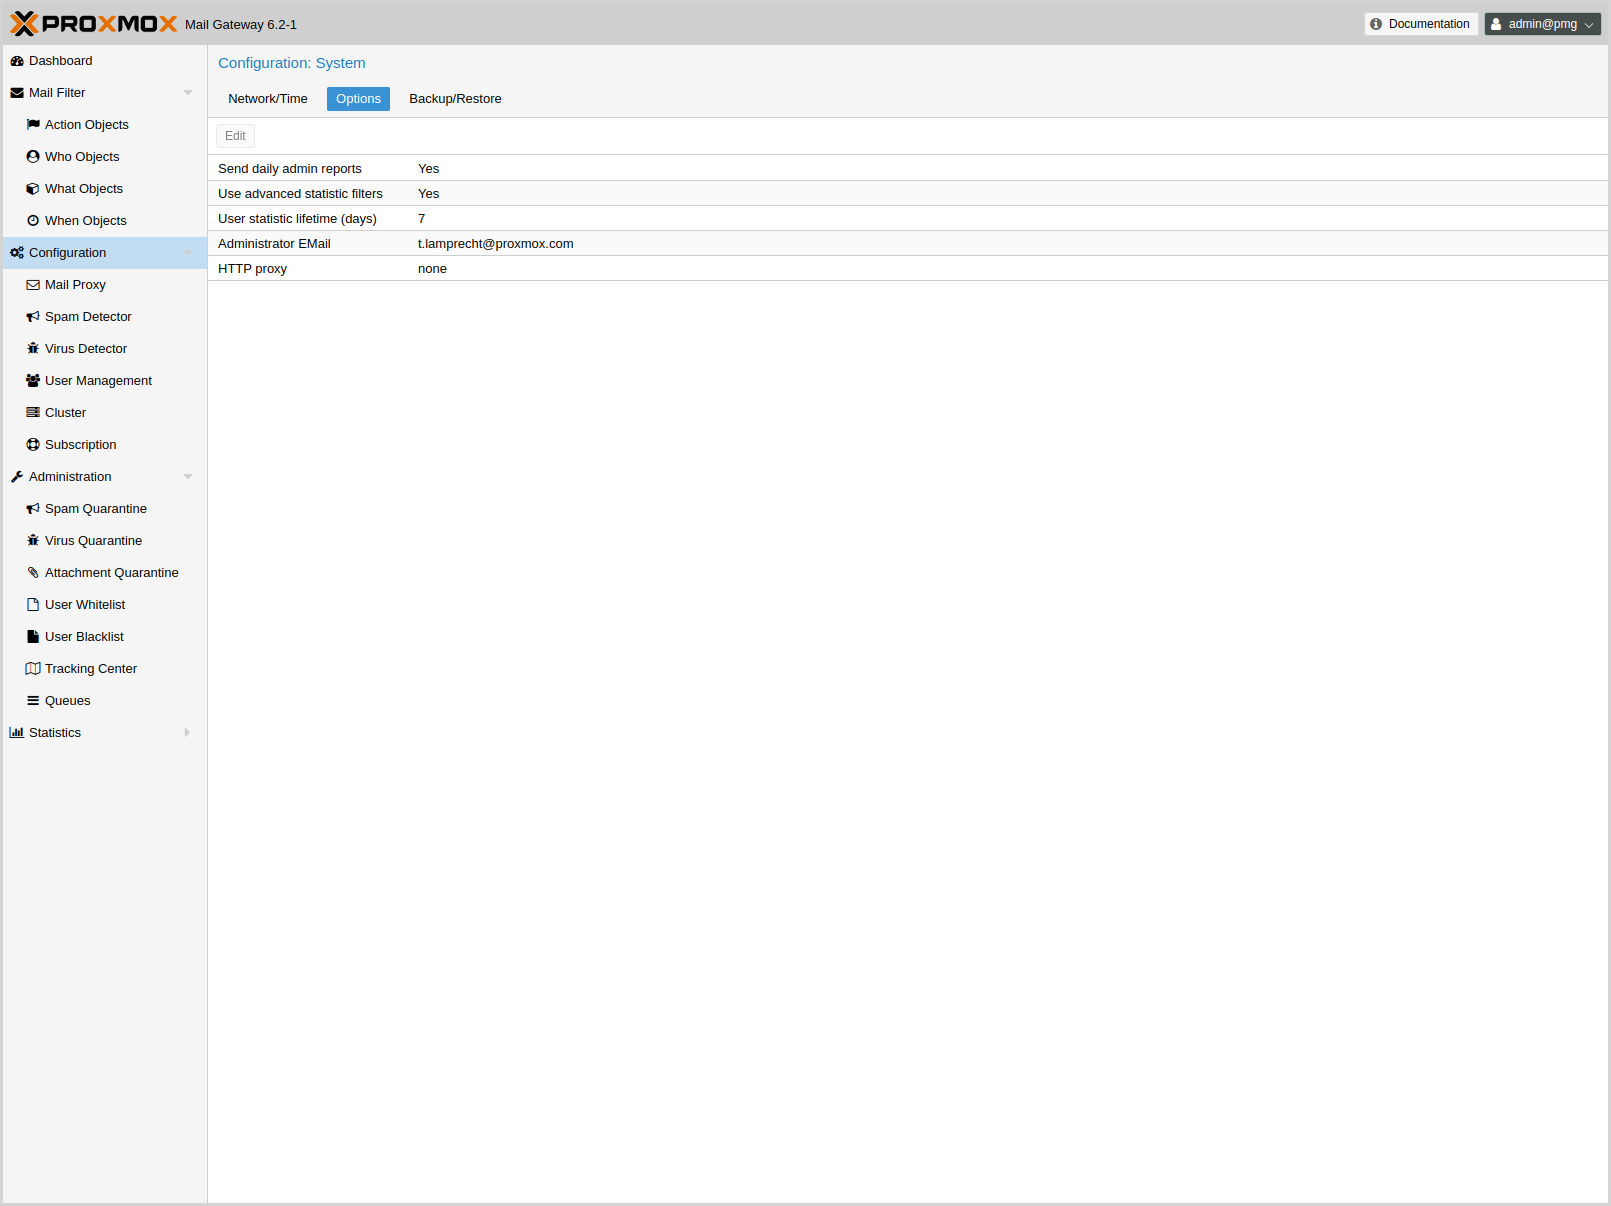
These settings are saved to the admin subsection in /etc/pmg/pmg.conf, using the following configuration keys:
- admin-mail-from: ^\p{PosixPrint}{1,998}$ (default = Proxmox Mail Gateway <postmaster>)
-
Text for From header in admin mails and bounces.
- advfilter: <boolean> (default = 0)
-
Enable advanced filters for statistic.
If this is enabled, the receiver statistic are limited to active ones (receivers which also sent out mail in the 90 days before), and the contact statistic will not contain these active receivers.
- avast: <boolean> (default = 0)
-
Use Avast Virus Scanner (/usr/bin/scan). You need to buy and install Avast Core Security before you can enable this feature.
- clamav: <boolean> (default = 1)
-
Use ClamAV Virus Scanner. This is the default virus scanner and is enabled by default.
- consent-text: <string> (default = ``)
-
Consent text that is displayed before logging in.
- custom_check: <boolean> (default = 0)
-
Use Custom Check Script. The script has to take the defined arguments and can return Virus findings or a Spamscore.
- custom_check_path: ^/([^/\0]+\/)+[^/\0]+$ (default = /usr/local/bin/pmg-custom-check)
-
Absolute Path to the Custom Check Script
- dailyreport: <boolean> (default = 1)
-
Send daily reports.
- demo: <boolean> (default = 0)
-
Demo mode - do not start SMTP filter.
- dkim-use-domain: <envelope | header> (default = envelope)
-
Whether to sign using the domain found in the header or the envelope.
- dkim_selector: <string>
-
Default DKIM selector
- dkim_sign: <boolean> (default = 0)
-
DKIM sign outbound mails with the configured Selector.
- dkim_sign_all_mail: <boolean> (default = 0)
-
DKIM sign all outgoing mails irrespective of the Envelope From domain.
- email: <string> (default = admin@domain.tld)
-
Administrator E-Mail address.
- http_proxy: http://.*
-
Specify external http proxy which is used for downloads (example: http://username:password@host:port/)
- statlifetime: <integer> (1 - N) (default = 7)
-
User Statistics Lifetime (days)
4.6. Certificate Management
Access to the web-based administration interface is always encrypted through https. Each Proxmox Mail Gateway host creates by default its own (self-signed) certificate. This certificate is used for encrypted communication with the host’s pmgproxy service, for any API call between a user and the web-interface or between nodes in a cluster.
Certificate verification in a Proxmox Mail Gateway cluster is done based on pinning the certificate fingerprints in the cluster configuration and verifying that they match on connection.
4.6.1. Certificates for the API and SMTP
Proxmox Mail Gateway uses two different certificates:
-
/etc/pmg/pmg-api.pem: the required certificate used for Proxmox Mail Gateway API requests.
-
/etc/pmg/pmg-tls.pem: the optional certificate used for SMTP TLS connections, see mailproxy TLS configuration for details.
You have the following options for these certificates:
-
Keep using the default self-signed certificate in /etc/pmg/pmg-api.pem.
-
Use an externally provided certificate (for example, signed by a commercial Certificate Authority (CA)).
-
Use an ACME provider like Let’s Encrypt to get a trusted certificate with automatic renewal; this is also integrated in the Proxmox Mail Gateway API and web interface.
Certificates are managed through the Proxmox Mail Gateway web-interface/API or using the pmgconfig CLI tool.
4.6.2. Upload Custom Certificate
If you already have a certificate which you want to use for a Proxmox Mail Gateway host, you can simply upload that certificate over the web interface.
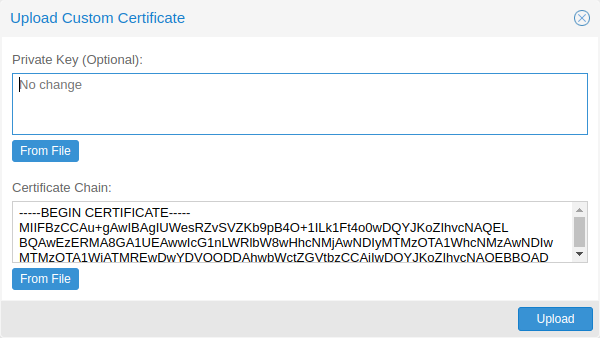
Note that any certificate key files must not be password protected.
4.6.3. Trusted certificates via Let’s Encrypt (ACME)
Proxmox Mail Gateway includes an implementation of the Automatic Certificate Management Environment (ACME) protocol, allowing Proxmox Mail Gateway admins to use an ACME provider like Let’s Encrypt for easy setup of TLS certificates, which are accepted and trusted by modern operating systems and web browsers out of the box.
Currently, the two ACME endpoints implemented are the Let’s Encrypt (LE) production and staging environments. Our ACME client supports validation of http-01 challenges using a built-in web server and validation of dns-01 challenges using a DNS plugin supporting all the DNS API endpoints acme.sh does.
ACME Account
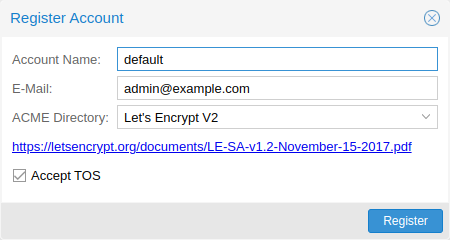
You need to register an ACME account per cluster, with the endpoint you want to use. The email address used for that account will serve as the contact point for renewal-due or similar notifications from the ACME endpoint.
You can register or deactivate ACME accounts over the web interface Certificates -> ACME Accounts or using the pmgconfig command-line tool.
pmgconfig acme account register <account-name> <mail@example.com>
|
|
Because of rate-limits you should use LE staging for experiments or if you use ACME for the very first time until all is working there, and only then switch over to the production directory. |
ACME Plugins
The ACME plugin’s role is to provide automatic verification that you, and thus the Proxmox Mail Gateway cluster under your operation, are the real owner of a domain. This is the basic building block of automatic certificate management.
The ACME protocol specifies different types of challenges, for example the http-01, where a web server provides a file with a specific token to prove that it controls a domain. Sometimes this isn’t possible, either because of technical limitations or if the address of a record is not reachable from the public internet. The dns-01 challenge can be used in such cases. This challenge is fulfilled by creating a certain DNS record in the domain’s zone.
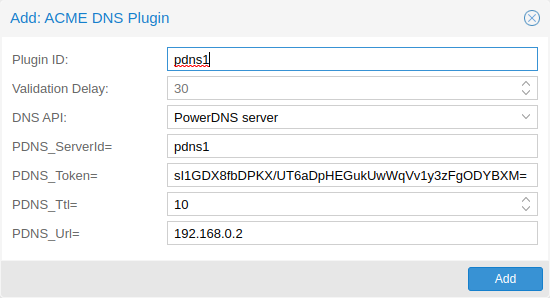
Proxmox Mail Gateway supports both of those challenge types out of the box, you can configure plugins either over the web interface under Certificates -> ACME Challenges, or using the pmgconfig acme plugin add command.
ACME Plugin configurations are stored in /etc/pmg/acme/plugins.cfg. A plugin is available for all nodes in the cluster.
Domains
You can add new or manage existing domain entries under Certificates, or using the pmgconfig command.
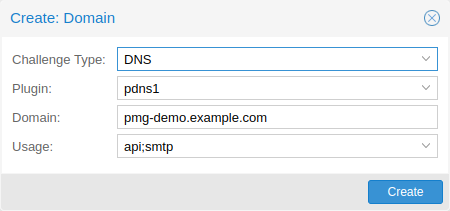
After configuring the desired domain(s) for a node and ensuring that the desired ACME account is selected, you can order your new certificate over the web-interface. On success, the interface will reload after roughly 10 seconds.
Renewal will happen automatically.
4.6.4. ACME HTTP Challenge Plugin
There is always an implicitly configured standalone plugin for validating http-01 challenges via the built-in web server spawned on port 80.
|
|
The name standalone means that it can provide the validation on its own, without any third party service. So this plugin also works for cluster nodes. |
There are a few prerequisites to use this for certificate management with Let’s Encrypts ACME.
-
You have to accept the ToS of Let’s Encrypt to register an account.
-
Port 80 of the node needs to be reachable from the internet.
-
There must be no other listener on port 80.
-
The requested (sub)domain needs to resolve to a public IP of the Proxmox Mail Gateway host.
4.6.5. ACME DNS API Challenge Plugin
On systems where external access for validation via the http-01 method is not possible or desired, it is possible to use the dns-01 validation method. This validation method requires a DNS server that allows provisioning of TXT records via an API.
Configuring ACME DNS APIs for validation
Proxmox Mail Gateway re-uses the DNS plugins developed for the acme.sh
[acme.sh https://github.com/acmesh-official/acme.sh]
project. Please
refer to its documentation for details on configuration of specific APIs.
The easiest way to configure a new plugin with the DNS API is using the web interface (Certificates -> ACME Accounts/Challenges).
Here you can add a new challenge plugin by selecting your API provider and entering the credential data to access your account over their API.
|
|
See the acme.sh How to use DNS API wiki for more detailed information about getting API credentials for your provider. Configuration values do not need to be quoted with single or double quotes; for some plugins that is even an error. |
As there are many DNS providers and API endpoints, Proxmox Mail Gateway automatically generates the form for the credentials, but not all providers are annotated yet. For those you will see a bigger text area, into which you simply need to copy all the credential’s KEY=VALUE pairs.
DNS Validation through CNAME Alias
A special alias mode can be used to handle validation on a different domain/DNS server, in case your primary/real DNS does not support provisioning via an API. Manually set up a permanent CNAME record for _acme-challenge.domain1.example pointing to _acme-challenge.domain2.example, and set the alias property in the Proxmox Mail Gateway node configuration file /etc/pmg/node.conf to domain2.example to allow the DNS server of domain2.example to validate all challenges for domain1.example.
Wildcard Certificates
Wildcard DNS names start with a *. prefix and are considered valid for all (one-level) subdomain names of the verified domain. So a certificate for *.domain.example is valid for foo.domain.example and bar.domain.example, but not for baz.foo.domain.example.
Currently, you can only create wildcard certificates with the DNS challenge type.
Combination of Plugins
Combining http-01 and dns-01 validation is possible in case your node is reachable via multiple domains with different requirements / DNS provisioning capabilities. Mixing DNS APIs from multiple providers or instances is also possible by specifying different plugin instances per domain.
|
|
Accessing the same service over multiple domains increases complexity and should be avoided if possible. |
4.6.6. Automatic renewal of ACME certificates
If a node has been successfully configured with an ACME-provided certificate (either via pmgconfig or via the web-interface/API), the certificate will be renewed automatically by the pmg-daily.service. Currently, renewal is triggered if the certificate either has already expired or if it will expire in the next 30 days.
Manually Change Certificate over the Command Line
If you want to get rid of certificate verification warnings, you have to
generate a valid certificate for your server.

Log in to your {pmg} via ssh or use the console:

----
openssl req -newkey rsa:2048 -nodes -keyout key.pem -out req.pem
----

Follow the instructions on the screen, for example:

----
Country Name (2 letter code) [AU]: AT
State or Province Name (full name) [Some-State]:Vienna
Locality Name (eg, city) []:Vienna
Organization Name (eg, company) [Internet Widgits Pty Ltd]: Proxmox GmbH
Organizational Unit Name (eg, section) []:Proxmox Mail Gateway
Common Name (eg, YOUR name) []: yourproxmox.yourdomain.com
Email Address []:support@yourdomain.com

Please enter the following 'extra' attributes to be sent with your certificate request
A challenge password []: not necessary
An optional company name []: not necessary
----

After you have finished the certificate request, you have to send the file
`req.pem` to your Certification Authority (CA). The CA will issue the
certificate (BASE64 encoded), based on your request – save this file as
`cert.pem` to your {pmg}.

To activate the new certificate, do the following on your {pmg}:

----
cat key.pem cert.pem >/etc/pmg/pmg-api.pem
----

Then restart the API servers:

----
systemctl restart pmgproxy
----

Test your new certificate, using your browser.

NOTE: To transfer files to and from your {pmg}, you can use secure copy: If your
desktop runs Linux, you can use the `scp` command-line tool. If your desktop PC
runs windows, please use an scp client like WinSCP (see https://winscp.net/).

Change Certificate for Cluster Setups
If you change the API certificate of an active cluster node manually, you also need to update the pinned fingerprint inside the cluster configuration.
You can do that by executing the following command on the host where the certificate changed:
pmgcm update-fingerprints
Note, this will be done automatically if using the integrated ACME (for example, through Let’s Encrypt) feature.
4.7. Mail Proxy Configuration
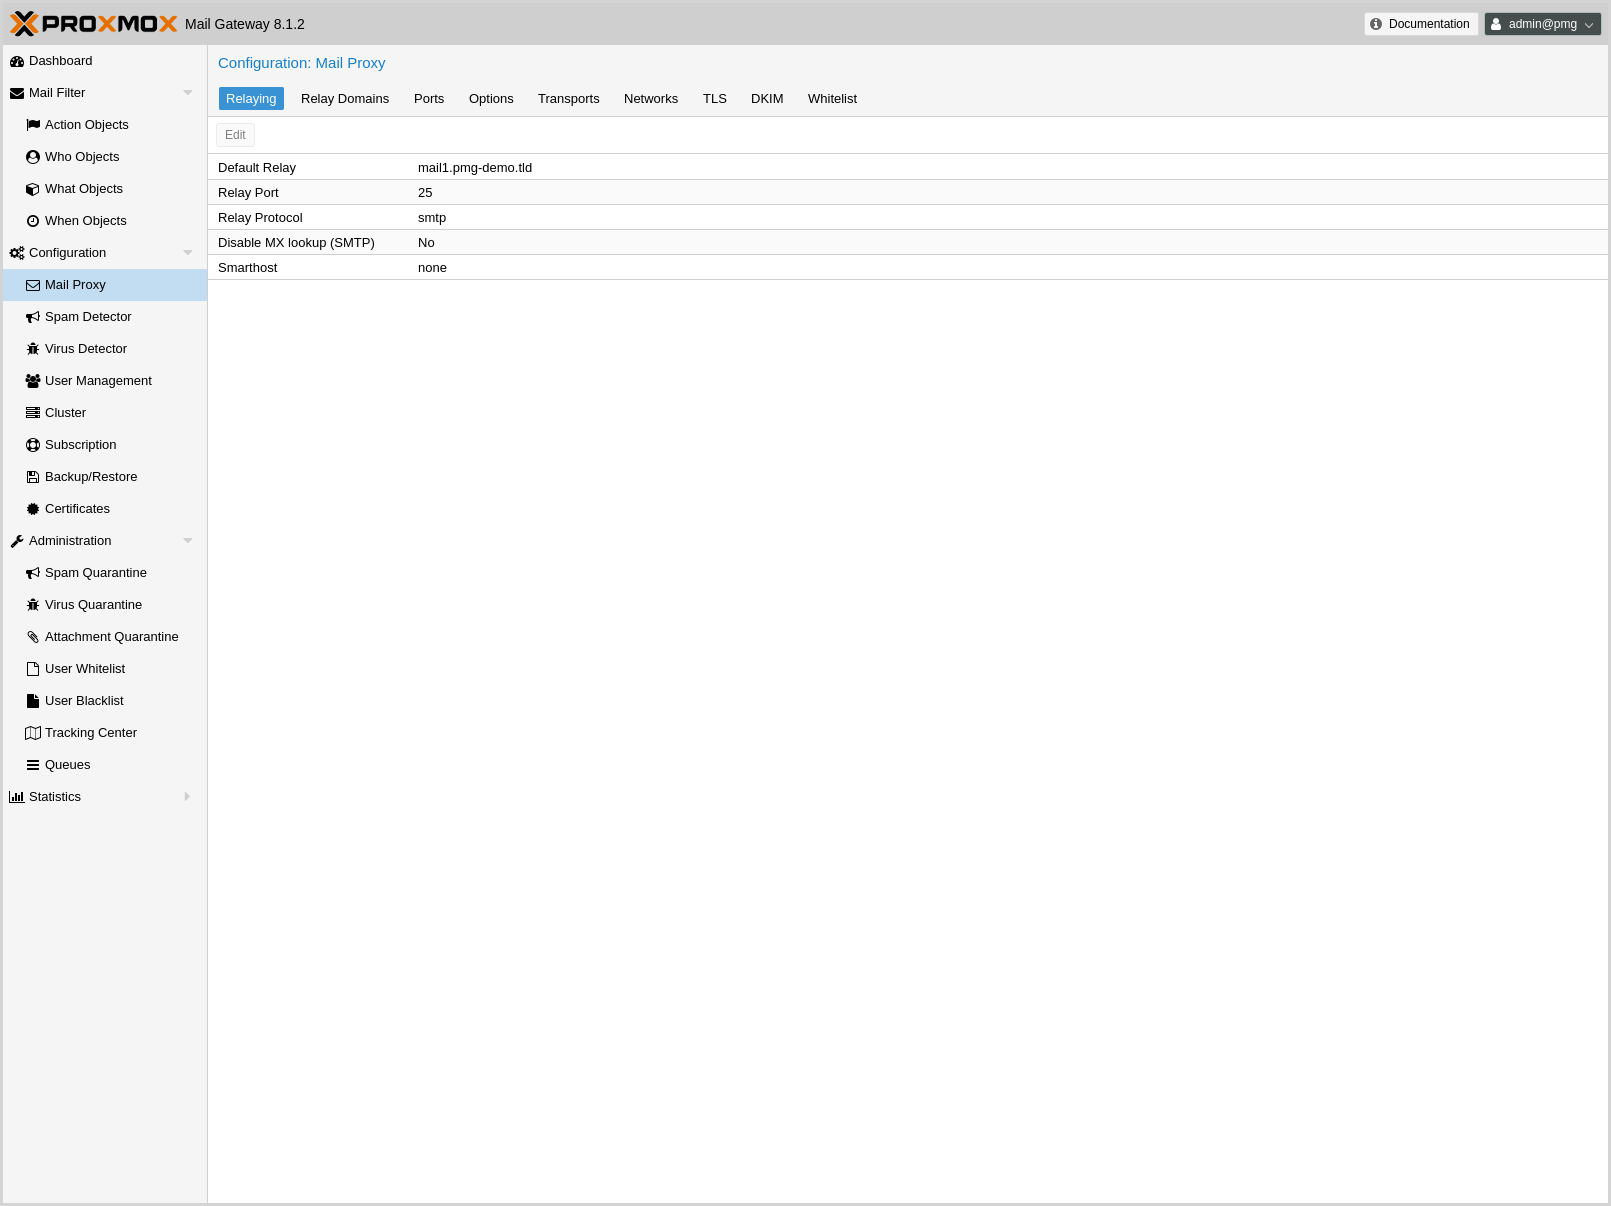
4.7.1. Relaying
These settings are saved to the mail subsection in /etc/pmg/pmg.conf. Some of these correspond to postfix options in the main.cf (see the postconf documentation).
They use the following configuration keys:
- relay: <string>
-
The default mail delivery transport (incoming mails).
- relaynomx: <boolean> (default = 0)
-
Disable MX lookups for default relay (SMTP only, ignored for LMTP).
- relayport: <integer> (1 - 65535) (default = 25)
-
SMTP/LMTP port number for relay host.
- relayprotocol: <lmtp | smtp> (default = smtp)
-
Transport protocol for relay host.
- smarthost: <string>
-
When set, all outgoing mails are delivered to the specified smarthost. (postfix option default_transport)
- smarthostport: <integer> (1 - 65535) (default = 25)
-
SMTP port number for smarthost. (postfix option default_transport)
4.7.2. Relay Domains

A list of relayed mail domains, that is, what destination domains this system will relay mail to. The system will reject incoming mails to other domains.
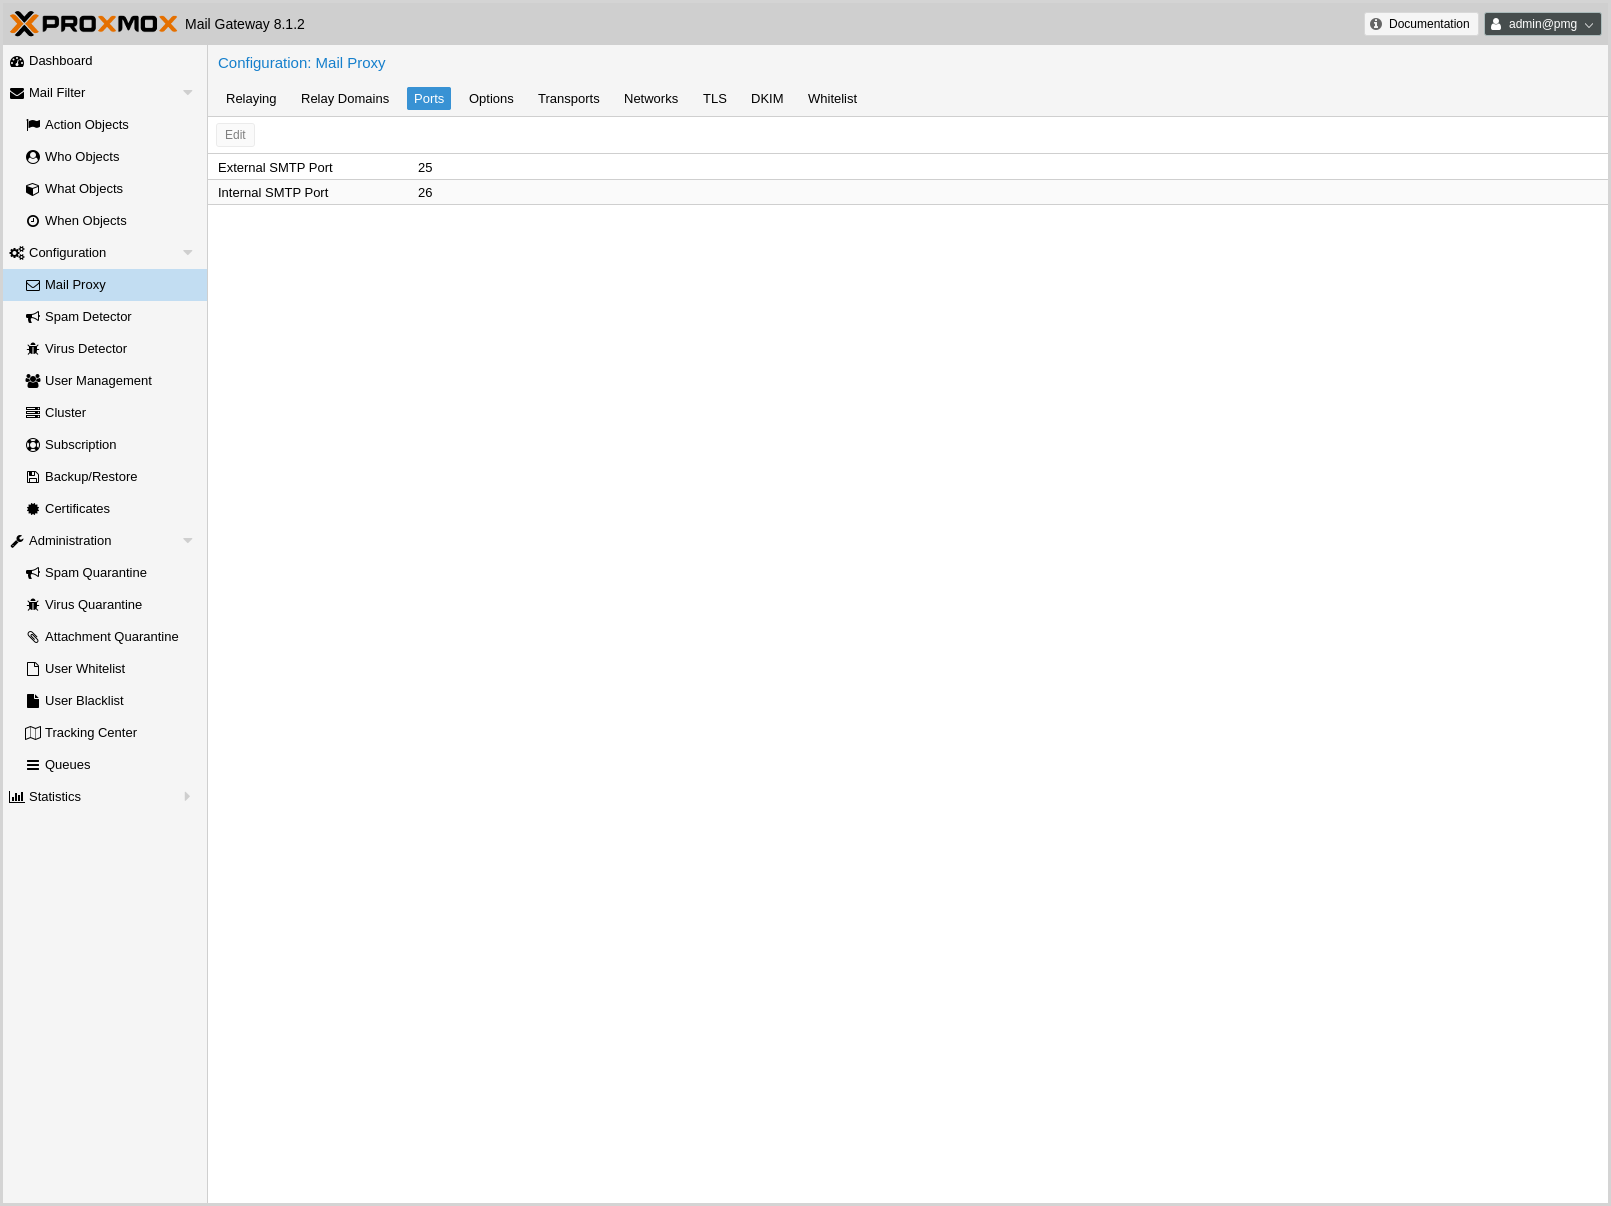
4.7.3. Ports
These settings are saved to the mail subsection in /etc/pmg/pmg.conf. Many of these correspond to postfix options in the main.cf (see the postconf documentation).
They use the following configuration keys:
- ext_port: <integer> (1 - 65535) (default = 25)
-
SMTP port number for incoming mail (untrusted). This must be a different number than int_port.
- int_port: <integer> (1 - 65535) (default = 26)
-
SMTP port number for outgoing mail (trusted).
4.7.4. Options
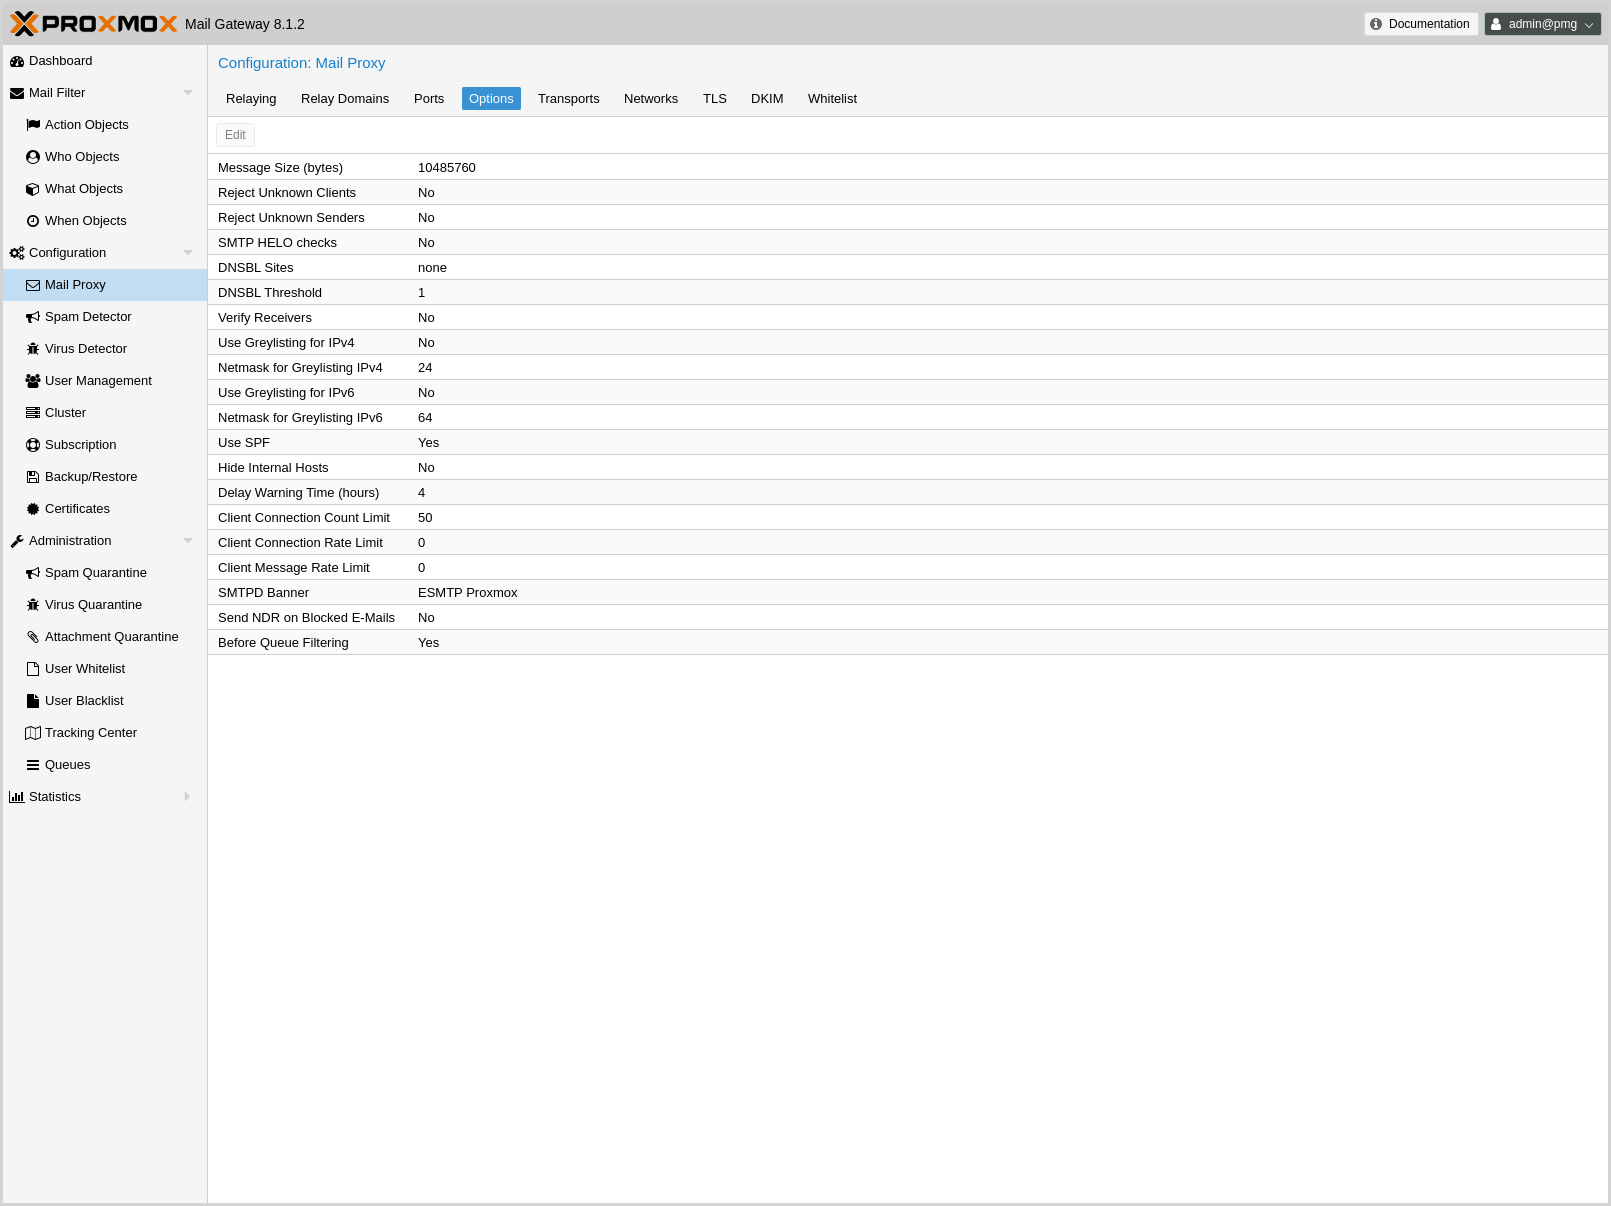
These settings are saved to the mail subsection in /etc/pmg/pmg.conf, using the following configuration keys:
- accept-broken-mime: <boolean> (default = 0)
-
Accept e-mails with broken MIME structure (insecure). If enabled, a X-Proxmox-Broken-Message header is added to each mail with broken MIME structure.
- banner: <string> (default = ESMTP Proxmox)
-
ESMTP banner.
- before_queue_filtering: <boolean> (default = 0)
-
Enable before queue filtering by pmg-smtp-filter
- conn_count_limit: <integer> (0 - N) (default = 50)
-
How many simultaneous connections any client is allowed to make to this service. To disable this feature, specify a limit of 0.
- conn_rate_limit: <integer> (0 - N) (default = 0)
-
The maximal number of connection attempts any client is allowed to make to this service per minute. To disable this feature, specify a limit of 0.
- dnsbl_sites: <string>
-
Optional list of DNS welcome/blocklist domains (postfix option postscreen_dnsbl_sites).
- dnsbl_threshold: <integer> (0 - N) (default = 1)
-
The inclusive lower bound for blocking a remote SMTP client, based on its combined DNSBL score (postfix option postscreen_dnsbl_threshold).
- dwarning: <integer> (0 - N) (default = 4)
-
SMTP delay warning time (in hours). (postfix option delay_warning_time)
- filter-timeout: <integer> (2 - 86400) (default = 600)
-
Timeout for the processing of one mail (in seconds) (postfix option smtpd_proxy_timeout and lmtp_data_done_timeout)
- greylist: <boolean> (default = 1)
-
Use Greylisting for IPv4.
- greylist6: <boolean> (default = 0)
-
Use Greylisting for IPv6.
- greylistmask4: <integer> (0 - 32) (default = 24)
-
Netmask to apply for greylisting IPv4 hosts
- greylistmask6: <integer> (0 - 128) (default = 64)
-
Netmask to apply for greylisting IPv6 hosts
- helotests: <boolean> (default = 0)
-
Use SMTP HELO tests. (postfix option smtpd_helo_restrictions)
- hide_received: <boolean> (default = 0)
-
Hide received header in outgoing mails.
- log-headers: <boolean> (default = 0)
-
Log the envelope sender and recipient together with the decoded From, To, and Subject headers of each processed mail to the mail log. This eases auditing and tracing, but writes potentially personal data, such as mail subjects and addresses, to the host log. Make sure this is compatible with your data-protection obligations before enabling it.
- maxsize: <integer> (1024 - N) (default = 10485760)
-
Maximum email size. Larger mails are rejected. (postfix option message_size_limit)
- message_rate_limit: <integer> (0 - N) (default = 0)
-
The maximal number of message delivery requests that any client is allowed to make to this service per minute.To disable this feature, specify a limit of 0.
- ndr_on_block: <boolean> (default = 0)
-
Send out NDR when mail gets blocked
- queue-lifetime: <integer> (1 - 100)
-
Maximum time (in days) a deferred message is kept in the queue before it is returned to the sender as undeliverable. Also applies to bounce (notification) messages. (postfix options maximal_queue_lifetime and bounce_queue_lifetime)
- rejectunknown: <boolean> (default = 0)
-
Reject unknown clients. (postfix option reject_unknown_client_hostname)
- rejectunknownsender: <boolean> (default = 0)
-
Reject unknown senders. (postfix option reject_unknown_sender_domain)
- smtputf8: <boolean> (default = 1)
-
Enable SMTPUTF8 support in Postfix and detection for locally generated mail (postfix option smtputf8_enable)
- spf: <boolean> (default = 1)
-
Use Sender Policy Framework.
- verifyreceivers: <450 | 550>
-
Enable receiver verification. The value specifies the numerical reply code when the Postfix SMTP server rejects a recipient address. (postfix options reject_unknown_recipient_domain, reject_unverified_recipient, and unverified_recipient_reject_code)
4.7.5. Logging Mail Header Information
For auditing and troubleshooting, you can enable the log-headers option in the mail proxy settings. Proxmox Mail Gateway then logs the envelope sender and recipient together with the decoded From, To, and Subject headers of each processed mail to the mail log, in addition to the queue and rule information that is always logged.
|
|
The logged headers can contain personal data, such as mail subjects and sender or recipient addresses. Make sure that logging this information, and keeping it in the system logs, is compatible with your data-protection obligations before you enable this option. It is disabled by default. |
4.7.6. Before and After Queue scanning
Email scanning can happen at two different stages of mail-processing:
-
Before-queue filtering: During the SMTP session, after the complete message has been received (after the DATA command).
-
After-queue filtering: After initially accepting the mail and putting it on a queue for further processing.
Before-queue filtering has the advantage that the system can reject a mail (by sending a permanent reject code 554), and leave the task of notifying the original sender to the other mail server. This is of particular advantage if the processed mail is a spam message or contains a virus and has a forged sender address. Sending out a notification in this situation leads to so-called backscatter mail, which might cause your server to get listed as spamming on RBLs (Real-time Blackhole List).
After-queue filtering has the advantage of providing faster delivery of mails for the sending servers, since queuing emails is much faster than analyzing them for spam and viruses.
If a mail is addressed to multiple recipients (for example, when multiple addresses are subscribed to the same mailing list), the situation is more complicated; your mail server can only reject or accept the mail for all recipients, after having received the complete message, while your rule setup might accept the mail for part of the recipients and reject it for others. This can be due to a complicated rule setup, or if your users use the User Welcome- and Blocklist feature.
If the resulting action of the rule system is the same for all recipients, Proxmox Mail Gateway responds accordingly, if configured for before-queue filtering (sending 554 for a blocked mail and 250 for an accepted or quarantined mail). If some mailboxes accept the mail and some reject it, the system has to accept the mail.
Whether Proxmox Mail Gateway notifies the sender that delivery failed for some recipients by sending a non-delivery report, depends on the ndr_on_block setting in /etc/pmg/pmg.conf. If enabled, an NDR is sent. Keeping this disabled prevents NDRs being sent to the (possibly forged) sender and thus minimizes the chance of getting your IP listed on an RBL. However in certain environments, it can be unacceptable not to inform the sender about a rejected mail.
The setting has the same effect if after-queue filtering is configured, with the exception that an NDR is always sent out, even if all recipients block the mail, since the mail already got accepted before being analyzed.
The details of integrating the mail proxy with Postfix in both setups are explained in Postfix Before-Queue Content Filter and Postfix After-Queue Content Filter respectively.
4.7.7. Greylisting
Greylisting is a technique for preventing unwanted messages from reaching the resource intensive stages of content analysis (virus detection and spam detection). By initially replying with a temporary failure code (450) to each new email, Proxmox Mail Gateway tells the sending server that it should queue the mail and retry delivery at a later point. Since certain kinds of spam get sent out by software which has no provisioning for queuing, these mails are dropped without reaching Proxmox Mail Gateway or your mailbox.
The downside of greylisting is the delay introduced by the initial deferral of the email, which usually amounts to less than 30 minutes.
In order to prevent unnecessary delays in delivery from known sources, emails coming from a source for a recipient, which have passed greylisting in the past are directly passed on: For each email the triple <sender network, sender email, recipient email> is stored in a list, along with the time when delivery was attempted. If an email fits an already existing triple, the timestamp for that triple is updated, and the email is accepted for further processing.
As long as a sender and recipient communicate frequently, there is no delay introduced by enabling greylisting. A triple is removed after a longer period of time, if no mail fitting that triple has been seen. The timeouts in Proxmox Mail Gateway are:
-
2 days for the retry of the first delivery
-
36 days for a known triple
Mails with an empty envelope sender are always delayed.
Some email service providers send out emails for one domain from multiple servers. To prevent delays due to an email coming in from two separate IPs of the same provider, the triples store a network (cidr) instead of a single IP. For certain large providers, the default network size might be too small. You can configure the netmask applied to an IP for the greylist lookup in /etc/pmg/pmg.conf or in the GUI with the settings greylistmask for IPv4 and greylistmask6 for IPv6 respectively.
4.7.8. Transports
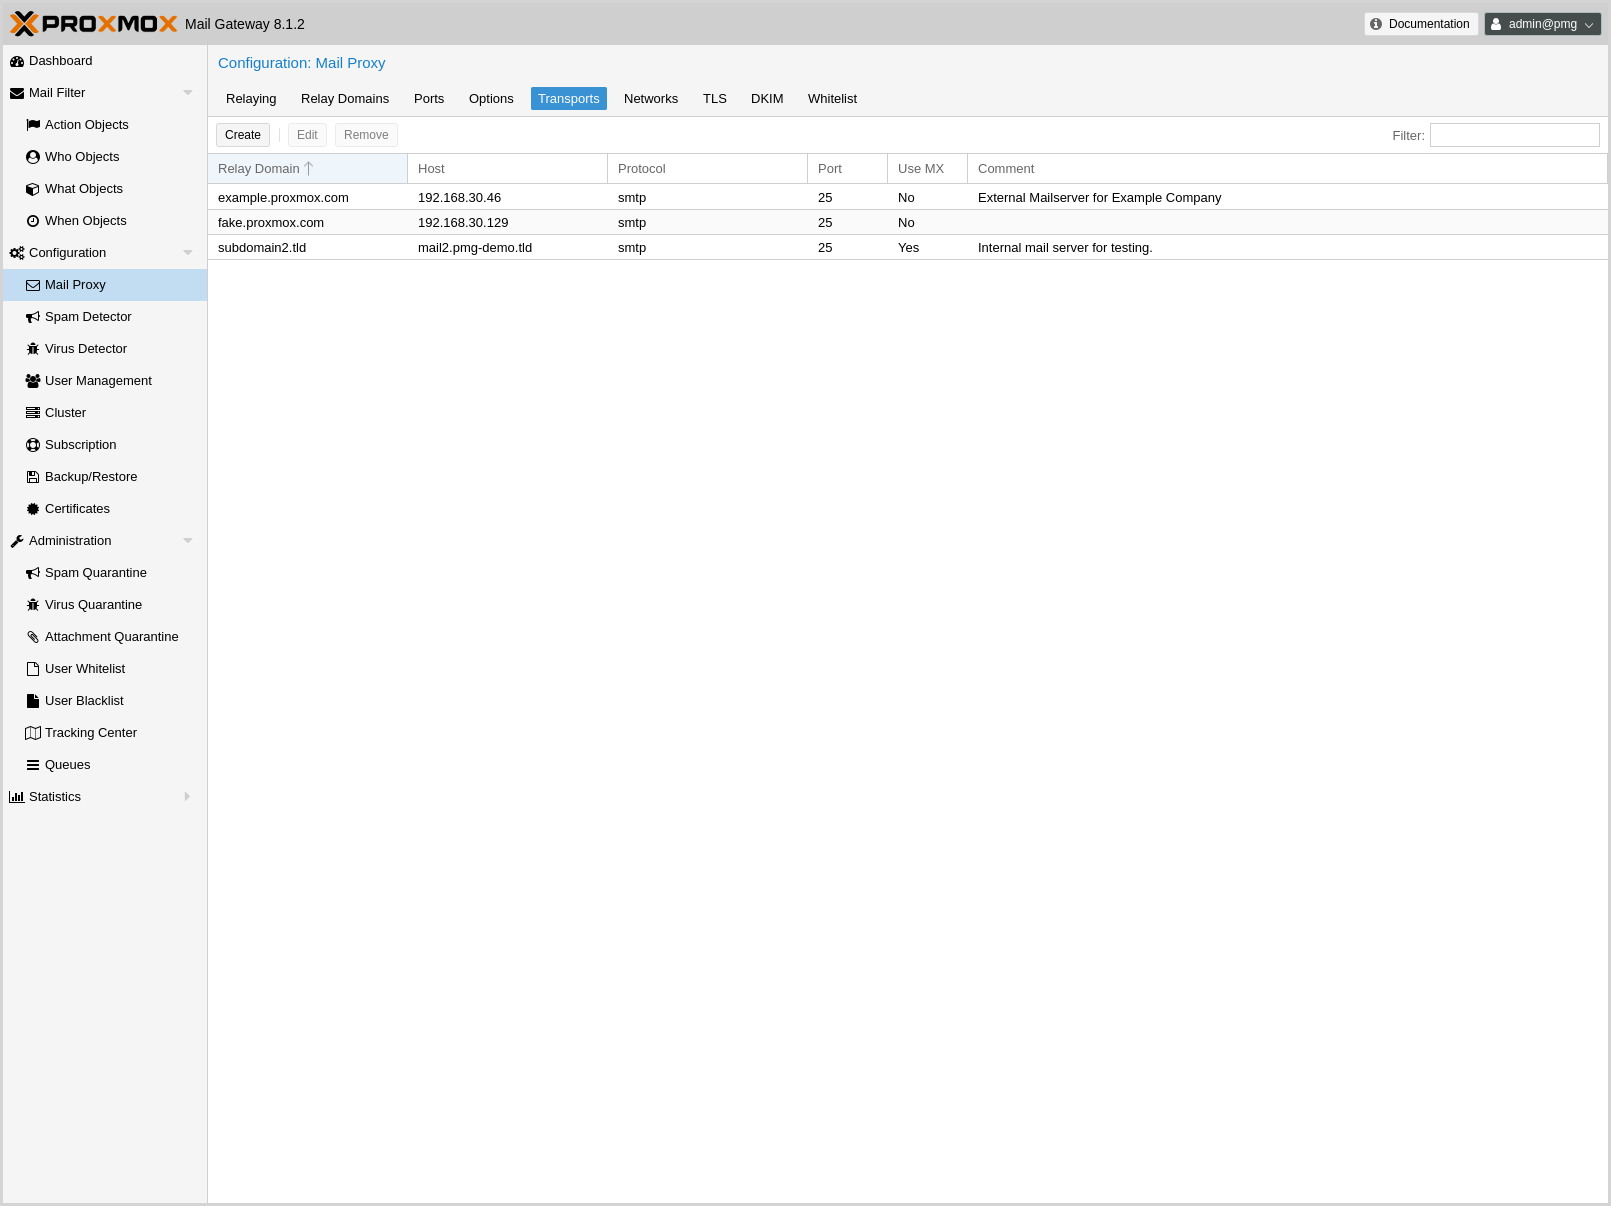
You can use Proxmox Mail Gateway to send emails to different internal email servers. For example, you can send emails addressed to domain.com to your first email server and emails addressed to subdomain.domain.com to a second one.
You can add the IP addresses, hostname, transport protocol (smtp/lmtp), transport ports and mail domains (or just single email addresses) of your additional email servers. When transport protocol is set to lmtp, the option Use MX is useless and will automatically be set to No.
4.7.9. Networks
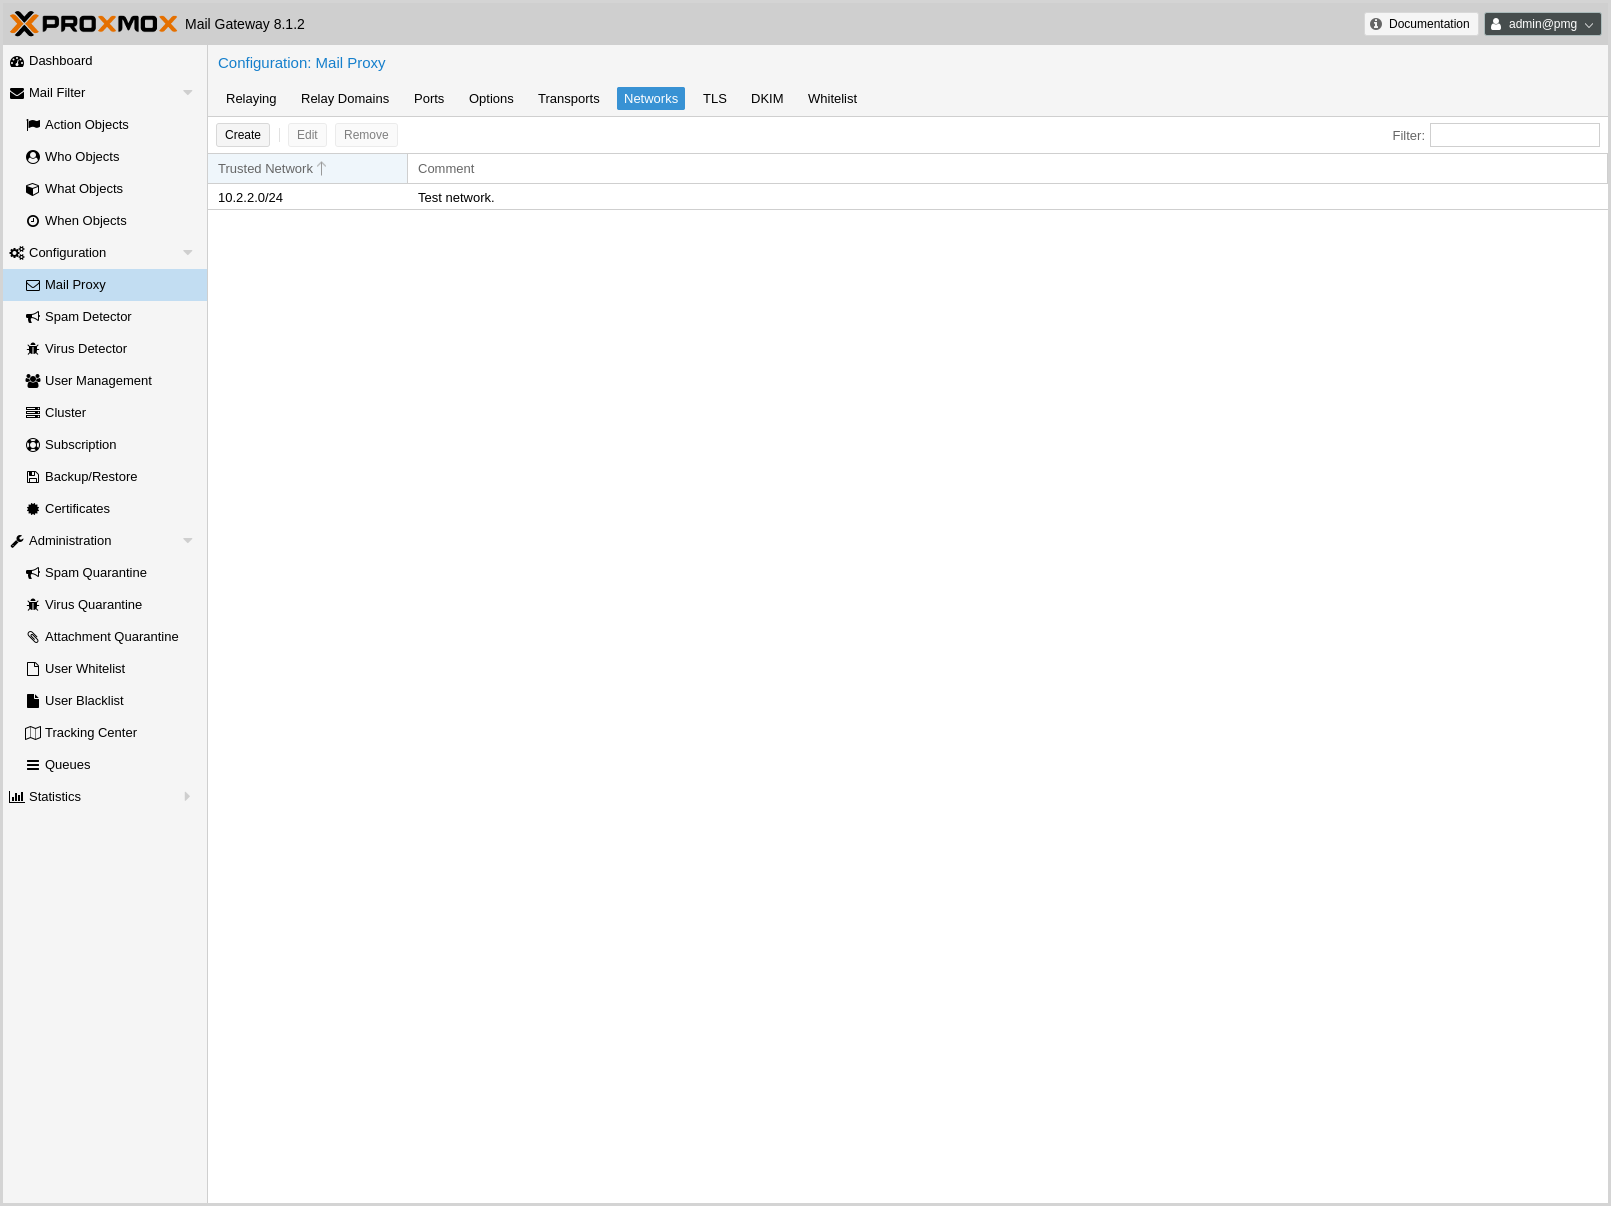
You can add additional internal (trusted) IP networks or hosts. All hosts in this list are allowed to relay.
|
|
Hosts in the same subnet as Proxmox Mail Gateway can relay by default and don’t need to be added to this list. |
4.7.10. TLS
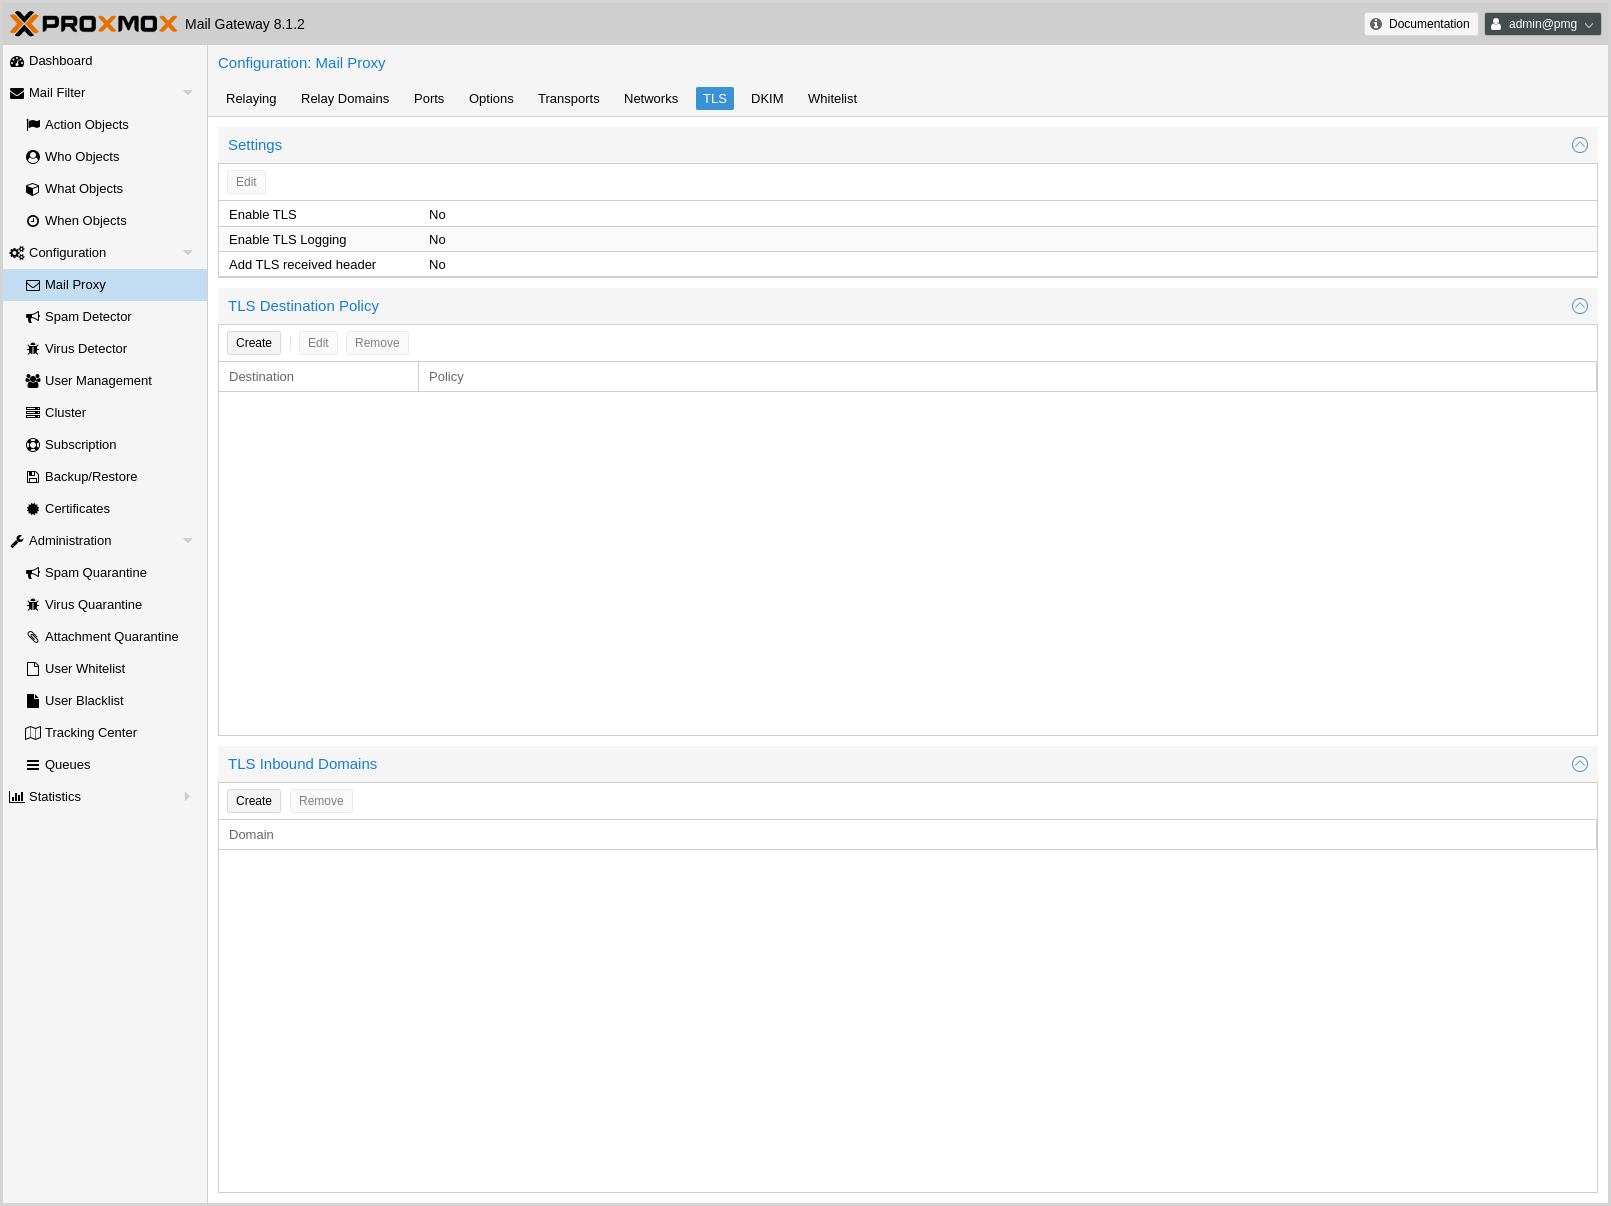
Transport Layer Security (TLS) provides certificate-based authentication and encrypted sessions. An encrypted session protects the information that is transmitted with SMTP mail. When you activate TLS, Proxmox Mail Gateway automatically generates a new self signed certificate for you (/etc/pmg/pmg-tls.pem).
Proxmox Mail Gateway uses opportunistic TLS encryption by default. The SMTP transaction is encrypted if the STARTTLS ESMTP feature is supported by the remote server. Otherwise, messages are sent unencrypted.
You can set a different TLS policy per destination. A destination is either a remote domain or a next-hop destination, as specified in /etc/pmg/transport. This can be used if you need to prevent email delivery without encryption, or to work around a broken STARTTLS ESMTP implementation. See Postfix TLS Readme for details on the supported policies.
Additionally, TLS can also be enforced on incoming connections on the external port for specific sender domains by creating a TLS inbound domains entry. Mails with matching domains must use an encrypted SMTP session, otherwise they are rejected. All domains on this list have an entry of reject_plaintext_session in a check_sender_access table.
- Enable TLS logging
-
To get additional information about SMTP TLS activity, you can enable TLS logging. In this case, information about TLS sessions and used certificates is logged via syslog.
- Add TLS received header
-
Set this option to include information about the protocol and cipher used, as well as the client and issuer CommonName into the "Received:" message header.
Those settings are saved to subsection mail in /etc/pmg/pmg.conf, using the following configuration keys:
- tls: <boolean> (default = 0)
-
Enable TLS.
- tlsheader: <boolean> (default = 0)
-
Add TLS received header.
- tlslog: <boolean> (default = 0)
-
Enable TLS Logging.
4.7.11. DKIM Signing
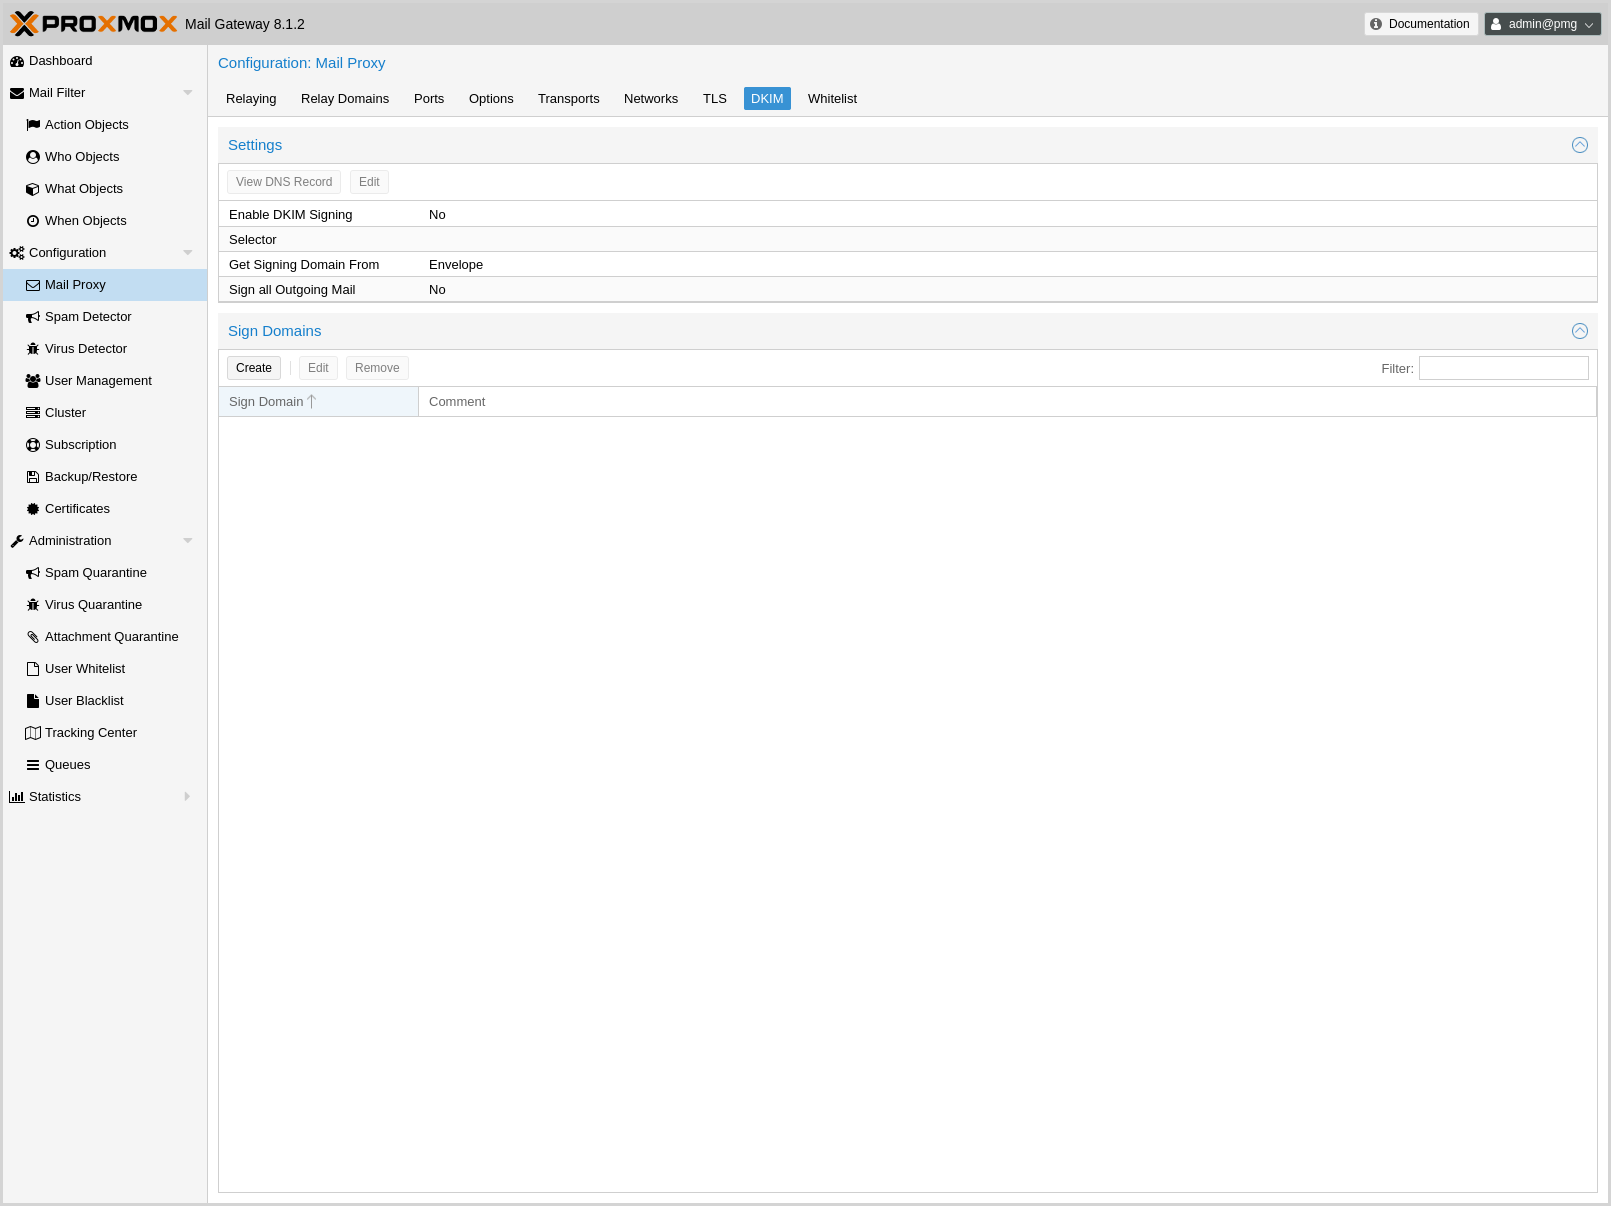
DomainKeys Identified Mail (DKIM) Signatures (see RFC 6376) is a method to cryptographically authenticate a mail as originating from a particular domain. Before sending the mail, a hash over certain header fields and the body is computed, signed with a private key and added in the DKIM-Signature header of the mail. The selector (a short identifier chosen by you, used to identify which system and private key were used for signing) is also included in the DKIM-Signature header.
The verification is done by the receiver. The public key is fetched via DNS TXT lookup for yourselector._domainkey.yourdomain.example and used for verifying the hash. You can publish multiple selectors for your domain, each used by a system which sends email from your domain, without the need to share the private key.
Proxmox Mail Gateway verifies DKIM Signatures for inbound mail in the Spam Filter by default.
Additionally, it supports conditionally signing outbound mail, if configured. It uses one private key and selector per Proxmox Mail Gateway deployment (all nodes in a cluster use the same key). The key has a minimal size of 1024 bits and rsa-sha256 is used as the signing algorithm.
The headers included in the signature are taken from the list of Mail::DKIM::Signer. Additionally Content-Type (if present), From, To, CC, Reply-To and Subject get oversigned.
You can either sign all mails received on the internal port using the domain of the envelope sender address or create a list of domains, for which emails should be signed, defaulting to the list of relay domains.
Mails generated by Proxmox Mail Gateway itself, like notifications and reports, usually have an empty envelope. Thus they will only be signed if you have selected header as the source of the signing domain and have set an RFC5322.From with a domain that would be signed as a From: setting in the spam quarantine options for spam reports and quarantine links, and in the system options for other mails sent by Proxmox Mail Gateway.
- Enable DKIM Signing
-
Controls whether outbound mail should get DKIM signed.
- Selector
-
The selector used for signing the mail. The private key used for signing is saved under /etc/pmg/dkim/yourselector.private. You can display the DNS TXT record which you need to add to all domains signed by Proxmox Mail Gateway by clicking on the View DNS Record Button.
- Sign all Outgoing Mail
-
Controls whether all outbound mail should get signed or only mails from domains listed in /etc/pmg/dkim/domains, if it exists and /etc/pmg/domains otherwise.
- Select Signing Domain
-
Determines whether to DKIM sign emails using the domain found in the envelope from or the from header of the email. The envelope from is also known as reverse-path and RFC5321.MailFrom (see RFC 5321 section 3.3). The from header is also known as RFC5322.From (see RFC 5322 section 3.6.2).
The envelope from of certain emails, bounces for example, can be empty. In these cases it is desirable to sign them using the domain found in the from header.
Additionally, DMARC (see RFC 7489 section 3.1.1) needs the domain found in the from header in certain situations.
These settings are saved to the admin subsection in /etc/pmg/pmg.conf, using the following configuration keys:
- dkim-use-domain: <envelope | header> (default = envelope)
-
Whether to sign using the domain found in the header or the envelope.
- dkim_selector: <string>
-
Default DKIM selector
- dkim_sign: <boolean> (default = 0)
-
DKIM sign outbound mails with the configured Selector.
- dkim_sign_all_mail: <boolean> (default = 0)
-
DKIM sign all outgoing mails irrespective of the Envelope From domain.
4.7.12. Handling of Messages With Broken MIME Structure
Messages with broken MIME structure and ambiguous content can be used to bypass security checks. Therefore, they are rejected by Proxmox Mail Gateway before being passed to the rule system.
As some legitimate messages also have a broken MIME structure, you can optionally allow broken messages to be accepted by the parser by enabling the accept-broken-mime setting in the mail subsection in /etc/pmg/pmg.conf.
If enabled, a X-Proxmox-Broken-Message header is added to each suspicious message. This header can be used in the rule system to selectively accept or block such messages.
4.7.13. Welcomelist
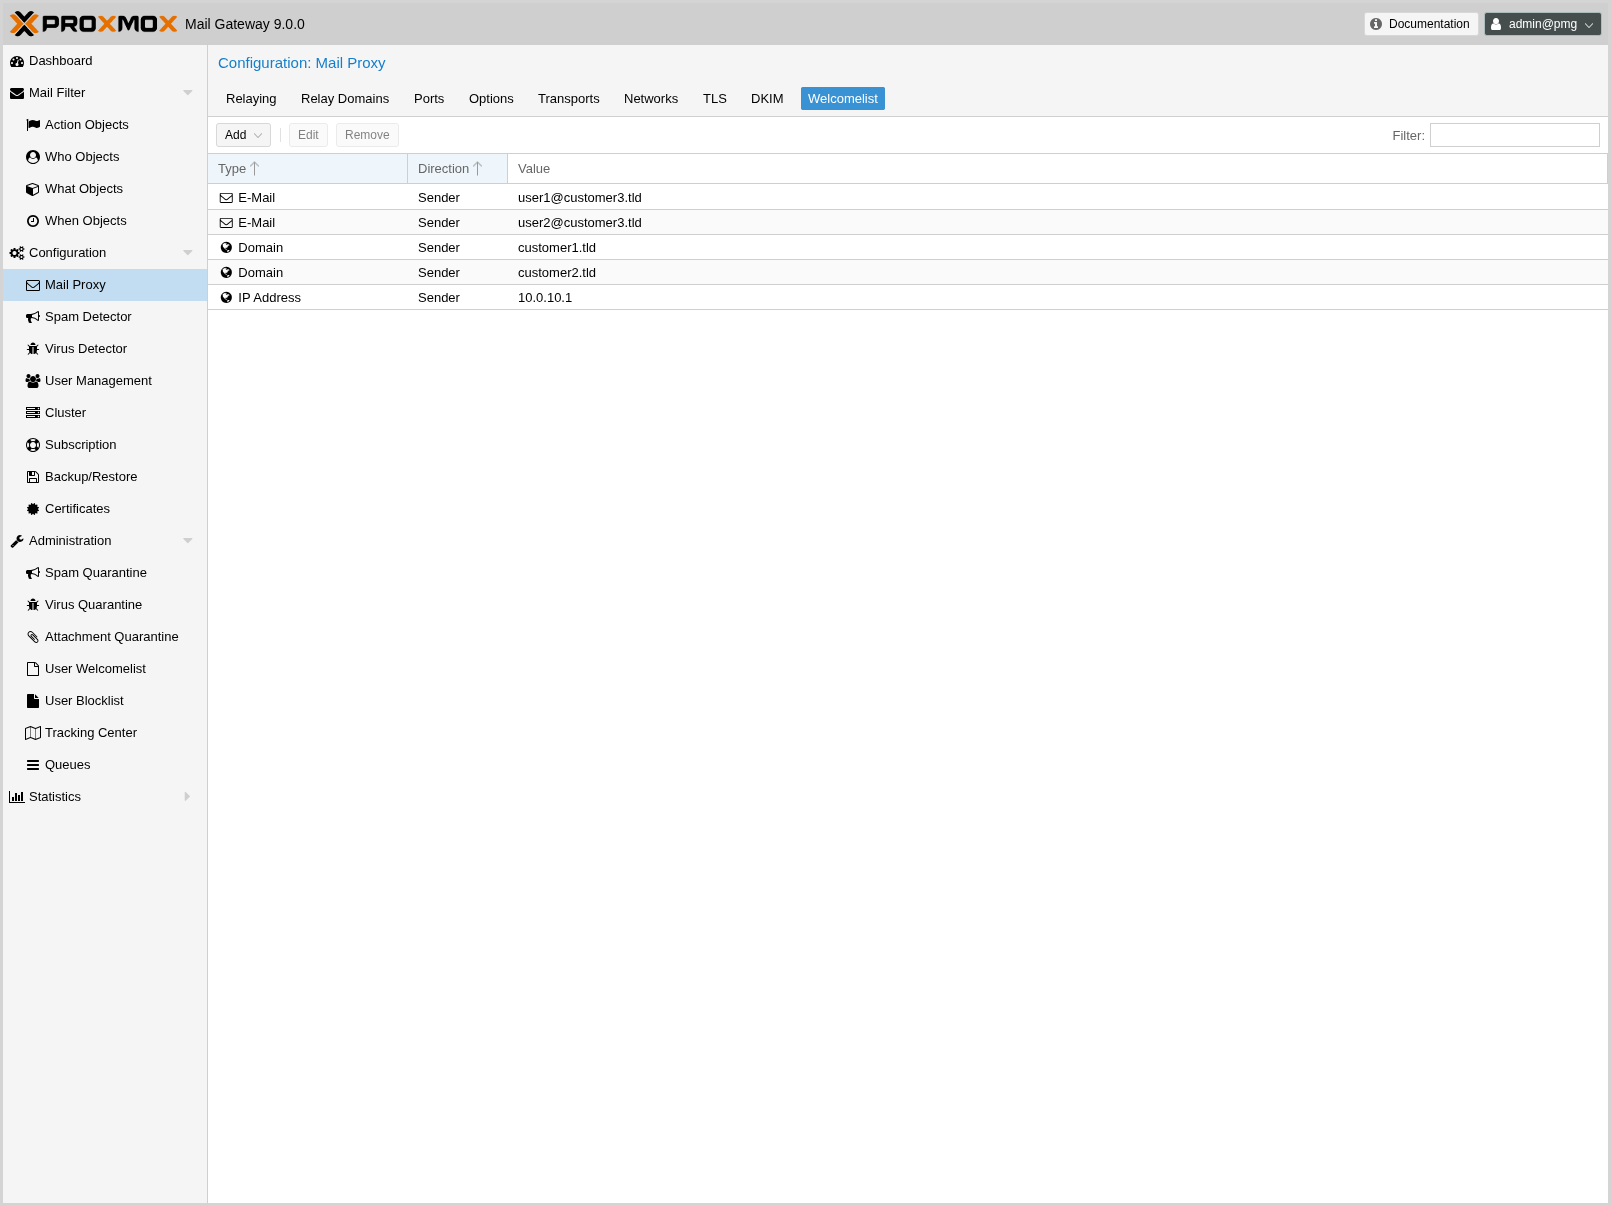
All SMTP checks are disabled for those entries (e.g. Greylisting, SPF, DNSBL, …)
DNSBL checks are done by postscreen, which works on IP addresses and networks. This means it can only make use of the IP Address and IP Network entries.
|
|
If you use a backup MX server (for example, your ISP offers this service for you) you should always add those servers here. |
|
|
To disable DNSBL checks entirely, remove any DNSBL Sites entries in Mail Proxy Options. |
4.8. Spam Detector Configuration
4.8.1. Options
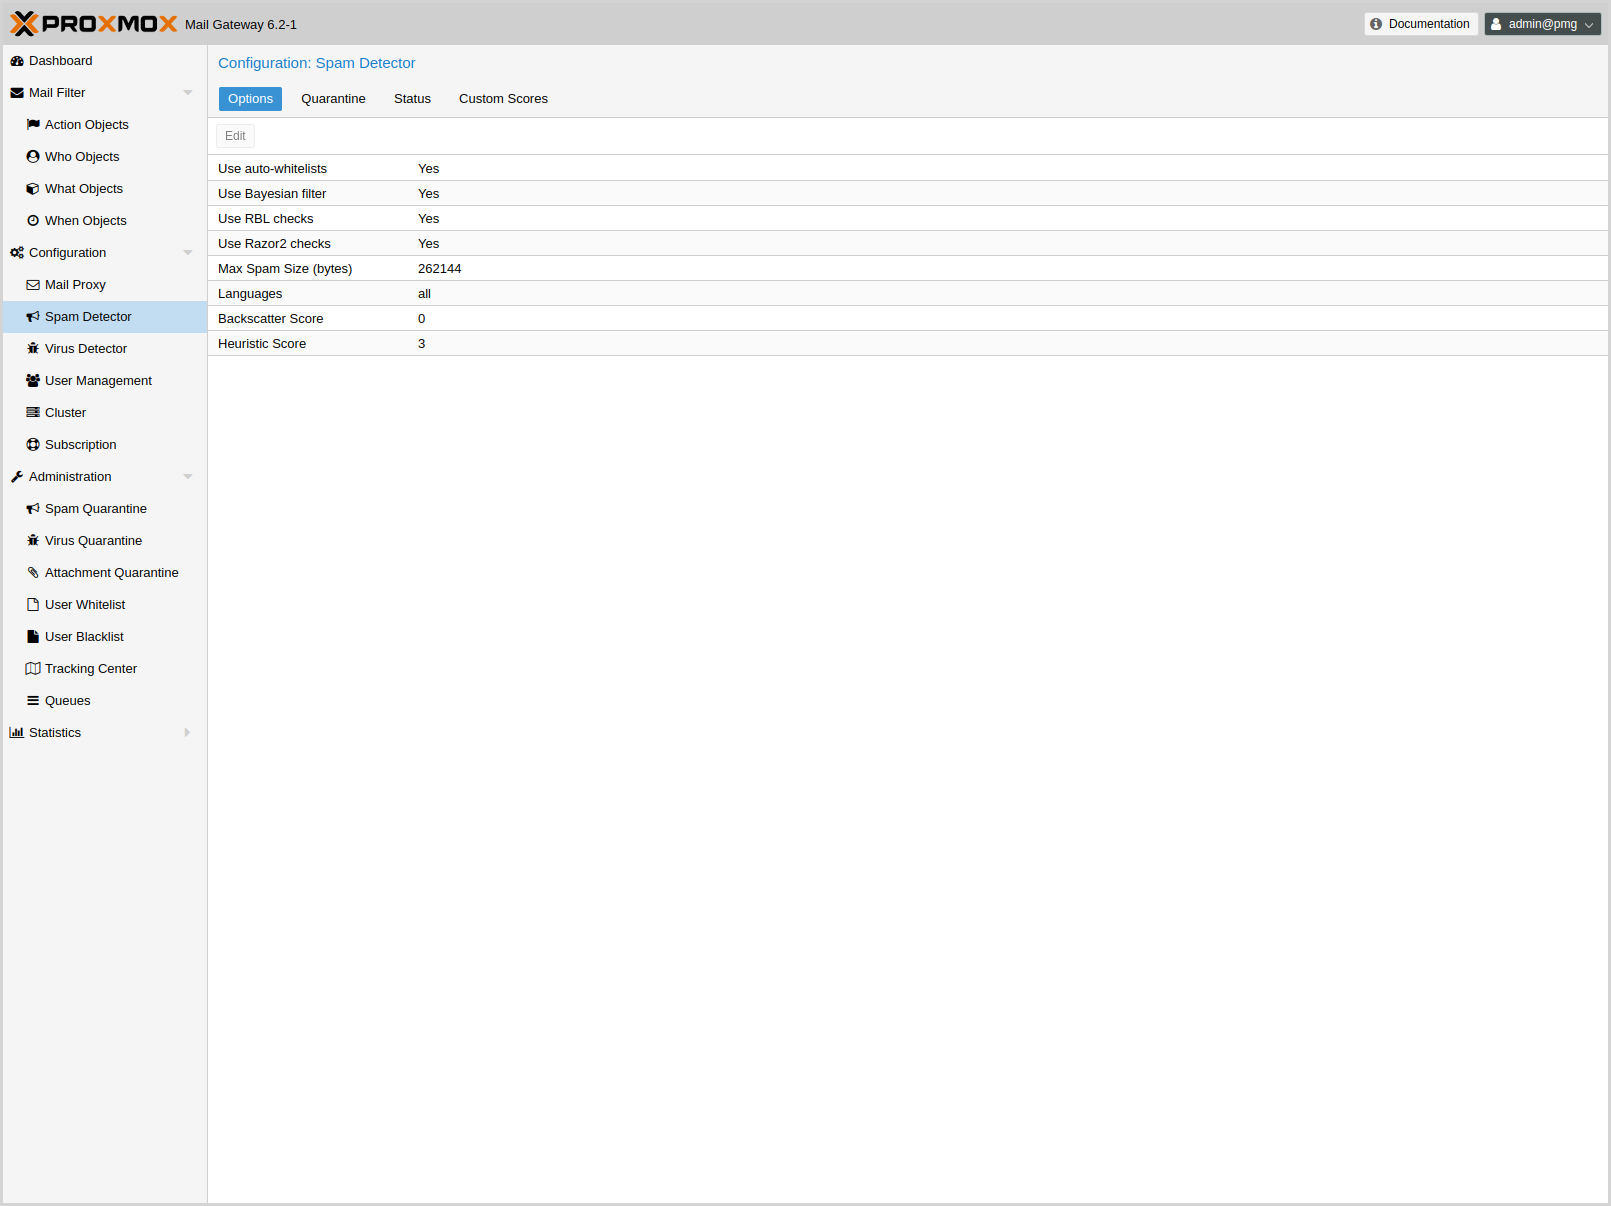
Proxmox Mail Gateway uses a wide variety of local and network tests to identify spam signatures. This makes it harder for spammers to identify one aspect which they can craft their messages to work around the spam filter.
Every single email will be analyzed and have a spam score assigned. The system attempts to optimize the efficiency of the rules that are run in terms of minimizing the number of false positives and false negatives.
- bounce_score: <integer> (0 - 1000) (default = 0)
-
Additional score for bounce mails.
- clamav_heuristic_score: <integer> (0 - 1000) (default = 3)
-
Score for ClamAV heuristics (Encrypted Archives/Documents, PhishingScanURLs, …).
- extract_text: <boolean> (default = 0)
-
Extract text from attachments (doc, pdf, rtf, images) and scan for spam.
- languages: (all|([a-z][a-z])+( ([a-z][a-z])+)*) (default = all)
-
This option is used to specify which languages are considered OK for incoming mail.
- maxspamsize: <integer> (64 - N) (default = 262144)
-
Maximum size of spam messages in bytes.
- rbl_checks: <boolean> (default = 1)
-
Enable real time blocklists (RBL) checks.
- use_awl: <boolean> (default = 0)
-
Use the Auto-Welcomelist plugin.
- use_bayes: <boolean> (default = 0)
-
Whether to use the naive-Bayesian-style classifier.
- use_razor: <boolean> (default = 1)
-
Whether to use Razor2, if it is available.
- wl_bounce_relays: <string>
-
Welcomelist legitimate bounce relays.
4.8.2. Quarantine
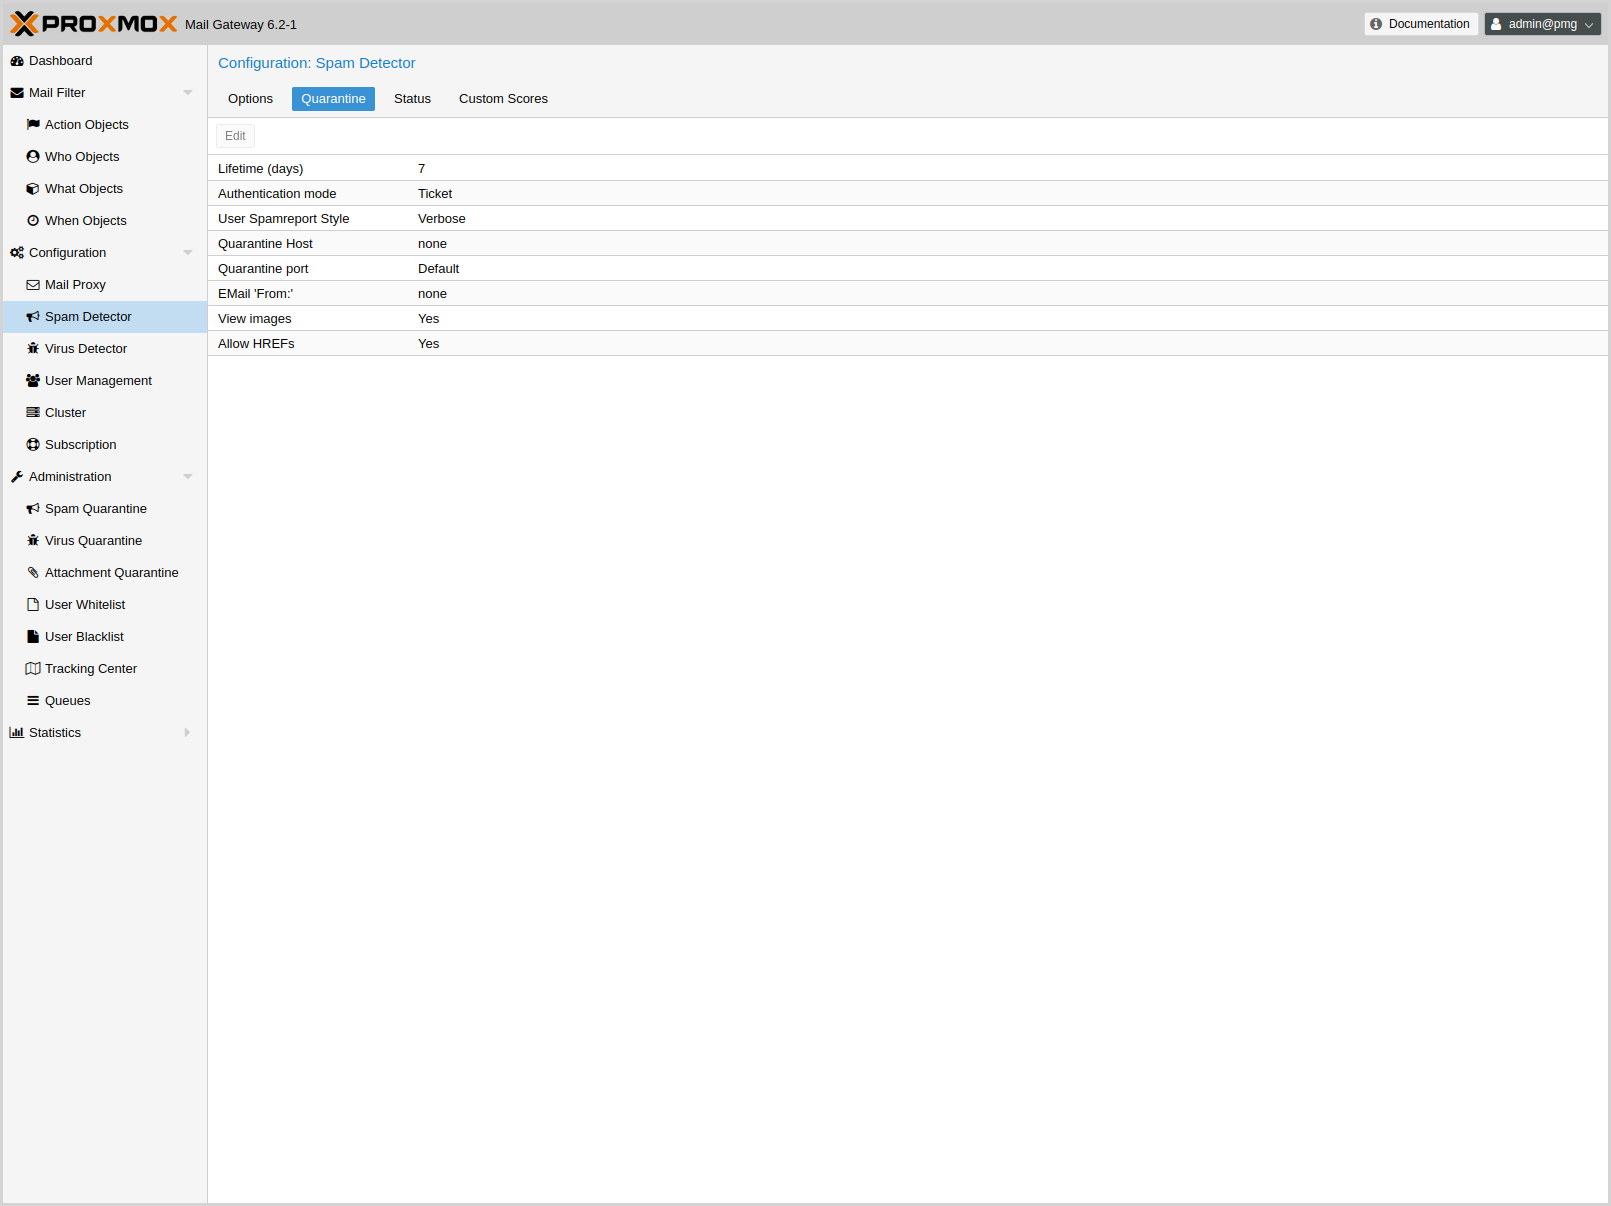
Proxmox Mail Gateway analyses all incoming email messages and decides for each email if it is ham or spam (or virus). Good emails are delivered to the inbox and spam messages are moved into the spam quarantine.
The system can be configured to send daily reports to inform users about personal spam messages received in the last day. The report is only sent if there are new messages in the quarantine.
Some options are only available in the config file /etc/pmg/pmg.conf, and not in the web interface.
- allowhrefs: <boolean> (default = 1)
-
Allow to view hyperlinks. When disabled hyperlinks will be displayed as plain-text.
- authmode: <ldap | ldapticket | ticket> (default = ticket)
-
Authentication mode to access the quarantine interface. Mode ticket allows login using tickets sent with the daily spam report. Mode ldap requires to login using an LDAP account. Finally, mode ldapticket allows both ways.
- hostname: <string>
-
Quarantine Host. Useful if you run a Cluster and want users to connect to a specific host.
- lifetime: <integer> (1 - N) (default = 7)
-
Quarantine life time (days)
- mailfrom: <string>
-
Text for From header in daily spam report mails.
- port: <integer> (1 - 65535) (default = 8006)
-
Quarantine Port. Useful if you have a reverse proxy or port forwarding for the webinterface. Only used for the generated Spam report.
- protocol: <http | https> (default = https)
-
Quarantine Webinterface Protocol. Useful if you have a reverse proxy for the webinterface. Only used for the generated Spam report.
- quarantinelink: <boolean> (default = 0)
-
Enables user self-service for Quarantine Links. Caution: this is accessible without authentication
- reportstyle: <custom | none | short | verbose> (default = verbose)
-
Spam report style.
- viewimages: <0 | 1 | on-demand> (default = 1)
-
Control how images in quarantined mails are displayed. 1 shows all images, including externally hosted ones; 0 hides all images; on-demand shows only embedded images and lets the user load externally hosted ones manually (avoids leaking that a mail was opened).
4.8.3. Customization of Rulescores
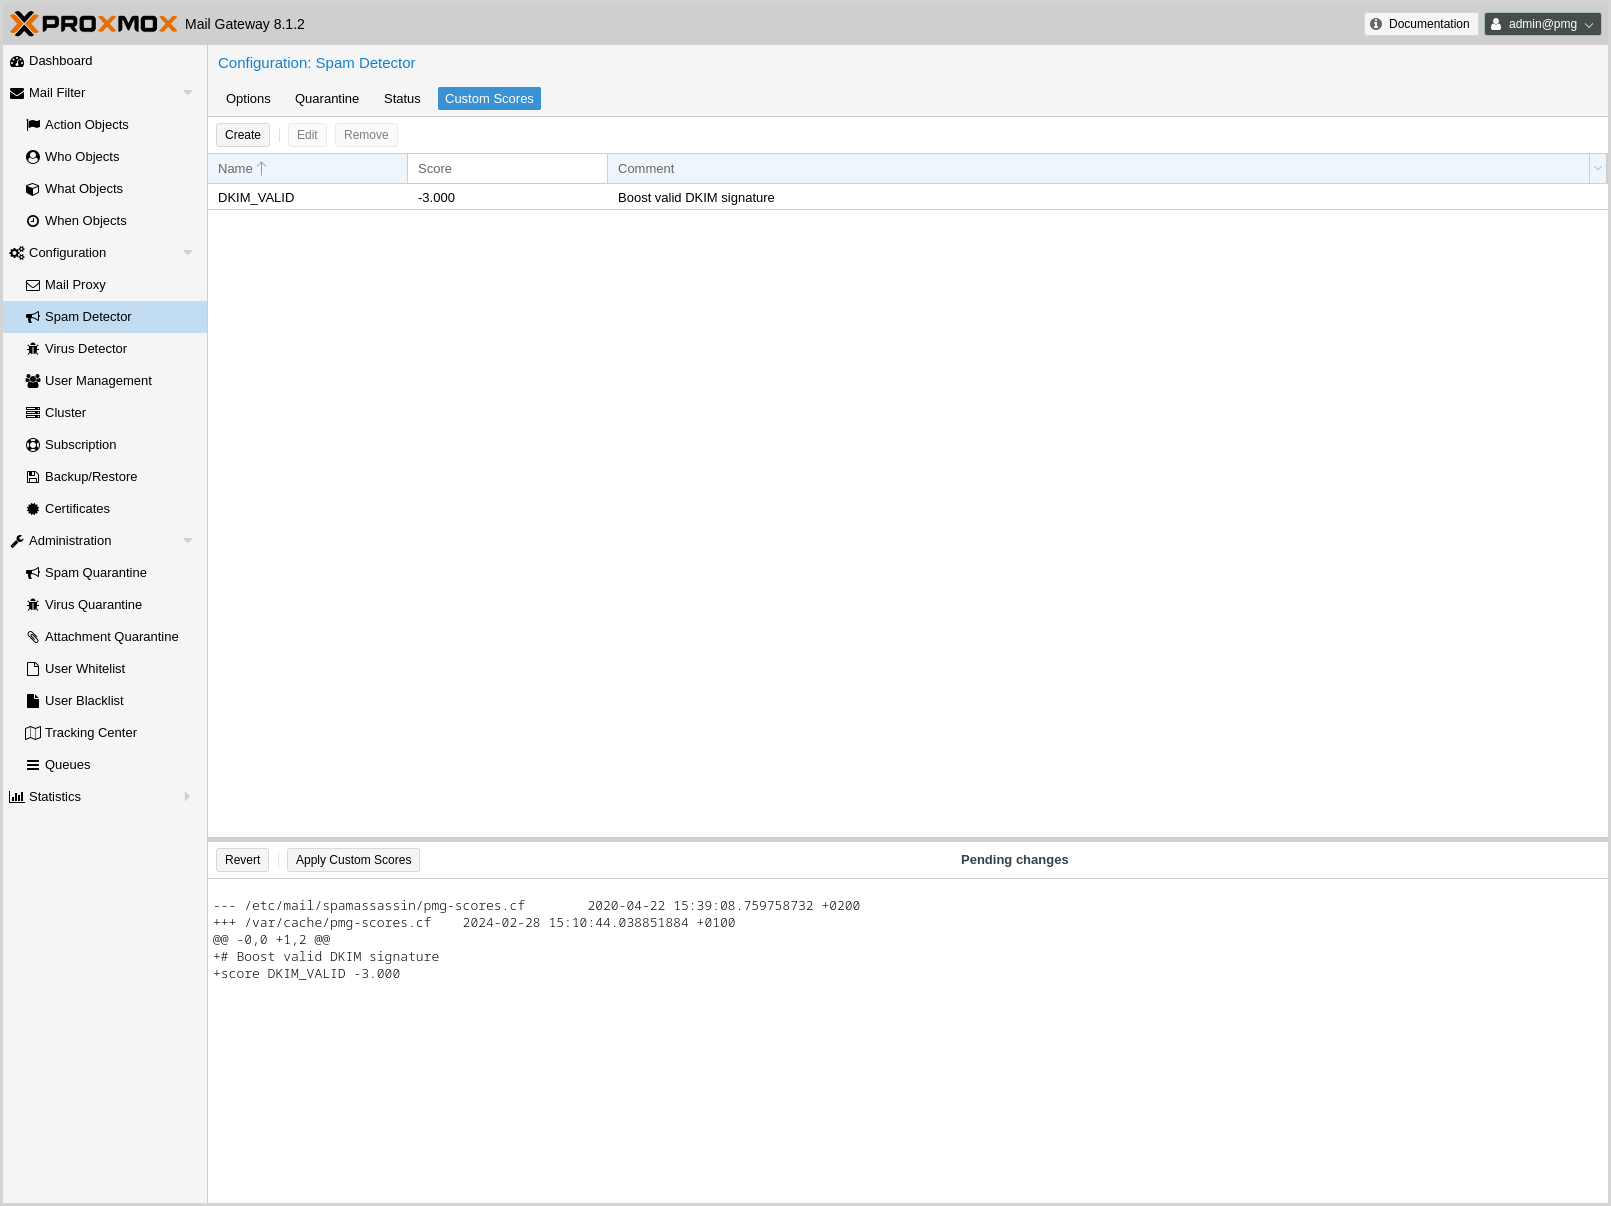
While the default scoring of SpamAssassin™'s ruleset provides very good detection rates, sometimes your particular environment can benefit from slightly adjusting the score of a particular rule. Two examples:
-
Your system receives spam mails which are scored at 4.9 and you have a rule which puts all mails above 5 in the quarantine. The one thing the spam mails have in common is that they all hit URIBL_BLACK. By increasing the score of this rule by 0.2 points the spam mails would all be quarantined instead of being sent to your users
-
Your system tags many legitimate mails from a partner organization as spam, because the organization has a policy that each mail has to start with Dear madam or sir (generating 1.9 points through the rule DEAR_SOMETHING). By setting the score of this rule to 0, you can disable it completely.
The system logs all the rules which a particular mail hits. Analyzing the logs can lead to finding such a pattern in your environment.
You can adjust the score of a rule by creating a new Custom Rule Score entry in the GUI and entering a SpamAssassin™ rule as the name.
|
|
In general, it is strongly recommended not to make large changes to the default scores. |
4.9. Virus Detector Configuration
4.9.1. Options
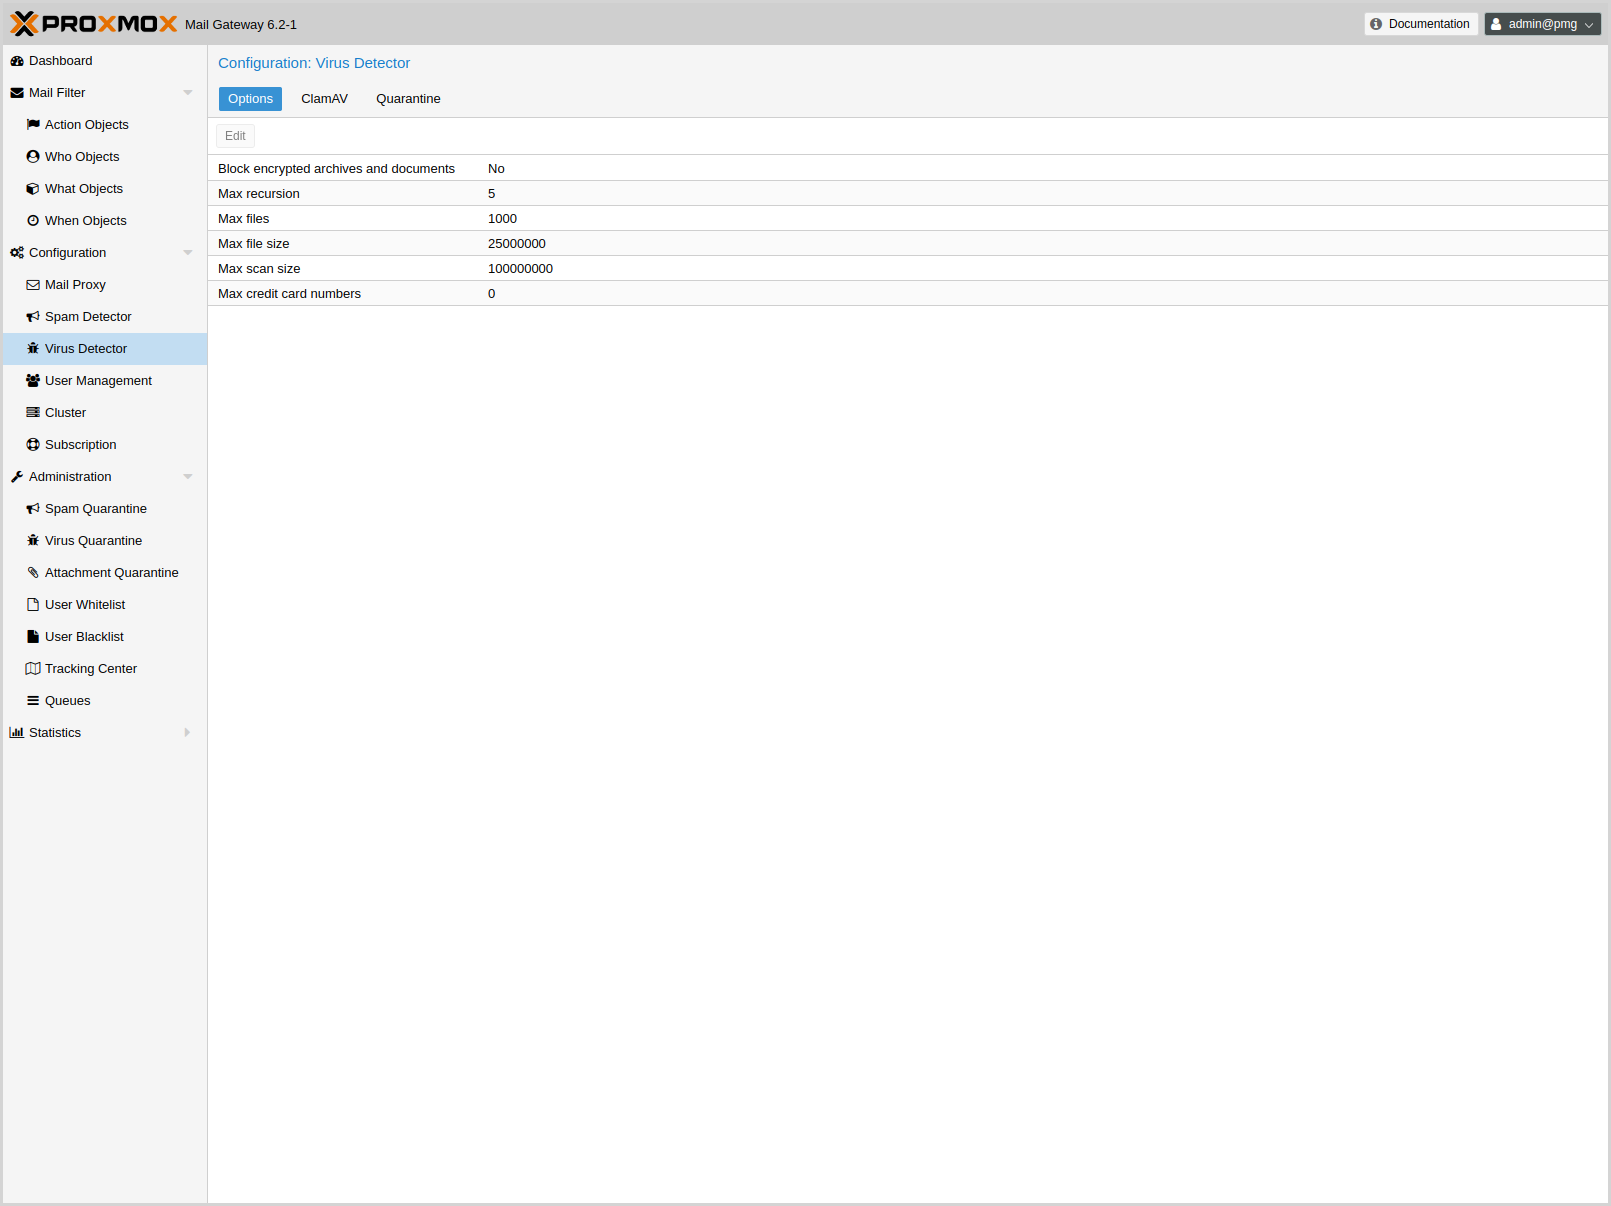
All mails are automatically passed to the included virus detector (ClamAV®). The default settings are considered safe, so it is usually not required to change them.
ClamAV® related settings are saved to subsection clamav in /etc/pmg/pmg.conf, using the following configuration keys:
- archiveblockencrypted: <boolean> (default = 0)
-
Whether to mark encrypted archives and documents as heuristic virus match. A match does not necessarily result in an immediate block, it just raises the Spam Score by clamav_heuristic_score.
- archivemaxfiles: <integer> (0 - N) (default = 1000)
-
Number of files to be scanned within an archive, a document, or any other kind of container. Warning: disabling this limit or setting it too high may result in severe damage to the system.
- archivemaxrec: <integer> (1 - N) (default = 5)
-
Nested archives are scanned recursively, e.g. if a ZIP archive contains a TAR file, all files within it will also be scanned. This options specifies how deeply the process should be continued. Warning: setting this limit too high may result in severe damage to the system.
- archivemaxsize: <integer> (1000000 - N) (default = 25000000)
-
Files larger than this limit (in bytes) won’t be scanned.
- dbmirror: <string> (default = database.clamav.net)
-
ClamAV database mirror server.
- maxcccount: <integer> (0 - N) (default = 0)
-
This option sets the lowest number of Credit Card or Social Security numbers found in a file to generate a detect.
- maxscansize: <integer> (1000000 - N) (default = 100000000)
-
Sets the maximum amount of data (in bytes) to be scanned for each input file.
- scriptedupdates: <boolean> (default = 1)
-
Enables ScriptedUpdates (incremental download of signatures)
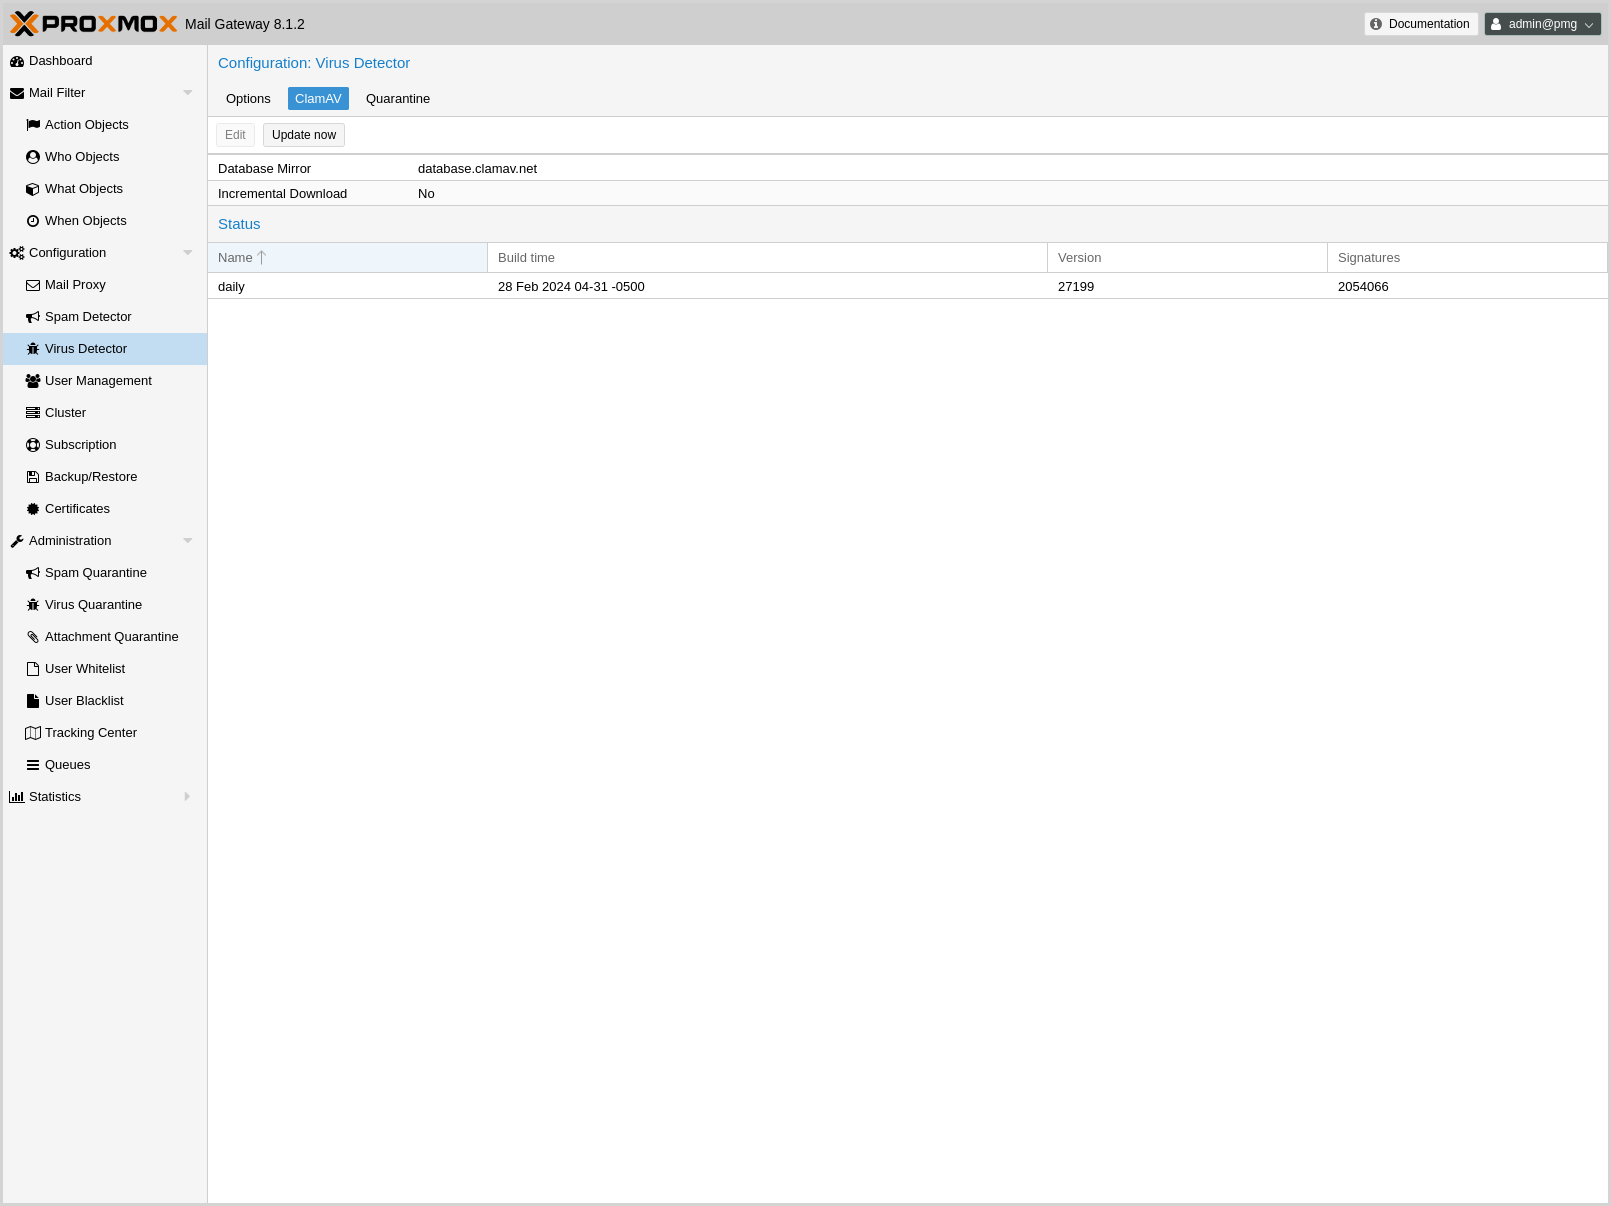
Please note that the virus signature database is automatically updated. You can see the database status in the GUI, and also trigger manual updates from there.
4.9.2. Quarantine
Identified virus mails are automatically moved to the virus quarantine. The administrator can view these mails from the GUI, and choose to deliver them, in case of false positives. Proxmox Mail Gateway does not notify individual users about received virus mails.
Virus quarantine related settings are saved to subsection virusquar in /etc/pmg/pmg.conf, using the following configuration keys:
- allowhrefs: <boolean> (default = 1)
-
Allow to view hyperlinks. When disabled hyperlinks will be displayed as plain-text.
- lifetime: <integer> (1 - N) (default = 7)
-
Quarantine life time (days)
- viewimages: <0 | 1 | on-demand> (default = 1)
-
Control how images in quarantined mails are displayed. 1 shows all images, including externally hosted ones; 0 hides all images; on-demand shows only embedded images and lets the user load externally hosted ones manually (avoids leaking that a mail was opened).
4.10. Custom SpamAssassin configuration
This is only for advanced users. SpamAssassin™'s rules and their associated scores get updated regularly and are trained on a huge corpus, which gets classified by experts. In most cases, adding a rule for matching a particular keyword is the wrong approach, leading to many false positives. Usually bad detection rates are better addressed by properly setting up DNS than by adding a custom rule - watch out for matches to URIBL_BLOCKED in the logs or spam-headers - see the SpamAssassin DNSBL documentation.
To add or change the Proxmox SpamAssassin™ configuration, log in to the console via SSH and change to the /etc/mail/spamassassin/ directory. In this directory there are several files (init.pre, local.cf, …) - do not change them, as init.pre, v310.pre, v320.pre, local.cf will be overwritten by the template engine, while the others can get updated by any SpamAssassin™ package upgrade.
To add your custom configuration, you have to create a new file named custom.cf (in /etc/mail/spamassassin/), then add your configuration there. Make sure to use the correct SpamAssassin rule syntax and test it with:
# spamassassin -D --lint
The change to the configuration will be picked up when pmg-smtp-filter gets restarted. To directly have it enabled you need to restart manually, after editing the custom configuration:
# systemctl restart pmg-smtp-filter.service
If you run a cluster, the custom.cf file is synchronized from the master node to all cluster members and the relevant services are restarted automatically on the cluster members.
To adjust the score assigned to a particular rule, you can also use the Custom Rule Score settings in the GUI.
4.11. Custom Check Interface
For use-cases which are not handled by the Proxmox Mail Gateway Virus Detector and SpamAssassin™ configuration, advanced users can create a custom check executable which, if enabled will be called before the Virus Detector and before passing an email through the Rule System. The custom check API is kept as simple as possible, while still providing a great deal of control over the treatment of an email. Its input is passed via two CLI arguments:
-
the api-version (currently v1) - for potential future change of the invocation
-
the queue-file-name - a filename, which contains the complete email as rfc822/eml file
The expected output needs to be printed to STDOUT and consists of two lines:
-
the api-version (currently v1) - see above
-
one of the following 3 results:
-
OK - email is OK
-
VIRUS: <virusdescription> - email is treated as if it contained a virus (the virus description is logged and added to the email’s headers)
-
SCORE: <number> - <number> is added (negative numbers are also possible) to the email’s spamscore
-
The check is run with a 5 minute timeout - if this is exceeded, the check executable is killed and the email is treated as OK.
All output written to STDERR by the check is written with priority err to the journal/mail.log.
Below is a simple sample script following the API (and yielding a random result) for reference:
#!/bin/sh

echo "called with $*" 1>&2

if [ "$#" -ne 2 ]; then
  echo "usage: $0 APIVERSION QUEUEFILENAME" 1>&2
  exit 1
fi

apiver="$1"
shift

if [ "$apiver" != "v1" ]; then
  echo "wrong APIVERSION: $apiver" 1>&2
  exit 2
fi

queue_file="$1"

echo "v1"

choice=$(shuf -i 0-3 -n1)

case "$choice" in
  0)
    echo OK
    ;;
  1)
    echo SCORE: 4
    ;;
  2)
    echo VIRUS: Random Virus
    ;;
  3) #timeout-test
    for i in $(seq 1 7); do
      echo "custom checking mail: $queue_file - minute $i" 1>&2
      sleep 60
    done
    ;;
esac

exit 0
The custom check needs to be enabled in the admin section of /etc/pmg/pmg.conf
section: admin
    custom_check 1
The location of the custom check executable can also be set there with the key custom_check_path and defaults to /usr/local/bin/pmg-custom-check.
|
|
The custom check executable runs as the unprivileged pmg-smtp-filter daemon user. It cannot elevate privileges with tools like sudo, as the service runs with the systemd NoNewPrivileges hardening enabled. |
4.12. User Management
User management in Proxmox Mail Gateway consists of three types of users/accounts:
4.12.1. Local Users
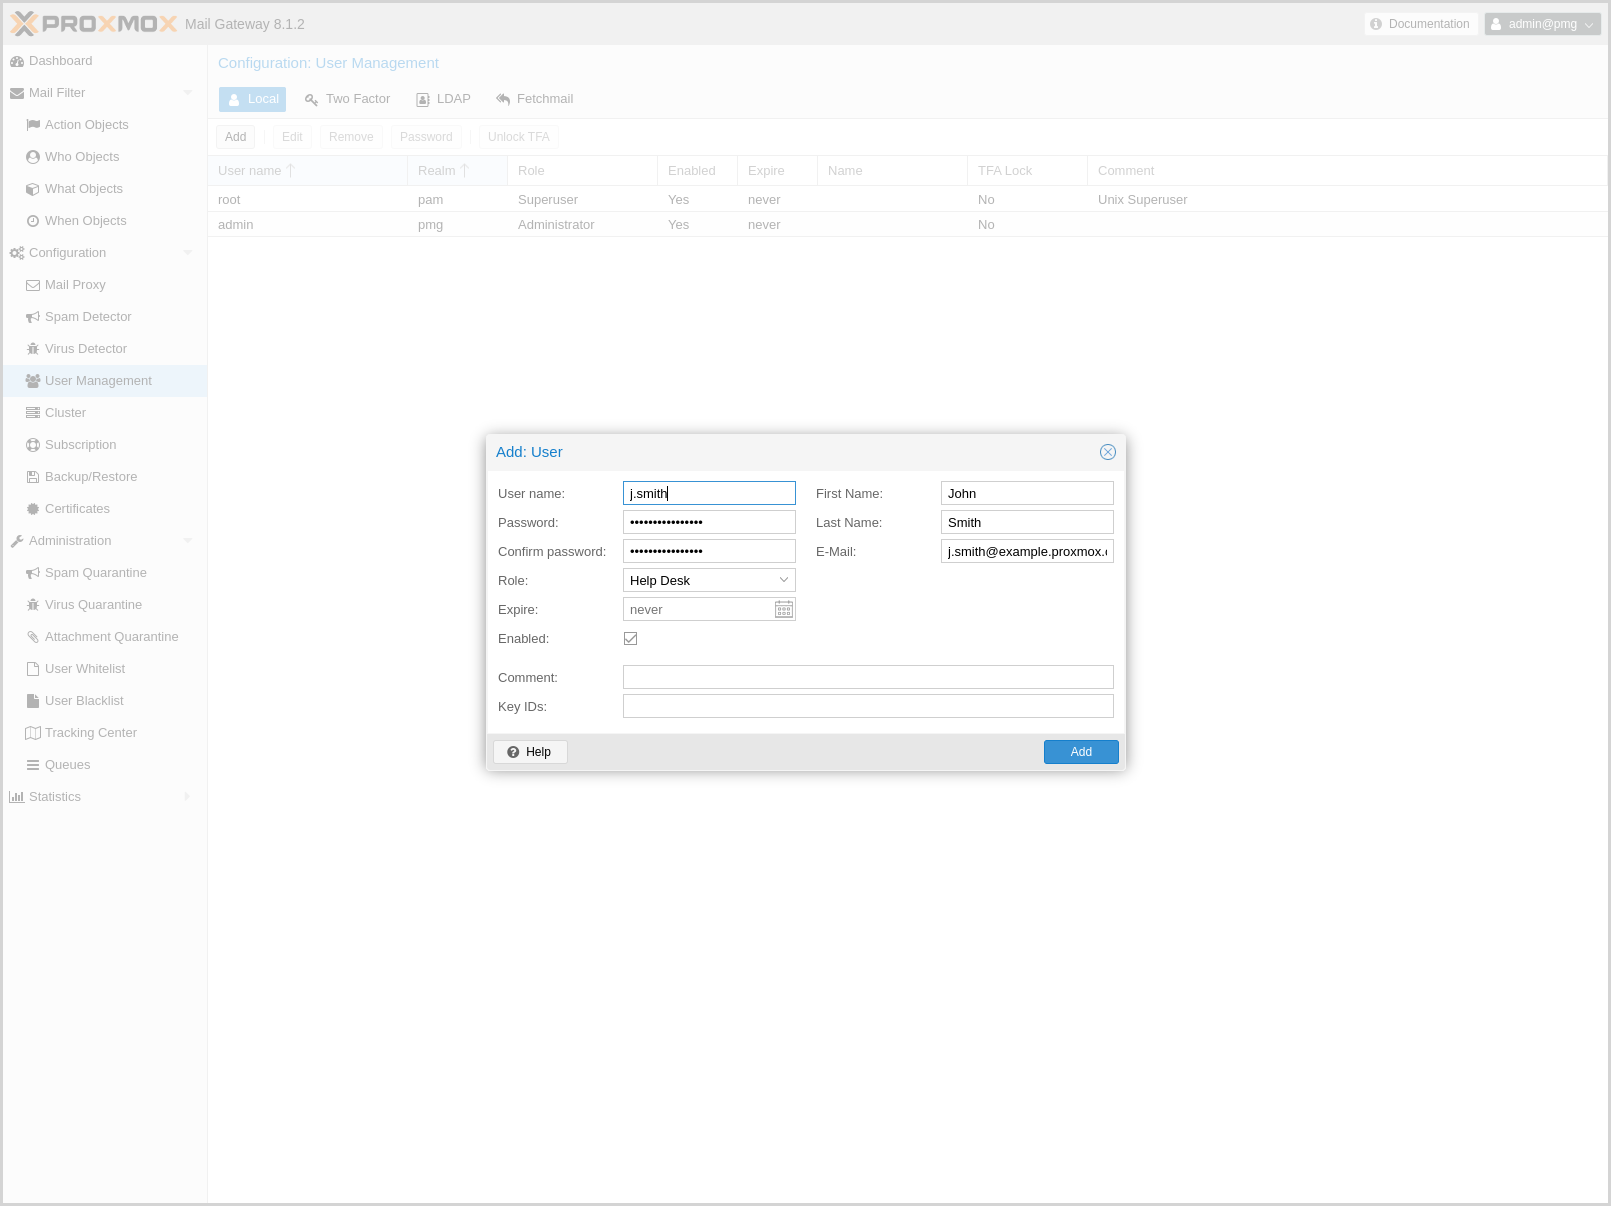
Local users can manage and audit Proxmox Mail Gateway. They can login on the management web interface.
There are four roles:
- Administrator
-
Is allowed to manage settings of Proxmox Mail Gateway, excluding some tasks like network configuration and upgrading.
- Quarantine manager
-
Is allowed to manage quarantines, blocklists and welcomelists, but not other settings. Has no right to view any other data.
- Auditor
-
With this role, the user is only allowed to view data and configuration, but not to edit it.
- Helpdesk
-
Combines permissions of the Auditor and the Quarantine Manager role.
In addition, there is always the root user, which is used to perform special system administrator tasks, such as upgrading a host or changing the network configuration.
|
|
Only PAM users are able to log in via the web interface and ssh, while the users created through the web interface are not. Those users are created for Proxmox Mail Gateway administration only. |
Local user related settings are saved in /etc/pmg/user.conf.
For details on the fields, see user.conf
4.12.2. LDAP/Active Directory
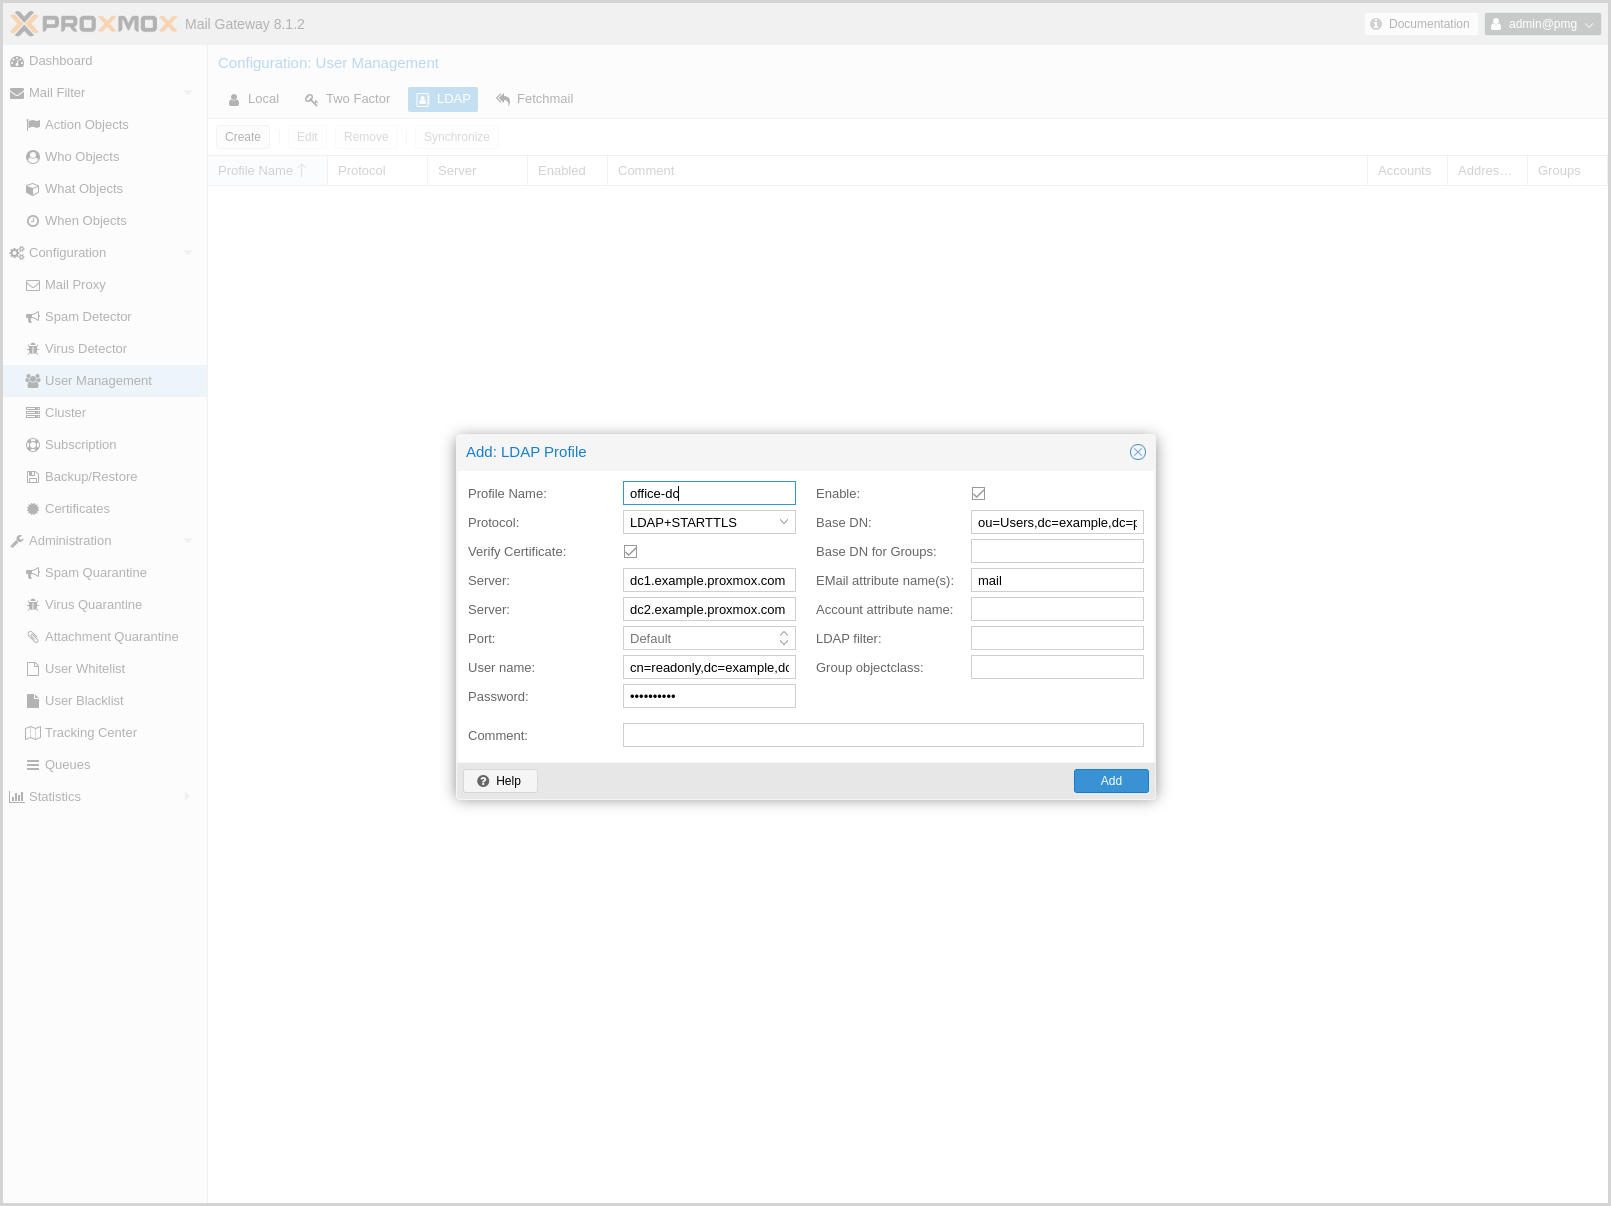
With Proxmox Mail Gateway, users can use LDAP and Active directory as authentication methods to access their individual Spam Quarantine. Additionally, if users have extra email aliases defined in the LDAP directory, they will have a single spam quarantine for all of these.
|
|
Authentication via LDAP must first be enabled using the Authentication mode (authmode) parameter in the Spam Detector’s Quarantine configuration settings. |
You can specify multiple LDAP/Active Directory profiles, so that you can create rules matching particular users and groups.
Creating a profile requires (at least) the following:
-
Profile Name: The name assigned to the LDAP profile.
-
Protocol: LDAP, LDAPS, or LDAP+STARTTLS (LDAP+STARTTLS is recommended).
-
Server: The domain name/IP address of the LDAP server. A fallback can also be configured using the second field.
-
User name: The Bind DN for authentication on the LDAP server. This is required if your server does not support anonymous binds.
-
Password: Password for the Bind DN user.
-
Base DN: The directory which users are searched under.
All other fields should work with the defaults for most setups, but can be used to customize the queries.
The settings are saved to /etc/pmg/ldap.conf. Details about the options can be found here: ldap.conf
Bind user
It is highly recommended that the user which you use for connecting to the LDAP server only has permission to query the server. For LDAP servers (for example OpenLDAP or FreeIPA), the username has to be of a format like uid=username,cn=users,cn=accounts,dc=domain, where the specific fields depend on your setup. For Active Directory servers, the format should be username@domain or domain\username.
Sync
Proxmox Mail Gateway synchronizes the relevant user and group information periodically, so that the information is quickly available, even when the LDAP/AD server is temporarily inaccessible.
You can actively trigger a synchronization with pmgconfig:
# pmgconfig ldapsync
After a successful sync, the groups and users should be visible on the web interface. Following this, you can create rules targeting LDAP users and groups.
4.12.3. Fetchmail
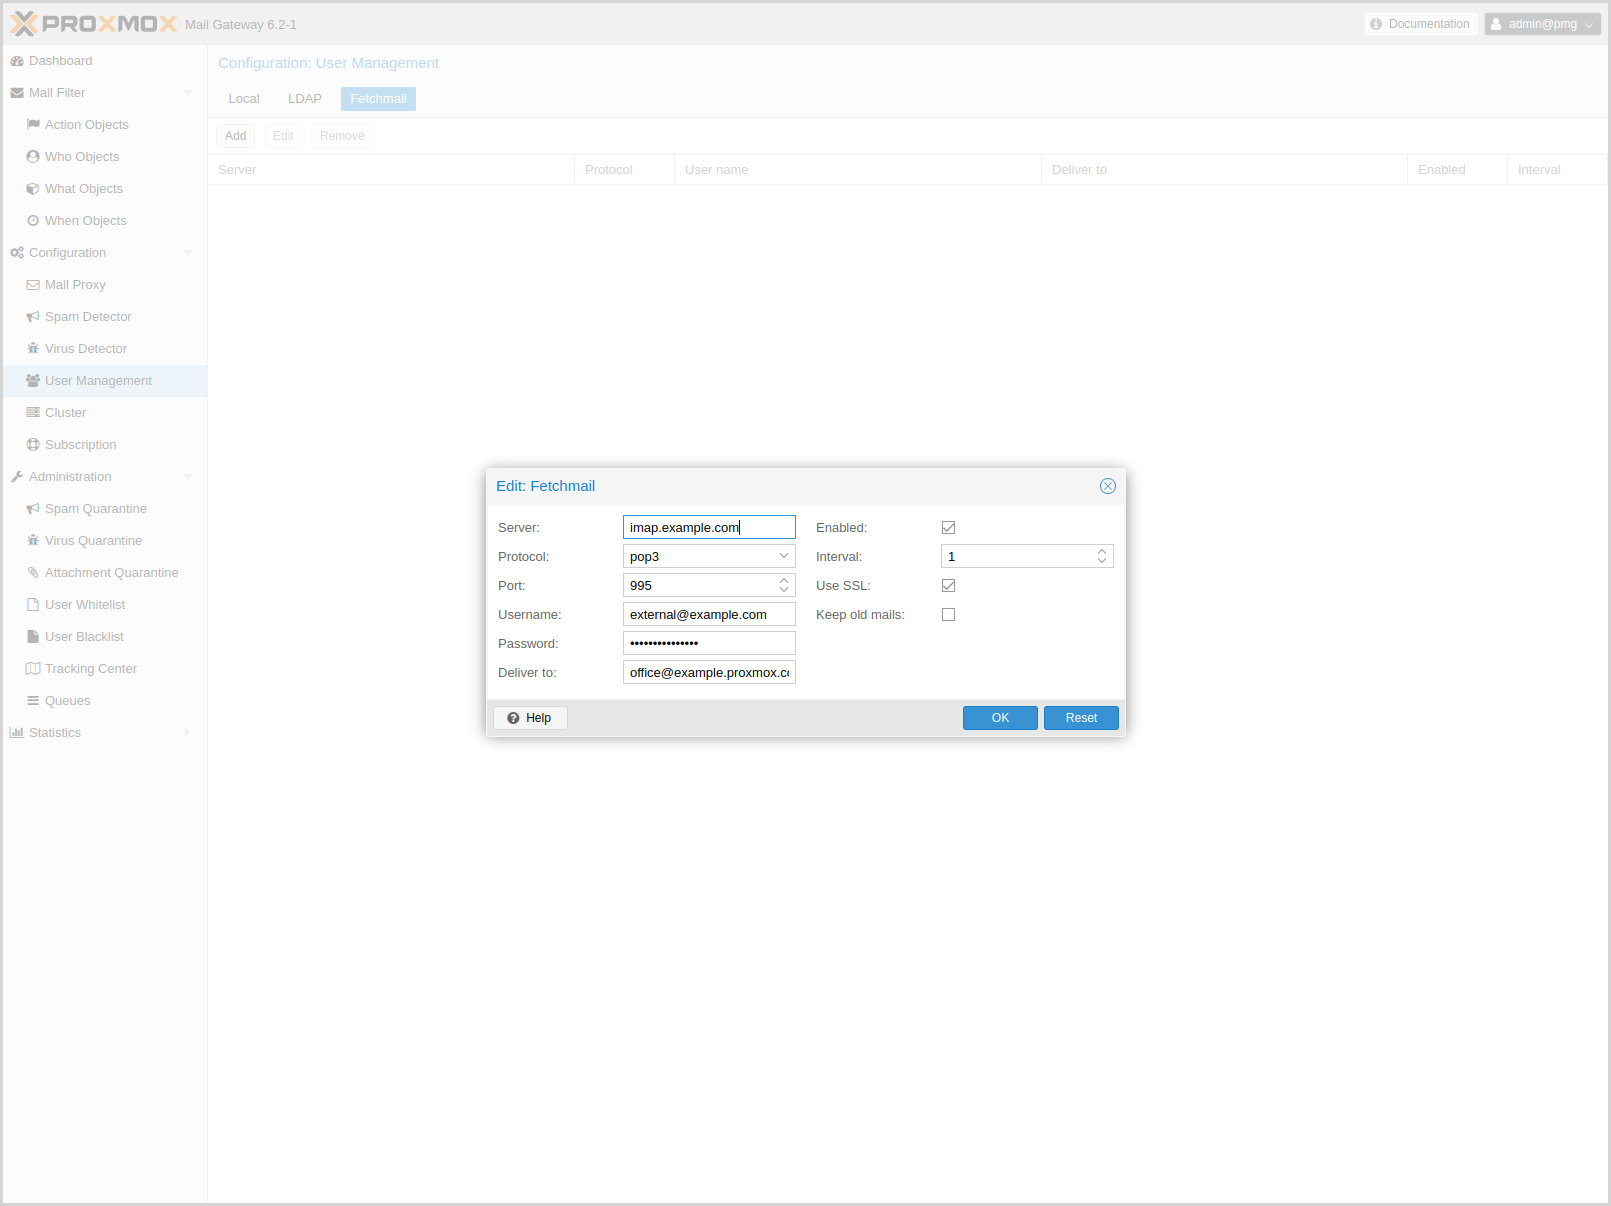
Fetchmail is a utility for polling and forwarding emails. You can define email accounts, which will then be fetched and forwarded to the email address you defined.
You have to add an entry for each account/target combination you want to fetch and forward. These will then be regularly polled and forwarded, according to your configuration.
The API and web interface offer the following configuration options:
- enable: <boolean> (default = 0)
-
Flag to enable or disable polling.
- interval: <integer> (1 - 2016)
-
Only check this site every <interval> poll cycles. A poll cycle is 5 minutes.
- keep: <boolean> (default = 0)
-
Keep retrieved messages on the remote mailserver.
- pass: <string>
-
The password used tfor server login.
- port: <integer> (1 - 65535)
-
Port number.
- protocol: <imap | pop3>
-
Specify the protocol to use when communicating with the remote mailserver
- server: <string>
-
Server address (IP or DNS name).
- ssl: <boolean> (default = 0)
-
Use SSL.
- target: (?:[^\s\\@]+\@[^\s\/\\@]+)
-
The target email address (where to deliver fetched mails).
- user: <string>
-
The user identification to be used when logging in to the server
4.13. Two-Factor Authentication
Users of the admin interface can configure two-factor authentication to increase protection of their accounts.
|
|
Joining a cluster with two-factor authentication enabled for the root user is not supported. Remove the second factor when joining the cluster. |
4.13.1. Available Second Factors
You can set up multiple second factors, in order to avoid a situation in which losing your smartphone or security key locks you out of your account permanently.
The following two-factor authentication methods are available:
-
User configured TOTP (Time-based One-Time Password). A short code derived from a shared secret and the current time, it changes every 30 seconds.
-
WebAuthn (Web Authentication). A general standard for authentication. It is implemented by various security devices, like hardware keys or trusted platform modules (TPM) from a computer or smart phone.
-
Single use Recovery Keys. A list of keys which should either be printed out and locked in a secure place or saved digitally in an electronic vault. Each key can be used only once. These are perfect for ensuring that you are not locked out, even if all of your other second factors are lost or corrupt.
4.13.2. Configuration of Two-Factor
Users can choose to enable TOTP or WebAuthn as a second factor on login, via the TFA button in the user list.
Users can always add and use one time Recovery Keys.
4.13.3. TOTP
There is no server setup required. Simply install a TOTP app on your smartphone (for example, andOTP) and use the Proxmox Backup Server web-interface to add a TOTP factor.
After opening the TOTP window, the user is presented with a dialog to set up TOTP authentication. The Secret field contains the key, which can be randomly generated via the Randomize button. An optional Issuer Name can be added to provide information to the TOTP app about what the key belongs to. Most TOTP apps will show the issuer name together with the corresponding OTP values. The username is also included in the QR code for the TOTP app.
After generating a key, a QR code will be displayed, which can be used with most OTP apps such as FreeOTP. The user then needs to verify the current user password (unless logged in as root), as well as the ability to correctly use the TOTP key, by typing the current OTP value into the Verification Code field and pressing the Apply button.
4.13.4. WebAuthn
For WebAuthn to work, you need to have two things:
-
A trusted HTTPS certificate (for example, by using Let’s Encrypt). While it probably works with an untrusted certificate, some browsers may warn or refuse WebAuthn operations if it is not trusted.
-
Setup the WebAuthn configuration (see User Management → Two Factor → WebAuthn in the Proxmox Mail Gateway web interface). This can be auto-filled in most setups.
Once you have fulfilled both of these requirements, you can add a WebAuthn configuration in the Two Factor panel under Datacenter → Permissions → Two Factor.
4.13.5. Recovery Keys
Recovery key codes do not need any preparation; you can simply create a set of recovery keys in the Two Factor panel under Datacenter → Permissions → Two Factor.
|
|
There can only be one set of single-use recovery keys per user at any time. |
4.13.6. WebAuthn Configuration
To allow users to use WebAuthn authentication, it is necessary to use a valid domain with a valid SSL certificate, otherwise some browsers may warn or refuse to authenticate altogether.
|
|
Changing the WebAuthn configuration may render all existing WebAuthn registrations unusable! |
You can configure WebAuthn directly in the Two Factor panel, there’s an auto-fill button that will set the correct values for most setups.
4.14. Authentication Realms
As Proxmox Mail Gateway users are just counterparts for users existing on some external realm, the realms have to be configured in /etc/pmg/realms.conf. The following realms (authentication methods) are available:
- Linux PAM Standard Authentication
-
Linux PAM is a framework for system-wide user authentication. These users are created on the host system with commands such as adduser.
- Proxmox Mail Gateway Authentication Server
-
This is a Unix-like password store, which stores hashed passwords directly in /etc/pmg/user.conf. Passwords are hashed using the SHA-256 hashing algorithm. This is the most convenient realm for small-scale (or even mid-scale) installations, where users do not need access to anything outside of Proxmox Mail Gateway. In this case, users are fully managed by Proxmox Mail Gateway and are able to change their own passwords via the GUI.
- OpenID Connect
-
OpenID Connect is implemented as an identity layer on top of the Oauth 2.0 protocol. It allows clients to verify the identity of the user, based on authentication performed by an external authorization server.
4.14.1. Linux PAM Standard Authentication
As Linux PAM corresponds to host system users, a system user must exist on each node which the user is allowed to log in on. The user authenticates with their usual system password. This realm is added by default and can’t be removed. In Proxmox Mail Gateway this realm is restricted to the root user.
4.14.2. Proxmox Mail Gateway Authentication Server
The Proxmox Mail Gateway authentication server realm is a simple Unix-like password store. The realm is created by default.
Unlike the other Proxmox Mail Gateway realm types, users are created and authenticated entirely through Proxmox Mail Gateway, rather than authenticating against another system. Hence, you are required to set a password for this type of user upon creation.
4.14.3. OpenID Connect
The main OpenID Connect configuration options are:
-
Issuer URL (issuer-url): This is the URL of the authorization server. Proxmox Mail Gateway uses the OpenID Connect Discovery protocol to automatically configure further details.
While it is possible to use unencrypted http:// URLs, we strongly recommend to use encrypted https:// connections.
-
Realm (realm): The realm identifier for Proxmox Mail Gateway users
-
Client ID (client-id): OpenID Client ID.
-
Client Key (client-key): Optional OpenID Client Key.
-
Autocreate Users (autocreate): Automatically create users if they do not exist. While authentication is done at the OpenID server, all users still need an entry in the Proxmox Mail Gateway user configuration. You can either add them manually, or use the autocreate option to automatically add new users.
-
Autocreate Users with Assigned Role (autocreate-role-assignment): By default, all autocreated users will be assigned the Audit role. You can either assign a fixed role to all autocreated users (for example, source=fixed,fixed-role=helpdesk), or set a custom claim that is used to assign users to different roles (for example, source=from-claim,role-claim=custom_role_claim).
-
Username Claim (username-claim): OpenID claim used to generate the unique username (sub or preferred_username).
Username mapping
The OpenID Connect specification defines a single unique attribute (claim in OpenID terms) named sub (Subject). By default, we use the value of this attribute to generate Proxmox Mail Gateway usernames, by simply adding @ and the realm name: ${subject}@${realm}.
Unfortunately, most OpenID servers use random strings for sub (Subject), like DGH76OKH34BNG3245SB, so a typical username would look like DGH76OKH34BNG3245SB@yourrealm. While unique, it is difficult for humans to remember such random strings, making it quite impossible to associate real users with this.
The username-claim setting allows you to use other attributes for the username mapping. Setting it to preferred_username is preferred if the OpenID Connect server provides that attribute and guarantees its uniqueness.
As Proxmox Mail Gateway currently forbids @ in usernames the option to use email is not possible.
Examples
Here is an example of creating an OpenID realm using Google. You need to replace --client-id and --client-key with the values from your Google OpenID settings.
pmgsh create /access/auth-realm --realm myrealm1 --type oidc --issuer-url https://accounts.google.com --client-id XXXX --client-key YYYY --username-claim username
The above command uses --username-claim username, so that the usernames on the Proxmox Mail Gateway side look like example.user@myrealm1.
Keycloak (https://www.keycloak.org/) is a popular open source Identity and Access Management tool, which supports OpenID Connect. In the following example, you need to replace the --issuer-url and --client-id with your information:
pmgsh create /access/auth-realm --realm myrealm2 --type oidc --issuer-url https://your.server:8080/realms/your-realm --client-id XXX --username-claim username
|
|
You need to ensure that the user is not allowed to edit the username setting themselves (on the Keycloak server). |
5. Rule-Based Mail Filter
Proxmox Mail Gateway ships with a highly configurable mail filter. This provides an easy but powerful way to define filter rules by user, domain, time frame, content type, and resulting action.
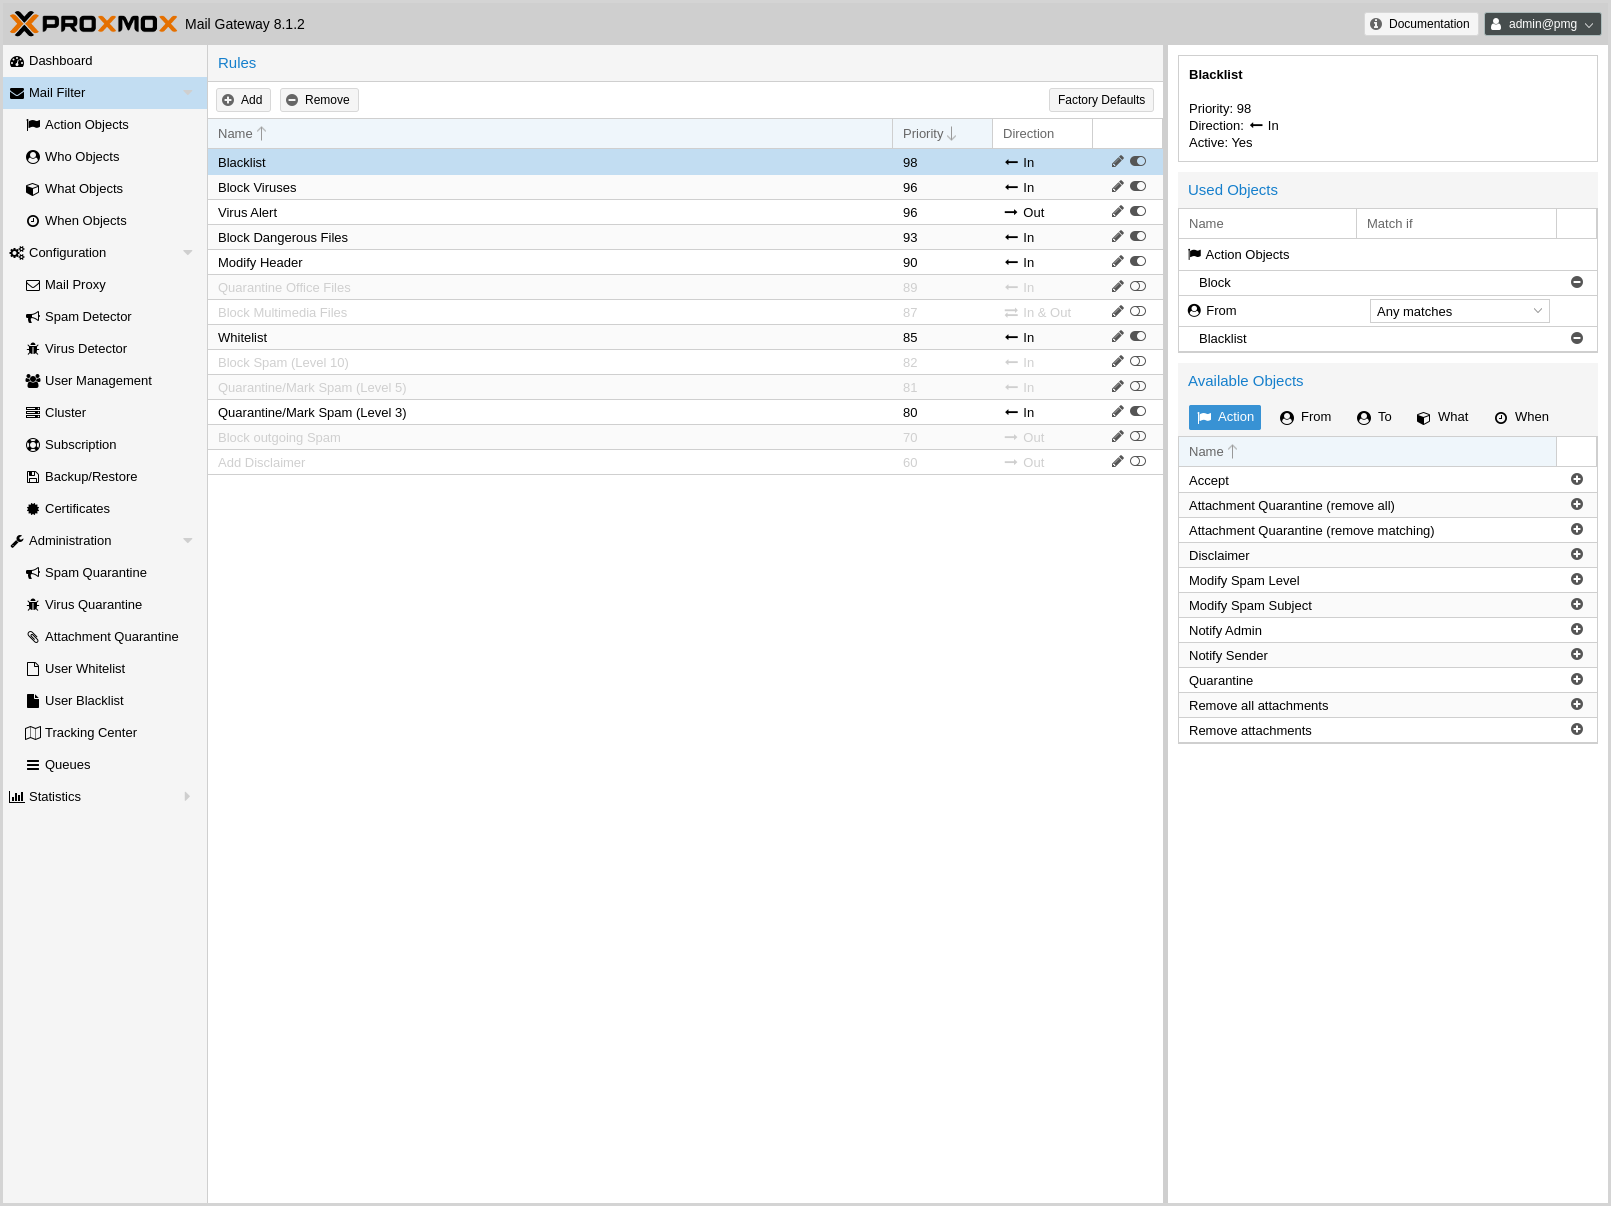
Every rule has 5 categories (FROM, TO, WHEN, WHAT, and ACTION), and each category may contain several objects to match certain criteria:
- Who - objects
-
Who is the sender or recipient of the email? Those objects can be used for the TO and/or FROM category.
Example: EMail-object - Who is the sender or recipient of the email?
- What - objects
-
What is in the email?
Example: Does the email contain spam?
- When - objects
-
When is the email received by Proxmox Mail Gateway?
Example: Office Hours - Mail is received between 8:00 and 16:00.
- Action - objects
-
Defines the final actions.
Example: Mark email with “SPAM:” in the subject.
Rules are ordered by priority, so rules with higher priority are executed first. It is also possible to set a processing direction:
- In
-
Rule applies to all incoming emails
- Out
-
Rule applies to all outgoing emails
- In & Out
-
Rule applies to both directions
You can also disable a rule completely, which is mostly useful for testing and debugging. The Factory Defaults button allows you to reset the filter rules.
5.1. Application of Rules
When there is more than one object category or multiple objects configured within a single rule, the following logic is used to determine if the rule should be applied by default:
-
Within one category (WHAT/FROM/TO/WHEN), all objects are logical-or linked, meaning that only one object of any one object group from the same category has to match for the whole category to match.
-
FROM/TO/WHAT/WHEN category match results are logical-and linked, so all categories that have at least one object in them must match for the rule to match.
When these conditions are met, all configured actions are executed.
Alternatively, one can configure the mode to any (the default) or all and set invert (default off) per object group and per object category for each rule.
When the mode is all for a group, all objects within must match for the object group to count as a match. This can be helpful when one wants to match multiple conditions at the same time (e.g. file content-type and filename).
When all is set for a category of a rule, all object groups for that type must match for the type to match.
When invert is active on a group, the original result of the group will simply be inverted, so a match becomes a non-match and vice versa.
The same is true for the object group types for rules.
Special handling is done for WHAT matches that mark mail parts (e.g. filename) since that is not a simple yes/no match for the complete mail, but could be a match for each part of the e-mail (e.g. attachments, or parts of a multi-part e-mail).
So for WHAT match object groups, the mode and invert is applied to the single parts of the e-mail, not the message as a whole.
This means one has to be very careful with the invert option, as previously not matching parts, will match when using invert (e.g. an inverted filename matching will also mark non attachment parts of the mail).
On the rule level, these marks of the parts will always be logical-or linked, this way even more scenarios can be represented.
To make it a bit easier to understand, the options are combined to a single selection in the web ui:
-
Any must match ⇒ mode: any, invert: off
-
All must match ⇒ mode: all, invert: off
-
At least one must not match ⇒ mode: all, invert: on
-
None must match ⇒ mode: any, invert: on
5.2. Action - objects
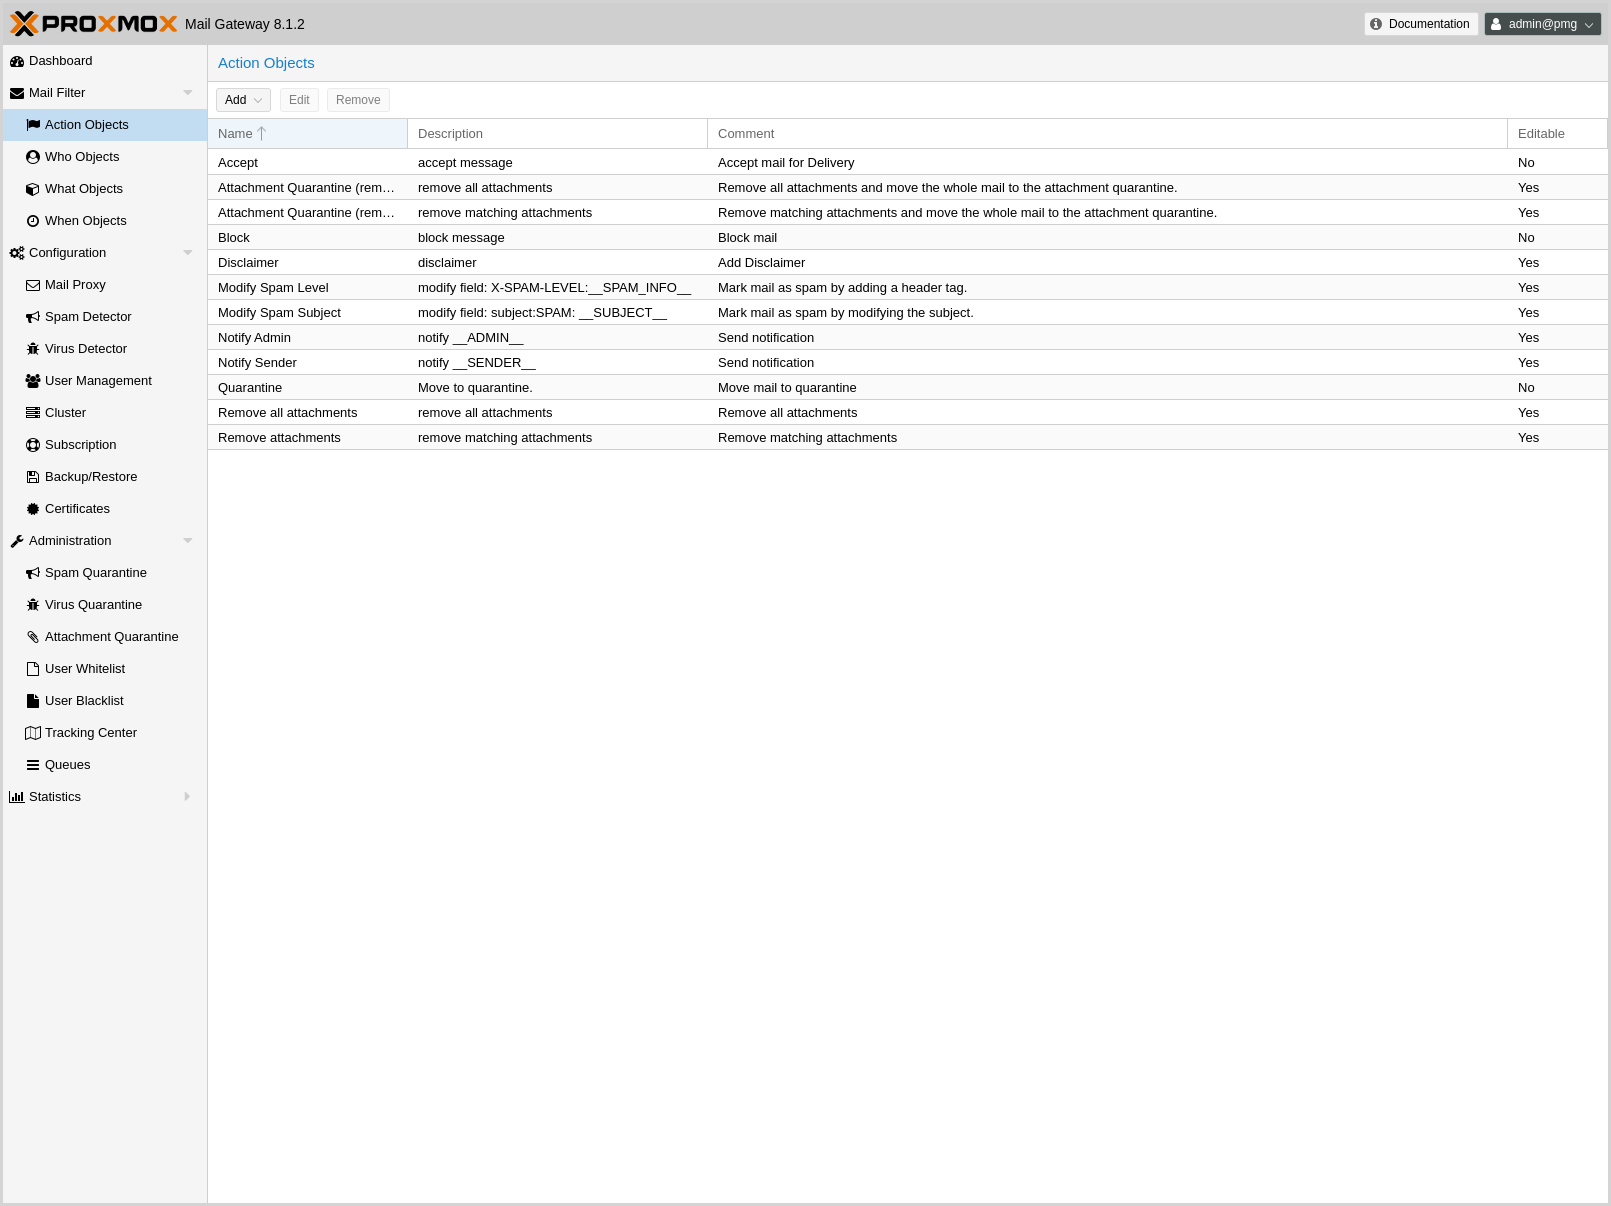
Please note that some actions stop further rule processing. We call such actions final.
5.2.3. Quarantine
Move to quarantine (virus mails are moved to the “virus quarantine”; other mails are moved to “spam quarantine”). This is also a final action.
5.2.4. Notification
Send notifications. Please note that object configuration can use macros, so it is easy to include additional information. For example, the default Notify Admin object sends the following information:
Proxmox Notification:
Sender:   __SENDER__
Receiver: __RECEIVERS__
Targets:  __TARGETS__
Subject: __SUBJECT__
Matching Rule: __RULE__

__RULE_INFO__

__VIRUS_INFO__
__SPAM_INFO__
Notification can also include a copy of the original mail.
5.2.5. Blind Carbon Copy (BCC)
The BCC object simply sends a copy to another target. It is possible to send the original unmodified mail, or the processed result. Please note that this can be quite different, for instance, when a previous rule removed attachments.
5.2.6. Header Attributes
This object is able to add or modify mail header attributes. As with Notifications above, you can use macros, making this a very powerful object. For example, the Modify Spam Level actions add detailed information about detected Spam characteristics to the X-SPAM-LEVEL header.
Field: X-SPAM-LEVEL
Value: __SPAM_INFO__
Another prominent example is the Modify Spam Subject action. This simply adds the SPAM: prefix to the original mail subject:
Field: subject
Value: SPAM: __SUBJECT__
5.2.7. Remove attachments
Remove attachments can either remove all attachments, or only those matched by the rule’s What - object. You can also specify the replacement text, if you want.
You can optionally move these mails into the attachment quarantine, where the original mail with all attachments will be stored. The mail with the attachments removed will continue through the rule system.
|
|
The Attachment Quarantine lifetime is the same as for the Spam Quarantine. |
5.2.8. Disclaimer
Add a Disclaimer.
The disclaimer can contain HTML markup. It will be added to the first text/html and text/plain part of an email. A disclaimer only gets added if its text can be encoded in the mail’s character encoding.
By default it will be appended at the end of the selected part of the mail with -- as a separator. The position (start or end of the selected part) and the existence of the separator can be configured with the position and add-separator options respectively.
5.3. Who objects
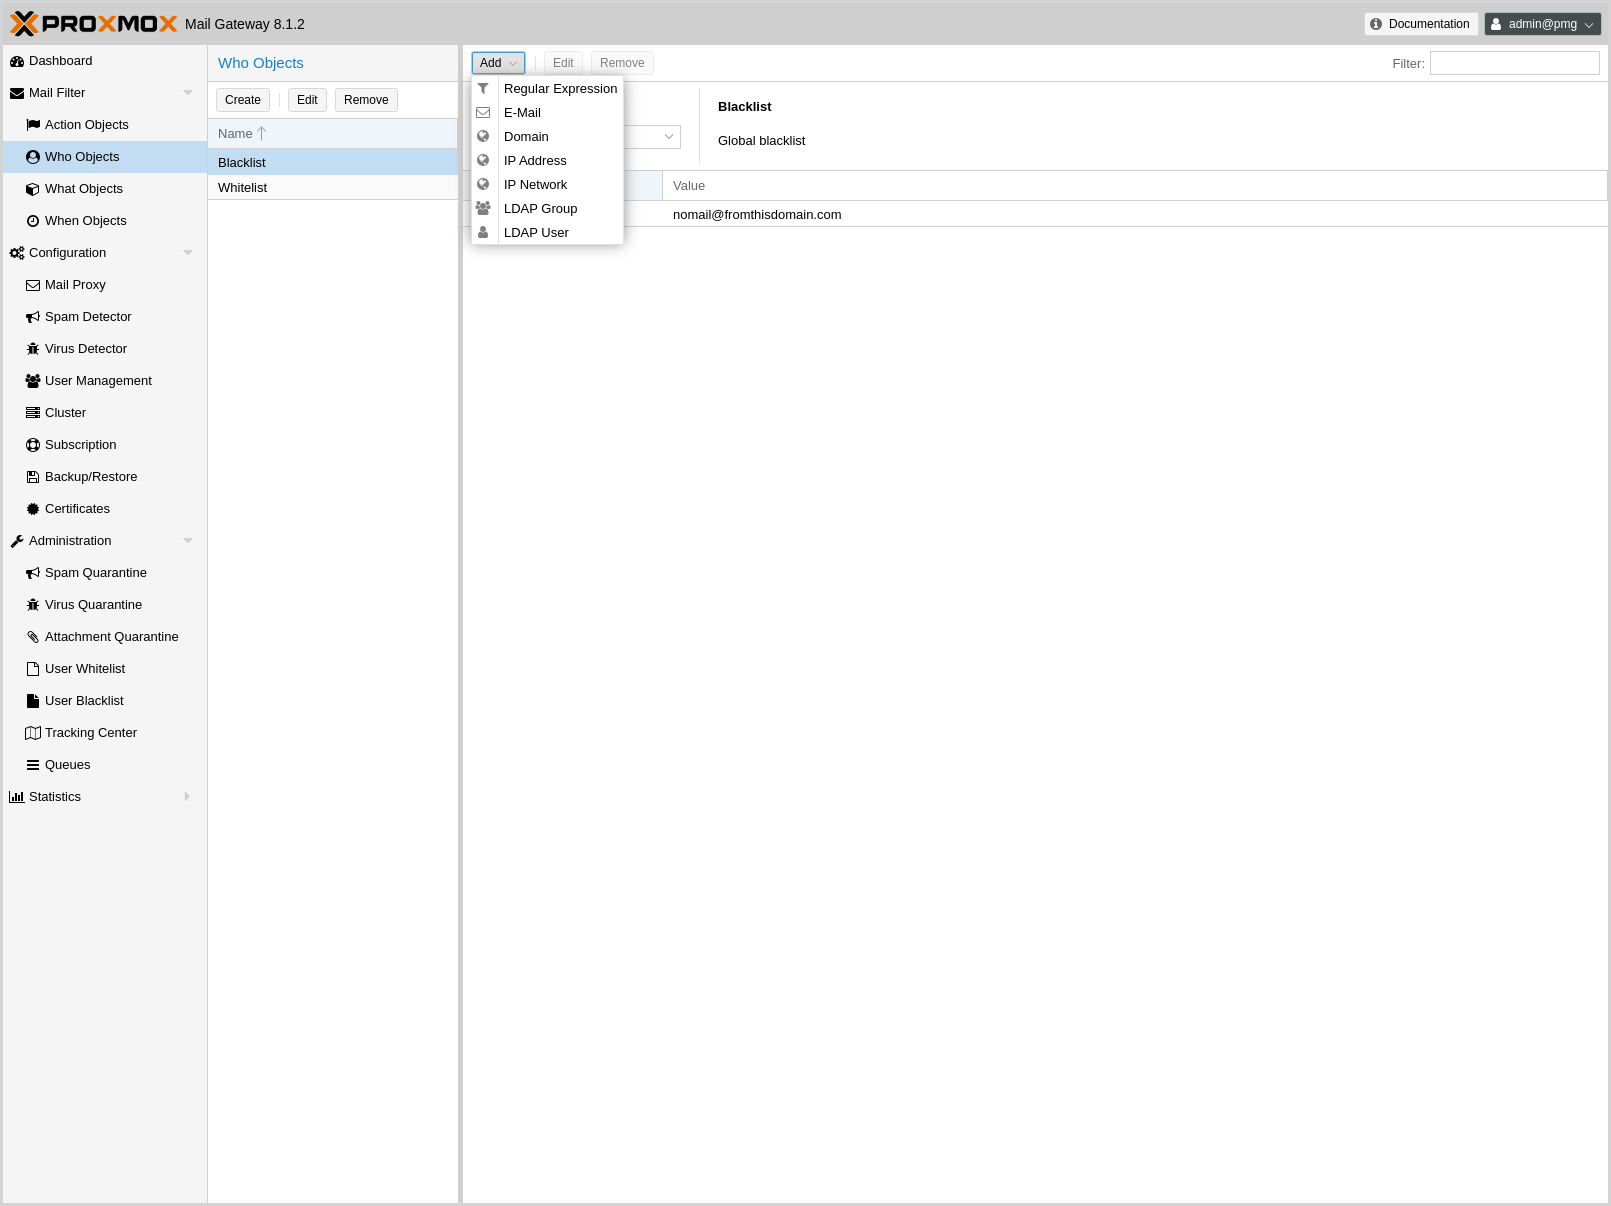
These types of objects can be used for the TO and/or FROM category, and match the sender or recipient of the email. A single object can combine multiple items, and the following item types are available:
-
Allows you to match a single mail address.
- Domain
-
Only match the domain part of the mail address.
- Regular Expression
-
This one uses a regular expression to match the whole mail address.
- IP Address or Network
-
This can be used to match the senders IP address.
- LDAP User or Group
-
Test if the mail address belongs to a specific LDAP user or group.
We have two important Who objects called Blocklist and Welcomelist. These are used in the default ruleset to globally block or allow specific senders.
Note that Who objects match against the mail addresses given during the SMTP dialog:
-
Who objects in the FROM category match against the sender’s mail address given in the MAIL command (the Envelope From).
-
Who objects in the TO category match against the recipient’s mail address given in the RCPT command (the Envelope To).
These addresses are also visible in the logs and the Tracking Center.
If you want to match against the From: or To: header fields of the mail, use a What object with type Match Field instead.
5.4. What objects
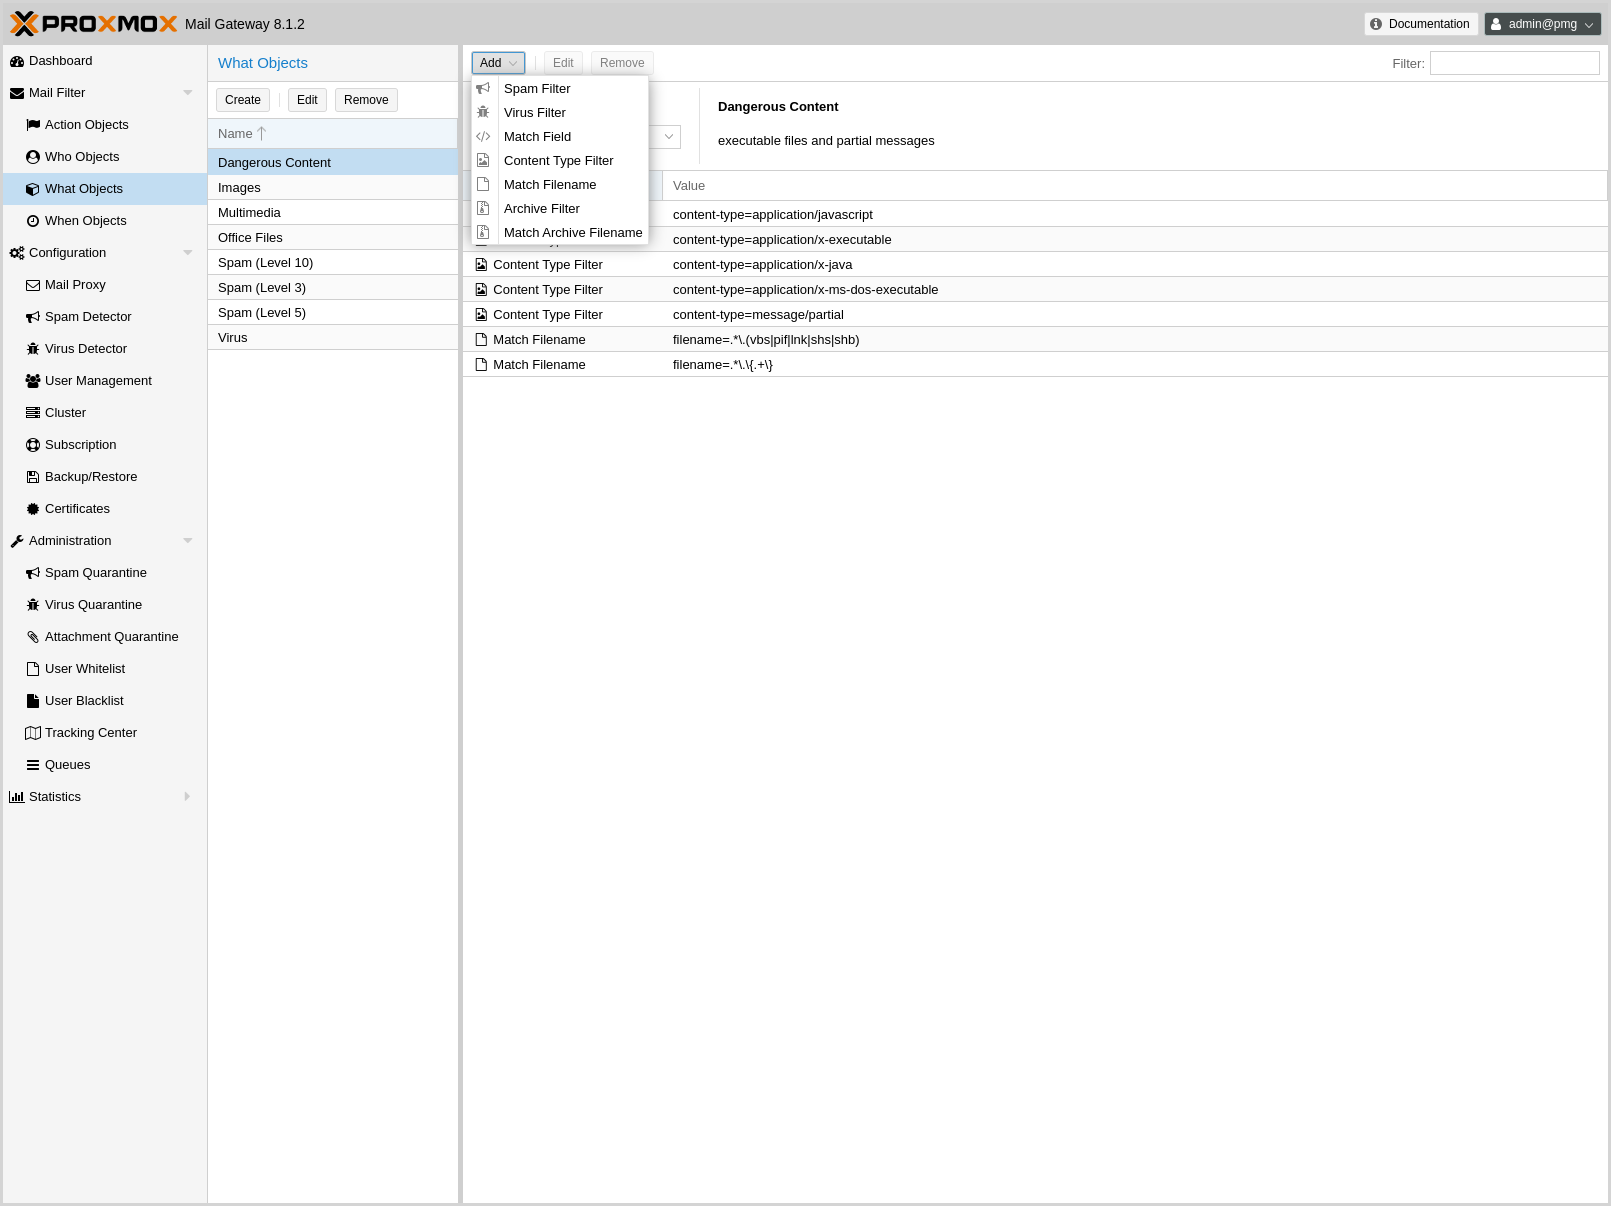
What objects are used to classify the mail’s content. A single object can combine multiple items, and the following item types are available:
- Spam Filter
-
Matches if the detected spam level is greater than or equal to the configured value.
- Virus Filter
-
Matches on infected mails.
- Match Field
-
Match specified mail header fields (for example, Subject:, From:, …). Header fields of all mail-parts are taken into account by default, including the headers of any attached mails, or the meta-information provided for attachments. This can be restricted to only consider the headers of the top part of the mail.
- Content Type Filter
-
Can be used to match specific content types. By default the content type information is taken from all available sources: The type determined by looking at the content (file magic) of the file, the provided Content-Type: header of the attachment mail part, the type determined by looking at the suffix of the suggested filename. Optionally this matching can be restricted to consider the file contents.
- Match Filename
-
Uses regular expressions to match attachment filenames.
- Archive Filter
-
Can be used to match specific content types inside archives. This also matches the content-types of all regular (non-archived) attachments.
- Match Archive Filename
-
Uses regular expressions to match attachment filenames inside archives. This also matches the filenames for all regular (non-archived) attachments.
5.5. When objects
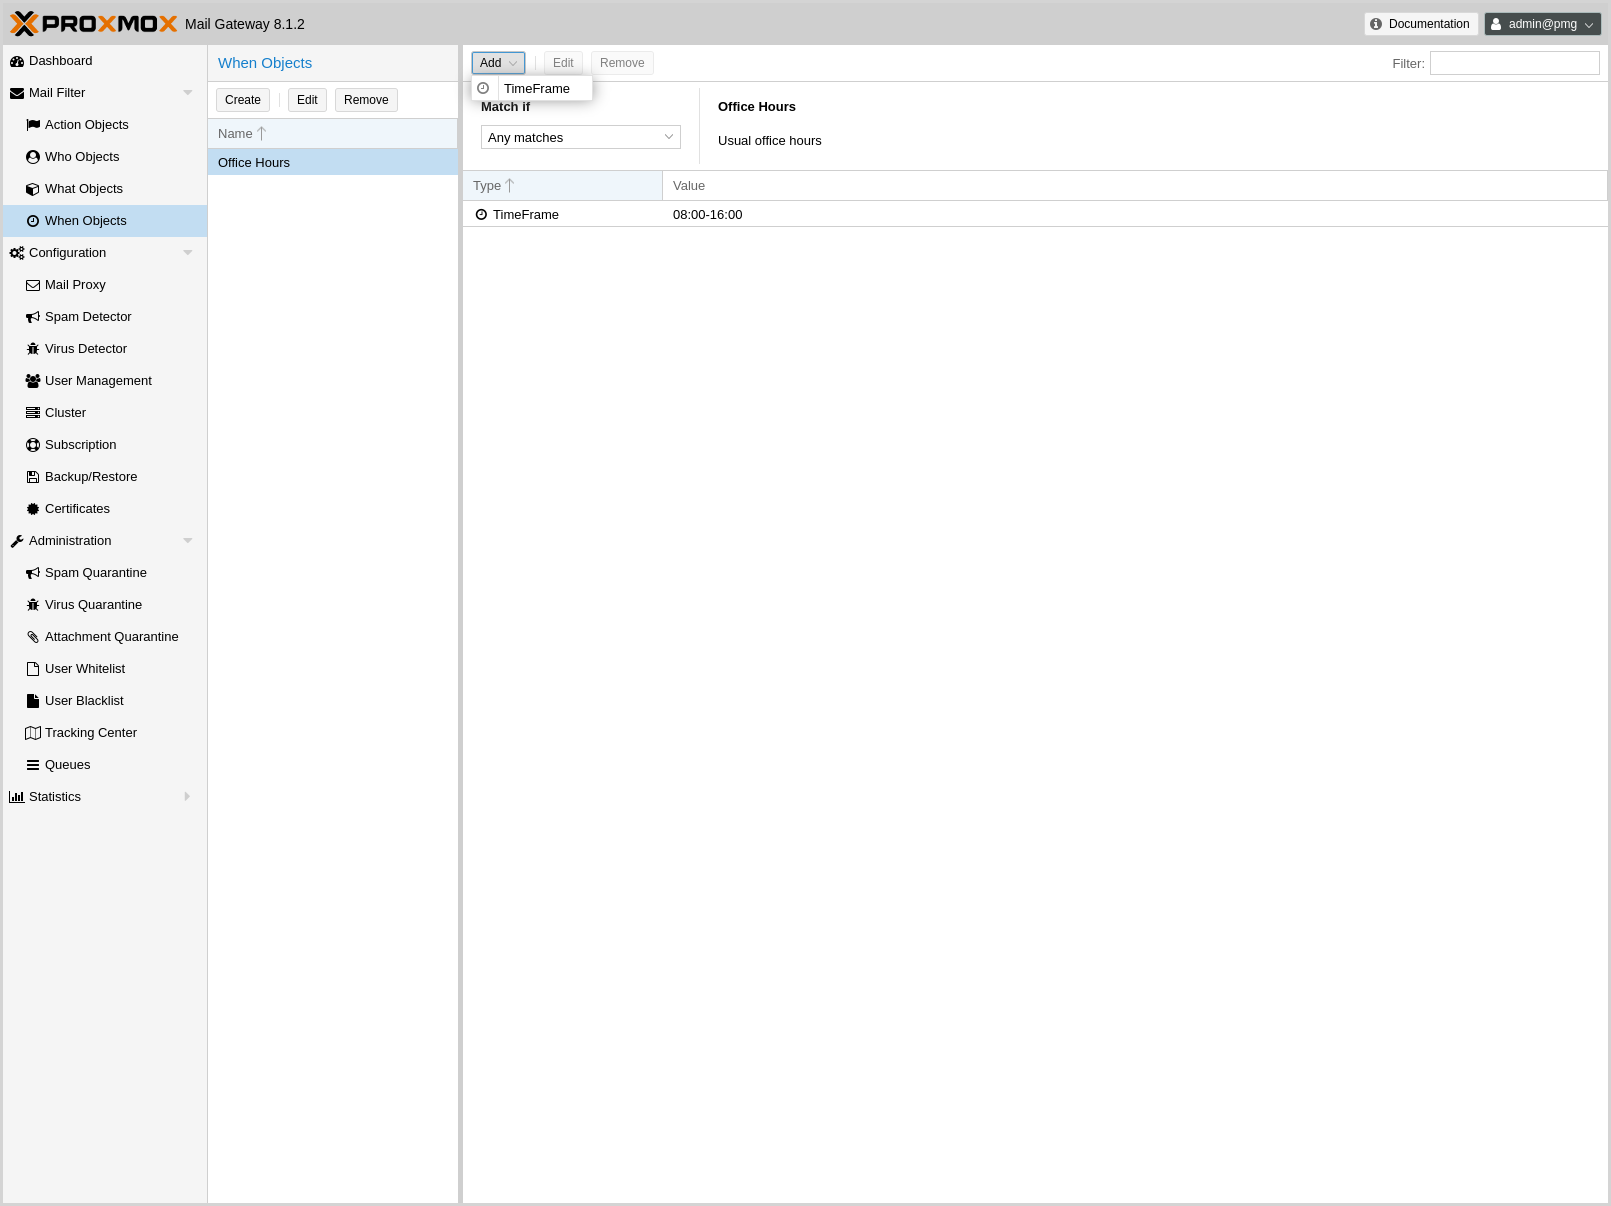
When objects are used to activate rules at specific times of the day. You can compose them from one or more time frame items.
The default ruleset defines Office Hours, but this is not used by the default rules.
5.6. Using regular expressions
A regular expression is a string of characters which represents a list of text patterns which you would like to match. The following is a short introduction to the syntax of regular expressions used by some objects. If you are familiar with Perl, you will already know the syntax.
5.6.1. Simple regular expressions
In its simplest form, a regular expression is just a word or phrase to search for. Mail would match the string "Mail". The search is case sensitive so "MAIL", "Mail", "mail" would not be matched.
5.6.2. Metacharacters
Some characters have a special meaning. These characters are called metacharacters. The Period (.) is a commonly used metacharacter. It matches exactly one character, regardless of what the character is. e.mail would match either "e-mail" or "e2mail" but not "e-some-mail" or "email".
The question mark (?) indicates that the character immediately preceding it shows up either zero or one time. e?mail would match either "email" or "mail" but not "e-mail".
Another metacharacter is the asterisk (*). This indicates that the character immediately preceding it may be repeated any number of times, including zero. e*mail would match "email", "mail", and "eeemail".
The plus (+) metacharacter indicates that the character immediately preceding it appears one or more times. So e+mail does not match "mail".
Metacharacters can also be combined. A common combination includes the period and asterisk metacharacters (.*), with the asterisk immediately following the period. This is used to match an arbitrary string of any length, including the null string. For example: .*company.* matches "company@domain.com" or "company@domain.co.uk" or "department.company@domain.com".
The book [Friedl97] provides a more comprehensive introduction.
6. Administration
The Administration GUI allows you to carry out common tasks such as updating software packages, managing quarantines, viewing the status of services, and managing mail queues. It also provides server statistics, in order to verify server health.
6.1. Dashboard
The Dashboard is the landing page of the web interface. It provides a quick overview of the system: recent mail volume and processing statistics, the subscription status, node resource usage, the top receivers and top senders by mail volume, and the average resource usage across all cluster nodes.
6.2. Server Administration
6.2.1. Status
This page shows statistics about server CPU, memory, disk and network usage. You can select the displayed time span from the upper right.
Administrators can open a terminal window using the Console button. It is also possible to trigger a server Restart or Shutdown.
6.2.2. Services

This panel lists all the major services used for mail processing and cluster synchronization. If necessary, you can start, stop or restart them. The Syslog button shows the system log, filtered for the selected service.
Please note that Proxmox Mail Gateway uses systemd to manage services, so you can also use the standard systemctl command-line tool to manage or view service status, for example:
systemctl status postfix
6.2.3. Updates
We release software updates on a regular basis, and it is recommended to always run the latest available version. This page shows the available updates, and administrators can run an upgrade by pressing the Upgrade button.
See section Package Repositories for details about the available package repositories.
6.2.4. Syslog and Tasks
The Syslog page gives you a quick real-time log view. You can use the Tracking Center to search the logs.
The Tasks page provides a history of the administration tasks that you carried out on the server, such as upgrading the system. Each task entry provides status information about the task, as well as the output.
6.3. Quarantine
6.3.1. Spam
This panel lets you inspect the mail quarantine. Emails can be safely previewed and if desired, delivered to the original user.
The email preview on the web interface is very secure, as malicious code (attacking your operating system or email client) is removed by Proxmox Mail Gateway.
How externally hosted images are handled in the preview is configurable. With the on-demand image mode, the preview shows only embedded images and offers a Load Images button to fetch external ones on request, so that opening a mail does not signal back to the sender that it was read. See the quarantine configuration for the image and hyperlink viewing modes.
A mail can also be marked as seen without delivering or deleting it. This is useful for shared mailboxes, where it lets reviewers keep track of which quarantined mails were already handled.
The Score column shows the total spam score of each mail together with the sums of its positive and negative test scores. This helps to judge borderline mails, where a few strong negative scores can mask many positive test hits.
Users can access their personalized quarantine via the daily spam report or by navigating to the URL configured for the quarantine (defaults to https://<pmg-host>:8006/quarantine) and logging in with their LDAP credentials (email address and password).
You can additionally enable user self-service for sending an access link from the Quarantine Login page. To enable this on the Quarantine Login page, edit /etc/pmg/pmg.conf. See section Spam Detector Configuration - Quarantine for more details about the available settings.
6.4. Tracking Center
Email processing is a complex task and involves several service daemons. Each daemon logs information to the syslog service. The problem is that a server analyzes many emails in parallel, so it is usually very hard to find all logs corresponding to a specific mail.
The Tracking Center simplifies the search for
emails dramatically. We use highly optimized and safe Rust
[A language
empowering everyone to build reliable and efficient software.
https://www.rust-lang.org/]
code to search the available syslog data. This is
very fast and powerful, and works for sites processing several million emails
per day.
The result is a list of received mails, including the following data:
Time |
Timestamp of first syslog entry found |
From |
Envelope From address (the sender) |
To |
The email receiver address |
Status |
Delivery status |
Syslog |
The corresponding syslog entries are shown if you double click such an entry or if you press the + button on the left |
To narrow the search down further, you can specify filters and set a Start and End time. By default, the start time is set to the last hour. If you still get too many entries, you can try to restrict the search to a specific sender or receiver address, or search for a specific text string in the logs (Filter entry).
|
|
Search is faster if you use a shorter time interval. |
A search returns at most 2000 entries by default. For queries over large time ranges, the Result Limit field can raise that cap, up to 100000 entries.
The Status field summarizes what happened with an email. Proxmox Mail Gateway is a mail proxy, meaning that the proxy receives mails from outside, processes them and finally sends the result to the receiver.
The first phase is receiving the mail. The proxy may reject the mail early or accept the mail and feed it into the filter. The filter rules can then block or accept the mail.
In the second phase, accepted mails need to be delivered to the receiver. This action may also fail or succeed. Status combines the results from the first and second phase.
| Status | Phase | Description |
|---|---|---|
rejected |
1 |
Email rejected (for example, the sender IP is listed on an IP blocklist) |
greylisted |
1 |
Email temporarily rejected by greylisting |
queued/deferred |
1 |
Internal email was queued, still trying to deliver |
queued/bounced |
1 |
Internal email was queued but not accepted by the target email server (for example, user unknown) |
queued/delivered |
1 |
Internal email was queued and delivered |
quarantine |
1 |
Email was moved to quarantine |
blocked |
1 |
Email was blocked by filter rules |
accepted/deferred |
2 |
Email accepted, still trying to deliver |
accepted/bounced |
2 |
Email accepted, but not accepted by the target email server (for example, user unknown) |
accepted/delivered |
2 |
Email accepted and delivered |
6.5. Postfix Queue Administration
Mail-queues are one of the central concepts of the SMTP protocol. Once a mail server accepts a mail for further processing it saves it to a queue. After the mail is either relayed to another system, stored locally or discarded, it is deleted from the local mail-queue.
If immediate processing is not possible, for example because a downstream mail server is not reachable, the mail remains on the queue for later processing.
The Queue Administration panel provides a summary about the current state of the postfix mail-queue, similar to the qshape (1) command-line utility. It shows domains for which mails were not delivered, and how long they have been queued.
The three Action Buttons on top provide the most common queue operations:
- Flush Queue
-
Attempt to deliver all currently queued mail, for example if a downstream server has become available again.
- Delete All Messages
-
Delete all currently queued mail, for example if the queue contains only spam.
- Discard address verification database
-
Clear the recipient verification cache.
A sudden increase in queued mails should be closely inspected. This increase can indicate issues connecting to downstream servers or that one of the servers for which you relay emails sends spam itself.
6.5.1. Deferred Mail
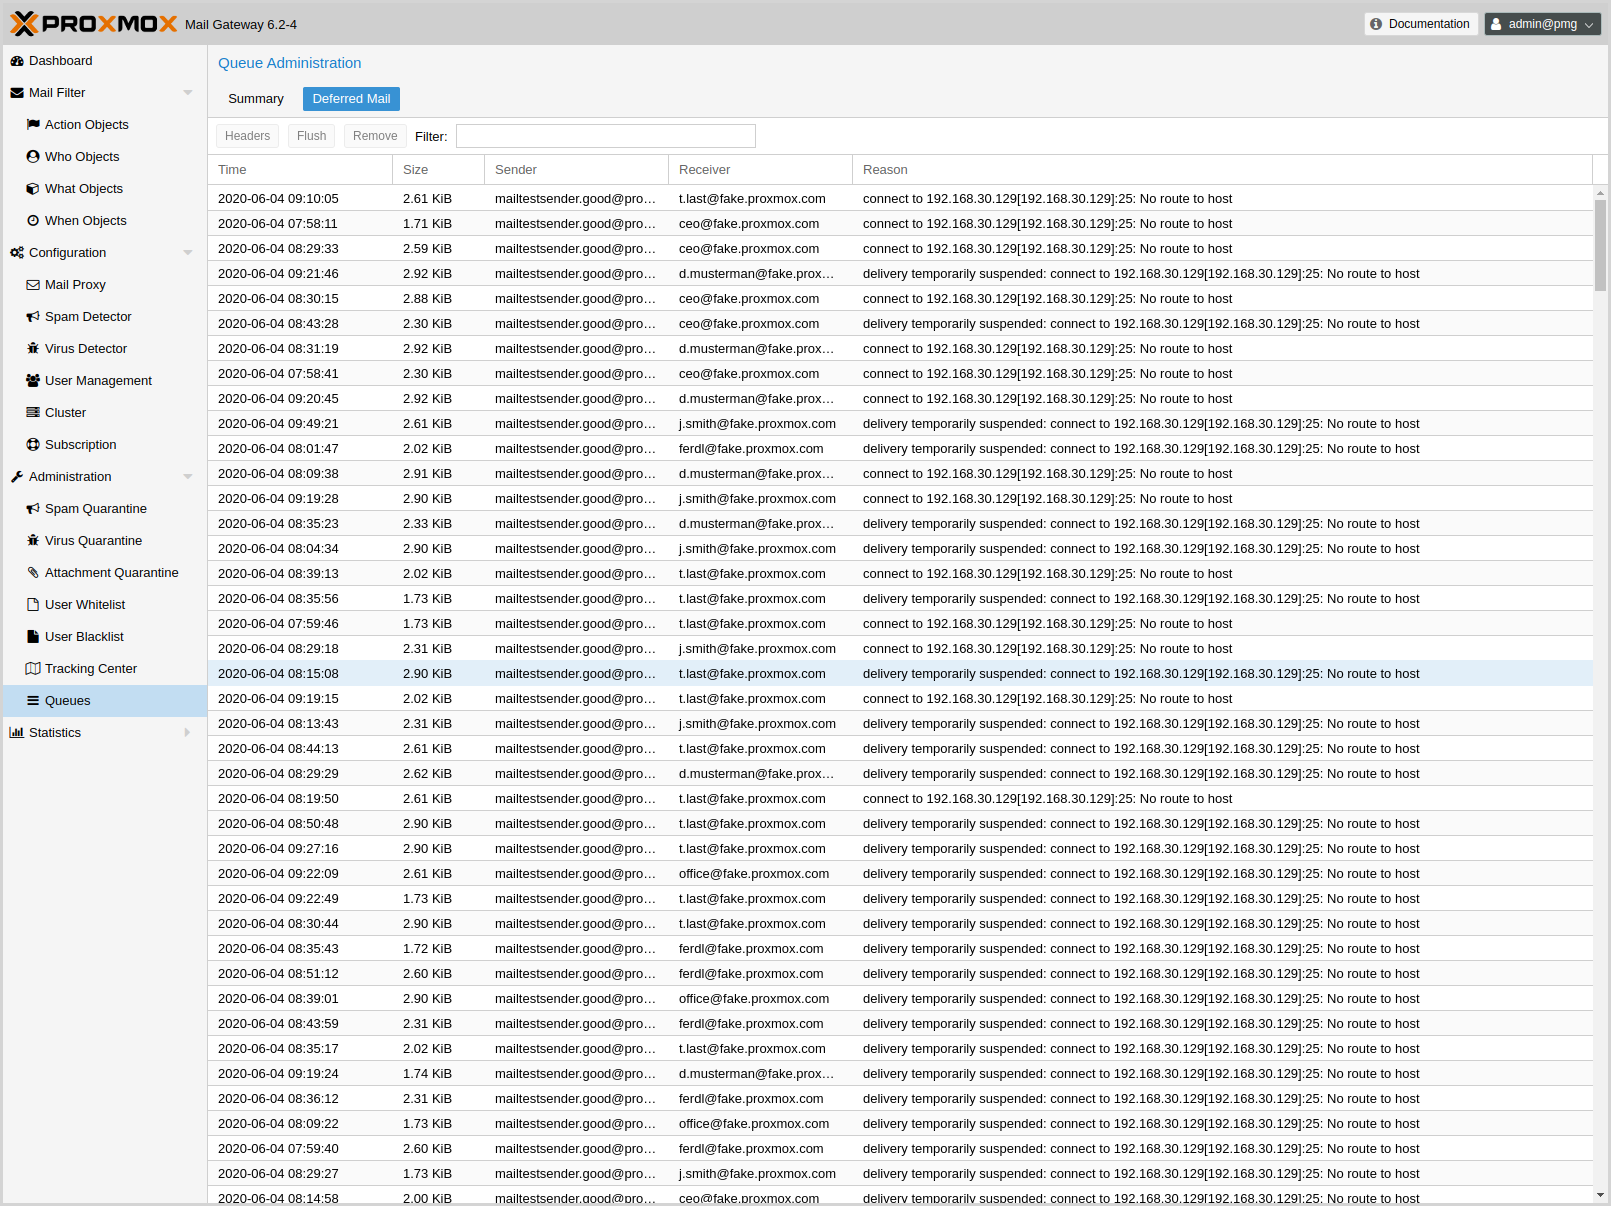
In the Deferred Mail tab, you can examine each deferred email separately. In addition to providing contact information about the sender and receiver, you can also check the reason for which an email remains queued.
You can view the complete headers and filter by sender or receiver of queued emails.
Here, you can also flush or delete each deferred email independently.
6.6. Firmware Updates
Firmware updates from this chapter should be applied when running Proxmox Mail Gateway or Debian on a bare-metal server. Whether configuring firmware updates is appropriate within a virtualized environment, e.g. when using device pass-through, depends strongly on your setup and is therefore out of scope.
In addition to regular software updates, firmware updates are also important for reliable and secure operation.
When obtaining and applying firmware updates, a combination of available options is recommended to get them as early as possible or at all.
The term firmware is usually divided linguistically into microcode (for CPUs) and firmware (for other devices).
6.6.1. Persistent Firmware
This section is suitable for all devices. Updated microcode, which is usually included in a BIOS/UEFI update, is stored on the motherboard, whereas other firmware is stored on the respective device. This persistent method is especially important for the CPU, as it enables the earliest possible regular loading of the updated microcode at boot time.
|
|
With some updates, such as for BIOS/UEFI or storage controller, the device configuration could be reset. Please follow the vendor’s instructions carefully and back up the current configuration. |
Please check with your vendor which update methods are available.
-
Convenient update methods for servers can include Dell’s Lifecycle Manager or Service Packs from HPE.
-
Sometimes there are Linux utilities available as well. Examples are mlxup for NVIDIA ConnectX or bnxtnvm/niccli for Broadcom network cards.
-
LVFS could also be an option if there is a cooperation with a vendor and supported hardware in use. The technical requirement for this is that the system was manufactured after 2014, is booted via UEFI and the easiest way is to mount the EFI partition from which you boot (mount /dev/disk/by-partuuid/<from efibootmgr -v> /boot/efi) before installing fwupd.
|
|
If the update instructions require a host reboot, please do not forget about it. |
6.6.2. Runtime Firmware Files
This method stores firmware on the Proxmox Mail Gateway operating system and will pass it to a device if its persisted firmware is less recent. It is supported by devices such as network and graphics cards, but not by those that rely on persisted firmware such as the motherboard and hard disks.
In Proxmox Mail Gateway the package pve-firmware is already installed by default. Therefore, with the normal system updates (APT), included firmware of common hardware is automatically kept up to date.
An additional Debian Firmware Repository exists, but is not configured by default.
If you try to install an additional firmware package but it conflicts, APT will abort the installation. Perhaps the particular firmware can be obtained in another way.
6.6.3. CPU Microcode Updates
Microcode updates are intended to fix found security vulnerabilities and other serious CPU bugs. While the CPU performance can be affected, a patched microcode is usually still more performant than an unpatched microcode where the kernel itself has to do mitigations. Depending on the CPU type, it is possible that performance results of the flawed factory state can no longer be achieved without knowingly running the CPU in an unsafe state.
To get an overview of present CPU vulnerabilities and their mitigations, run lscpu. Current real-world known vulnerabilities can only show up if the Proxmox Mail Gateway host is up to date, its version not end of life, and has at least been rebooted since the last kernel update.
Besides the recommended microcode update via persistent BIOS/UEFI updates, there is also an independent method via Early OS Microcode Updates. It is convenient to use and also quite helpful when the motherboard vendor no longer provides BIOS/UEFI updates. Regardless of the method in use, a reboot is always needed to apply a microcode update.
Set up Early OS Microcode Updates
To set up microcode updates that are applied early on boot by the Linux kernel, you need to:
-
Enable the Debian Firmware Repository
-
Get the latest available packages: apt update (or use the web interface, under Administration → Updates)
-
Install the CPU-vendor specific microcode package:
-
For Intel CPUs: apt install intel-microcode
-
For AMD CPUs: apt install amd64-microcode
-
-
Reboot the Proxmox Mail Gateway host
Any future microcode update will also require a reboot to be loaded.
Microcode Version
To get the current running microcode revision for comparison or debugging purposes:
# grep microcode /proc/cpuinfo | uniq
microcode       : 0xf0
A microcode package has updates for many different CPUs. But updates specifically for your CPU might not come often. So, just looking at the date on the package won’t tell you when the company actually released an update for your specific CPU.
If you’ve installed a new microcode package and rebooted your Proxmox Mail Gateway host, and this new microcode is newer than both, the version baked into the CPU and the one from the motherboard’s firmware, you’ll see a message in the system log saying "microcode updated early".
# dmesg | grep microcode
[    0.000000] microcode: microcode updated early to revision 0xf0, date = 2021-11-12
[    0.896580] microcode: Microcode Update Driver: v2.2.
Troubleshooting
For debugging purposes, the set up Early OS Microcode Update applied regularly at system boot can be temporarily disabled as follows:
-
Reboot the host to get to the GRUB menu (hold SHIFT if it is hidden)
-
At the desired Proxmox Mail Gateway boot entry press E
-
Go to the line which starts with linux and append separated by a space dis_ucode_ldr
-
Press CTRL-X to boot this time without an Early OS Microcode Update
If a problem related to a recent microcode update is suspected, a package downgrade should be considered instead of package removal (apt purge <intel-microcode|amd64-microcode>). Otherwise, a too old persisted microcode might be loaded, even though a more recent one would run without problems.
A downgrade is possible if an earlier microcode package version is available in the Debian repository, as shown in this example:
# apt list -a intel-microcode
Listing... Done
intel-microcode/stable-security,now 3.20230808.1~deb12u1 amd64 [installed]
intel-microcode/stable 3.20230512.1 amd64
# apt install intel-microcode=3.202305*
...
Selected version '3.20230512.1' (Debian:12.1/stable [amd64]) for 'intel-microcode'
...
dpkg: warning: downgrading intel-microcode from 3.20230808.1~deb12u1 to 3.20230512.1
...
intel-microcode: microcode will be updated at next boot
...
To apply an older microcode potentially included in the microcode package for your CPU type, reboot now.
|
|
It makes sense to hold the downgraded package for a while and try more recent versions again at a later time. Even if the package version is the same in the future, system updates may have fixed the experienced problem in the meantime. # apt-mark hold intel-microcode intel-microcode set on hold. # apt-mark unhold intel-microcode # apt update # apt upgrade |
6.7. Host Bootloader
Proxmox Mail Gateway currently uses one of two bootloaders depending on the disk setup selected in the installer.
For EFI Systems installed with ZFS as the root filesystem systemd-boot is used, unless Secure Boot is enabled. All other deployments use the standard GRUB bootloader (this usually also applies to systems which are installed on top of Debian).
6.7.1. Partitioning Scheme Used by the Installer
The Proxmox Mail Gateway installer creates 3 partitions on all disks selected for installation.
The created partitions are:
-
a 1 MB BIOS Boot Partition (gdisk type EF02)
-
a 512 MB EFI System Partition (ESP, gdisk type EF00)
-
a third partition spanning the set hdsize parameter or the remaining space used for the chosen storage type
Systems using ZFS as root filesystem are booted with a kernel and initrd image stored on the 512 MB EFI System Partition. For legacy BIOS systems, and EFI systems with Secure Boot enabled, GRUB is used, for EFI systems without Secure Boot, systemd-boot is used. Both are installed and configured to point to the ESPs.
GRUB in BIOS mode (--target i386-pc) is installed onto the BIOS Boot
Partition of all selected disks on all systems booted with GRUB
[These are all installs with root on ext4 or xfs and installs
with root on ZFS on non-EFI systems]
.
6.7.2. Synchronizing the content of the ESP with proxmox-boot-tool
proxmox-boot-tool is a utility used to keep the contents of the EFI System
Partitions properly configured and synchronized. It copies certain kernel
versions to all ESPs and configures the respective bootloader to boot from
the vfat formatted ESPs. In the context of ZFS as root filesystem this means
that you can use all optional features on your root pool instead of the subset
which is also present in the ZFS implementation in GRUB or having to create a
separate small boot-pool
[Booting ZFS on root with GRUB
https://openzfs.github.io/openzfs-docs/Getting%20Started/Debian/Debian%20Bookworm%20Root%20on%20ZFS.html]
.
In setups with redundancy all disks are partitioned with an ESP, by the installer. This ensures the system boots even if the first boot device fails or if the BIOS can only boot from a particular disk.
The ESPs are not kept mounted during regular operation. This helps to prevent filesystem corruption to the vfat formatted ESPs in case of a system crash, and removes the need to manually adapt /etc/fstab in case the primary boot device fails.
proxmox-boot-tool handles the following tasks:
-
formatting and setting up a new partition
-
copying and configuring new kernel images and initrd images to all listed ESPs
-
synchronizing the configuration on kernel upgrades and other maintenance tasks
-
managing the list of kernel versions which are synchronized
-
configuring the boot-loader to boot a particular kernel version (pinning)
You can view the currently configured ESPs and their state by running:
# proxmox-boot-tool status
To format and initialize a partition as synced ESP, e.g., after replacing a failed vdev in an rpool, or when converting an existing system that pre-dates the sync mechanism, proxmox-boot-tool from proxmox-kernel-helper can be used.
|
|
the format command will format the <partition>, make sure to pass in the right device/partition! |
For example, to format an empty partition /dev/sda2 as ESP, run the following:
# proxmox-boot-tool format /dev/sda2
To setup an existing, unmounted ESP located on /dev/sda2 for inclusion in Proxmox Mail Gateway’s kernel update synchronization mechanism, use the following:
# proxmox-boot-tool init /dev/sda2
or
# proxmox-boot-tool init /dev/sda2 grub
to force initialization with GRUB instead of systemd-boot, for example for Secure Boot support.
Afterwards /etc/kernel/proxmox-boot-uuids should contain a new line with the UUID of the newly added partition. The init command will also automatically trigger a refresh of all configured ESPs.
To copy and configure all bootable kernels and keep all ESPs listed in /etc/kernel/proxmox-boot-uuids in sync you just need to run:
# proxmox-boot-tool refresh
(The equivalent to running update-grub systems with ext4 or xfs on root).
This is necessary should you make changes to the kernel commandline, or want to sync all kernels and initrds.
|
|
Both update-initramfs and apt (when necessary) will automatically trigger a refresh. |
The following kernel versions are configured by default:
-
the currently running kernel
-
the version being newly installed on package updates
-
the two latest already installed kernels
-
the latest version of the second-to-last kernel series (e.g. 5.0, 5.3), if applicable
-
any manually selected kernels
Should you wish to add a certain kernel and initrd image to the list of bootable kernels use proxmox-boot-tool kernel add.
For example run the following to add the kernel with ABI version 5.0.15-1-pve to the list of kernels to keep installed and synced to all ESPs:
# proxmox-boot-tool kernel add 5.0.15-1-pve
proxmox-boot-tool kernel list will list all kernel versions currently selected for booting:
# proxmox-boot-tool kernel list
Manually selected kernels:
5.0.15-1-pve

Automatically selected kernels:
5.0.12-1-pve
4.15.18-18-pve
Run proxmox-boot-tool kernel remove to remove a kernel from the list of manually selected kernels, for example:
# proxmox-boot-tool kernel remove 5.0.15-1-pve
|
|
It’s required to run proxmox-boot-tool refresh to update all EFI System Partitions (ESPs) after a manual kernel addition or removal from above. |
6.7.3. Determine which Bootloader is Used
The simplest and most reliable way to determine which bootloader is used, is to watch the boot process of the Proxmox Mail Gateway node.
You will either see the blue box of GRUB or the simple black on white systemd-boot.
Determining the bootloader from a running system might not be 100% accurate. The safest way is to run the following command:
# efibootmgr -v
If it returns a message that EFI variables are not supported, GRUB is used in BIOS/Legacy mode.
If the output contains a line that looks similar to the following, GRUB is used in UEFI mode.
Boot0005* proxmox [...] File(\EFI\proxmox\grubx64.efi)
If the output contains a line similar to the following, systemd-boot is used.
Boot0006* Linux Boot Manager [...] File(\EFI\systemd\systemd-bootx64.efi)
By running:
# proxmox-boot-tool status
you can find out if proxmox-boot-tool is configured, which is a good indication of how the system is booted.
6.7.4. GRUB
GRUB has been the de-facto standard for booting Linux systems for many years
and is quite well documented
[GRUB Manual https://www.gnu.org/software/grub/manual/grub/grub.html]
.
Configuration
Changes to the GRUB configuration are done via the defaults file
/etc/default/grub or config snippets in /etc/default/grub.d. To regenerate
the configuration file after a change to the configuration run:
[Systems using proxmox-boot-tool will call proxmox-boot-tool
refresh upon update-grub.]
# update-grub
6.7.5. Systemd-boot
systemd-boot is a lightweight EFI bootloader. It reads the kernel and initrd images directly from the EFI Service Partition (ESP) where it is installed. The main advantage of directly loading the kernel from the ESP is that it does not need to reimplement the drivers for accessing the storage. In Proxmox Mail Gateway proxmox-boot-tool is used to keep the configuration on the ESPs synchronized.
Configuration
systemd-boot is configured via the file loader/loader.conf in the root directory of an EFI System Partition (ESP). See the loader.conf(5) manpage for details.
Each bootloader entry is placed in a file of its own in the directory loader/entries/
An example entry.conf looks like this (/ refers to the root of the ESP):
title    Proxmox
version  5.0.15-1-pve
options   root=ZFS=rpool/ROOT/pmg-1 boot=zfs
linux    /EFI/proxmox/5.0.15-1-pve/vmlinuz-5.0.15-1-pve
initrd   /EFI/proxmox/5.0.15-1-pve/initrd.img-5.0.15-1-pve
6.7.6. Editing the Kernel Commandline
You can modify the kernel commandline in the following places, depending on the bootloader used:
The kernel commandline needs to be placed in the variable GRUB_CMDLINE_LINUX_DEFAULT in the file /etc/default/grub. Running update-grub appends its content to all linux entries in /boot/grub/grub.cfg.
The kernel commandline needs to be placed as one line in /etc/kernel/cmdline. To apply your changes, run proxmox-boot-tool refresh, which sets it as the option line for all config files in loader/entries/proxmox-*.conf.
A complete list of kernel parameters can be found at https://www.kernel.org/doc/html/v<YOUR-KERNEL-VERSION>/admin-guide/kernel-parameters.html. replace <YOUR-KERNEL-VERSION> with the major.minor version, for example, for kernels based on version 6.5 the URL would be: https://www.kernel.org/doc/html/v6.5/admin-guide/kernel-parameters.html
You can find your kernel version by checking the web interface (Node → Summary), or by running
# uname -r
Use the first two numbers at the front of the output.
6.7.7. Override the Kernel-Version for next Boot
To select a kernel that is not currently the default kernel, you can either:
-
use the boot loader menu that is displayed at the beginning of the boot process
-
use the proxmox-boot-tool to pin the system to a kernel version either once or permanently (until pin is reset).
This should help you work around incompatibilities between a newer kernel version and the hardware.
|
|
Such a pin should be removed as soon as possible so that all current security patches of the latest kernel are also applied to the system. |
For example: To permanently select the version 5.15.30-1-pve for booting you would run:
# proxmox-boot-tool kernel pin 5.15.30-1-pve
|
|
The pinning functionality works for all Proxmox Mail Gateway systems, not only those using proxmox-boot-tool to synchronize the contents of the ESPs, if your system does not use proxmox-boot-tool for synchronizing you can also skip the proxmox-boot-tool refresh call in the end. |
You can also set a kernel version to be booted on the next system boot only. This is for example useful to test if an updated kernel has resolved an issue, which caused you to pin a version in the first place:
# proxmox-boot-tool kernel pin 5.15.30-1-pve --next-boot
To remove any pinned version configuration use the unpin subcommand:
# proxmox-boot-tool kernel unpin
While unpin has a --next-boot option as well, it is used to clear a pinned version set with --next-boot. As that happens already automatically on boot, invoking it manually is of little use.
After setting, or clearing pinned versions you also need to synchronize the content and configuration on the ESPs by running the refresh subcommand.
|
|
You will be prompted to automatically do for proxmox-boot-tool managed systems if you call the tool interactively. |
# proxmox-boot-tool refresh
6.7.8. Secure Boot
Since Proxmox Mail Gateway 8.1, Secure Boot is supported out of the box via signed packages and integration in proxmox-boot-tool.
The following packages are required for Secure Boot to work. You can install them all at once by using the proxmox-secure-boot-support meta-package.
-
shim-signed (shim bootloader signed by Microsoft)
-
shim-helpers-amd64-signed (fallback bootloader and MOKManager, signed by Proxmox)
-
grub-efi-amd64-signed (GRUB EFI bootloader, signed by Proxmox)
-
proxmox-kernel-6.X.Y-Z-pve-signed (Kernel image, signed by Proxmox)
Only GRUB is supported as bootloader out of the box, since other bootloaders are currently not eligible for secure boot code-signing.
Any new installation of Proxmox Mail Gateway will automatically have all of the above packages included.
More details about how Secure Boot works, and how to customize the setup, are available in our wiki.
Switching an Existing Installation to Secure Boot
|
|
This can lead to an unbootable installation in some cases if not done correctly. Reinstalling the host will setup Secure Boot automatically if available, without any extra interactions. Make sure you have a working and well-tested backup of your Proxmox Mail Gateway host! |
An existing UEFI installation can be switched over to Secure Boot if desired, without having to reinstall Proxmox Mail Gateway from scratch.
First, ensure all your system is up-to-date. Next, install proxmox-secure-boot-support. GRUB automatically creates the needed EFI boot entry for booting via the default shim.
If systemd-boot is used as a bootloader (see Determine which Bootloader is used), some additional setup is needed. This is only the case if Proxmox Mail Gateway was installed with ZFS-on-root.
To check the latter, run:
# findmnt /
If the host is indeed using ZFS as root filesystem, the FSTYPE column should contain zfs:
TARGET SOURCE           FSTYPE OPTIONS
/      rpool/ROOT/pmg-1 zfs    rw,relatime,xattr,noacl,casesensitive
Next, a suitable potential ESP (EFI system partition) must be found. This can be done using the lsblk command as following:
# lsblk -o +FSTYPE
The output should look something like this:
NAME   MAJ:MIN RM  SIZE RO TYPE MOUNTPOINTS FSTYPE
sda      8:0    0   32G  0 disk
├─sda1   8:1    0 1007K  0 part
├─sda2   8:2    0  512M  0 part             vfat
└─sda3   8:3    0 31.5G  0 part             zfs_member
sdb      8:16   0   32G  0 disk
├─sdb1   8:17   0 1007K  0 part
├─sdb2   8:18   0  512M  0 part             vfat
└─sdb3   8:19   0 31.5G  0 part             zfs_member
In this case, the partitions sda2 and sdb2 are the targets. They can be identified by the their size of 512M and their FSTYPE being vfat, in this case on a ZFS RAID-1 installation.
These partitions must be properly set up for booting through GRUB using proxmox-boot-tool. This command (using sda2 as an example) must be run separately for each individual ESP:
# proxmox-boot-tool init /dev/sda2 grub
Afterwards, you can sanity-check the setup by running the following command:
# efibootmgr -v
This list should contain an entry looking similar to this:
[..]
Boot0009* proxmox       HD(2,GPT,..,0x800,0x100000)/File(\EFI\proxmox\shimx64.efi)
[..]
|
|
The old systemd-boot bootloader will be kept, but GRUB will be preferred. This way, if booting using GRUB in Secure Boot mode does not work for any reason, the system can still be booted using systemd-boot with Secure Boot turned off. |
Now the host can be rebooted and Secure Boot enabled in the UEFI firmware setup utility.
On reboot, a new entry named proxmox should be selectable in the UEFI firmware boot menu, which boots using the pre-signed EFI shim.
If, for any reason, no proxmox entry can be found in the UEFI boot menu, you can try adding it manually (if supported by the firmware), by adding the file \EFI\proxmox\shimx64.efi as a custom boot entry.
|
|
Some UEFI firmwares are known to drop the proxmox boot option on reboot. This can happen if the proxmox boot entry is pointing to a GRUB installation on a disk, where the disk itself is not a boot option. If possible, try adding the disk as a boot option in the UEFI firmware setup utility and run proxmox-boot-tool again. |
|
|
To enroll custom keys, see the accompanying Secure Boot wiki page. |
Using DKMS/Third Party Modules With Secure Boot
On systems with Secure Boot enabled, the kernel will refuse to load modules which are not signed by a trusted key. The default set of modules shipped with the kernel packages is signed with an ephemeral key embedded in the kernel image which is trusted by that specific version of the kernel image.
In order to load other modules, such as those built with DKMS or manually, they need to be signed with a key trusted by the Secure Boot stack. The easiest way to achieve this is to enroll them as Machine Owner Key (MOK) with mokutil.
The dkms tool will automatically generate a keypair and certificate in /var/lib/dkms/mok.key and /var/lib/dkms/mok.pub and use it for signing the kernel modules it builds and installs.
You can view the certificate contents with
# openssl x509 -in /var/lib/dkms/mok.pub -noout -text
and enroll it on your system using the following command:
# mokutil --import /var/lib/dkms/mok.pub
input password:
input password again:
The mokutil command will ask for a (temporary) password twice, this password needs to be entered one more time in the next step of the process! Rebooting the system should automatically boot into the MOKManager EFI binary, which allows you to verify the key/certificate and confirm the enrollment using the password selected when starting the enrollment using mokutil. Afterwards, the kernel should allow loading modules built with DKMS (which are signed with the enrolled MOK). The MOK can also be used to sign custom EFI binaries and kernel images if desired.
The same procedure can also be used for custom/third-party modules not managed with DKMS, but the key/certificate generation and signing steps need to be done manually in that case.
7. Statistics
Proxmox Mail Gateway provides a useful and feature-rich statistics interface that allows administrators to quickly get an overview of the overall workload and easily identify problems.
The statistics are displayed for a selected period, which by default is the current day. This period can be changed to any other day, a whole month or even a whole year.
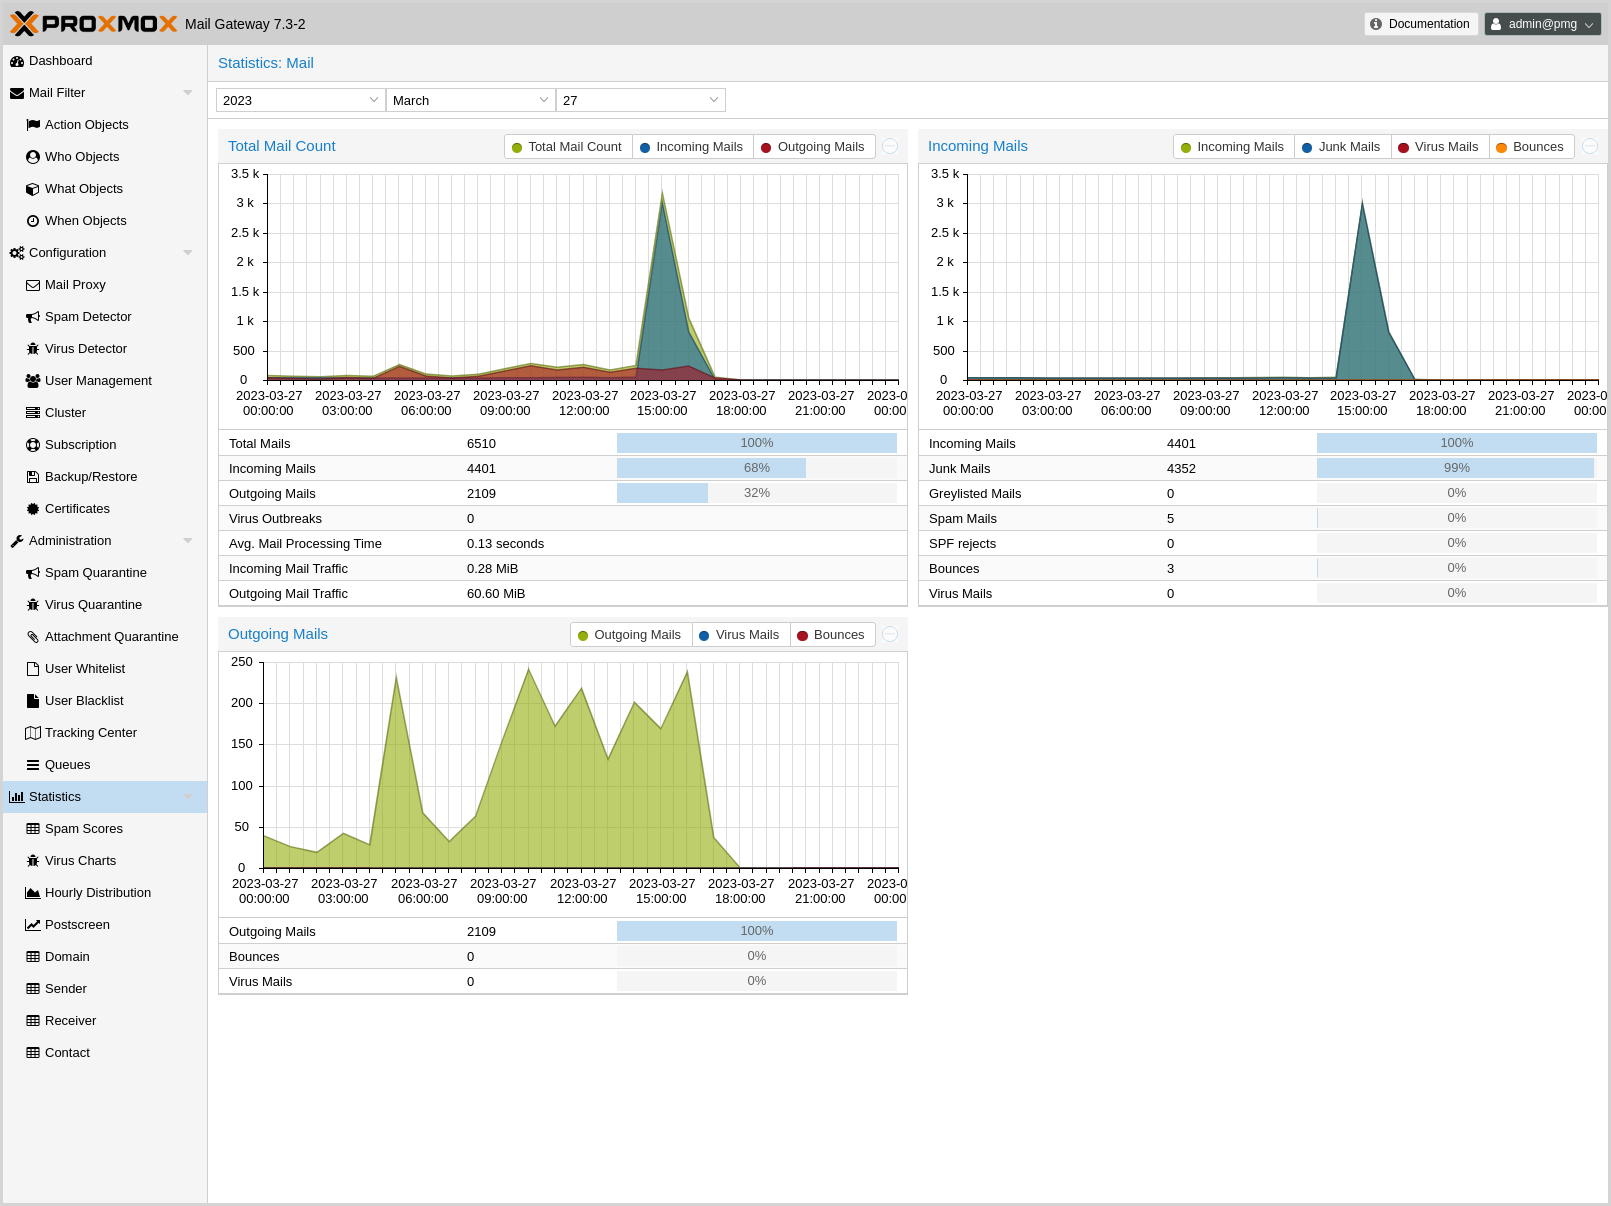
On the main statistics page there are three graphs with additional data:
- Total Mail Count
-
Shows the total mail flow as a graph and the following details:
-
Total Mails
-
Incoming/Outgoing Mails (as count and percentage)
-
Virus Outbreaks (the amount of outgoing virus mails)
-
Avg. Mail Processing Time
-
Incoming/Outgoing Mail Traffic
-
- Incoming Mails
-
Displays the count of incoming mails from each of the following categories, including their percentage of the total incoming mail volume:
-
Incoming Mails
-
Junk Mails (Virus + Spam + Greylisted + SPF rejects + RBL rejects)
-
Greylisted Mails
-
Spam Mails (Mails with Spamscore >= 3 and not containing a virus)
-
SPF rejects
-
Bounces (mails with an empty envelope-sender address)
-
Virus Mails
-
- Outgoing Mails
-
Displays the count of outgoing mails from each of the following categories, including their percentage of the total outgoing mail volume:
-
Outgoing Mails
-
Bounces (mails with an empty envelope-sender address)
-
Virus Mails
-
7.1. Spam Scores

The Spam Scores panel shows the distribution of the different spam scores for the selected time period. Note that you can also select a whole month or even a whole year as period to display.
7.2. Virus Charts
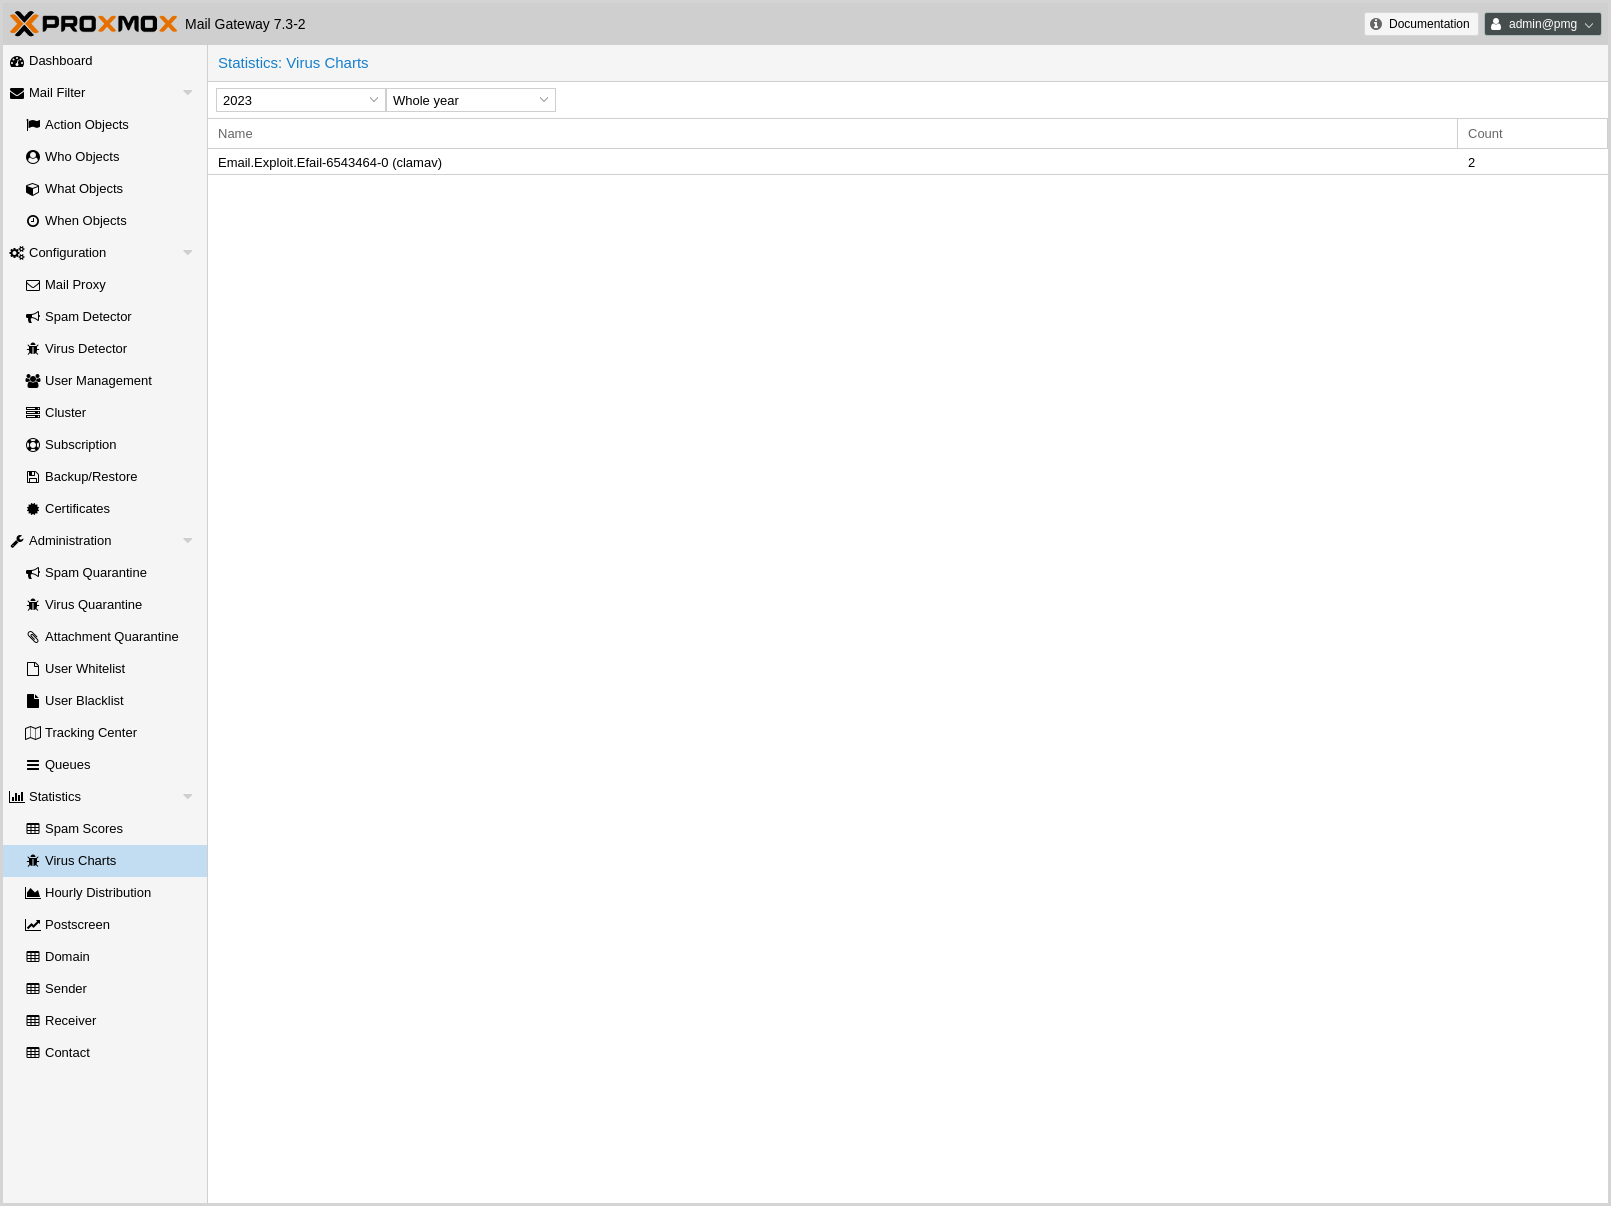
The Virus Charts panel gives you an overview of how many virus files were tried to be transmitted through your mail infrastructure, but got caught early by the Proxmox Mail Gateway.
The list shows which and how often certain viruses were detected in the selected time period.
See Virus Detector Configuration for details about how Proxmox Mail Gateway scans for virus files.
7.3. Hourly Distribution
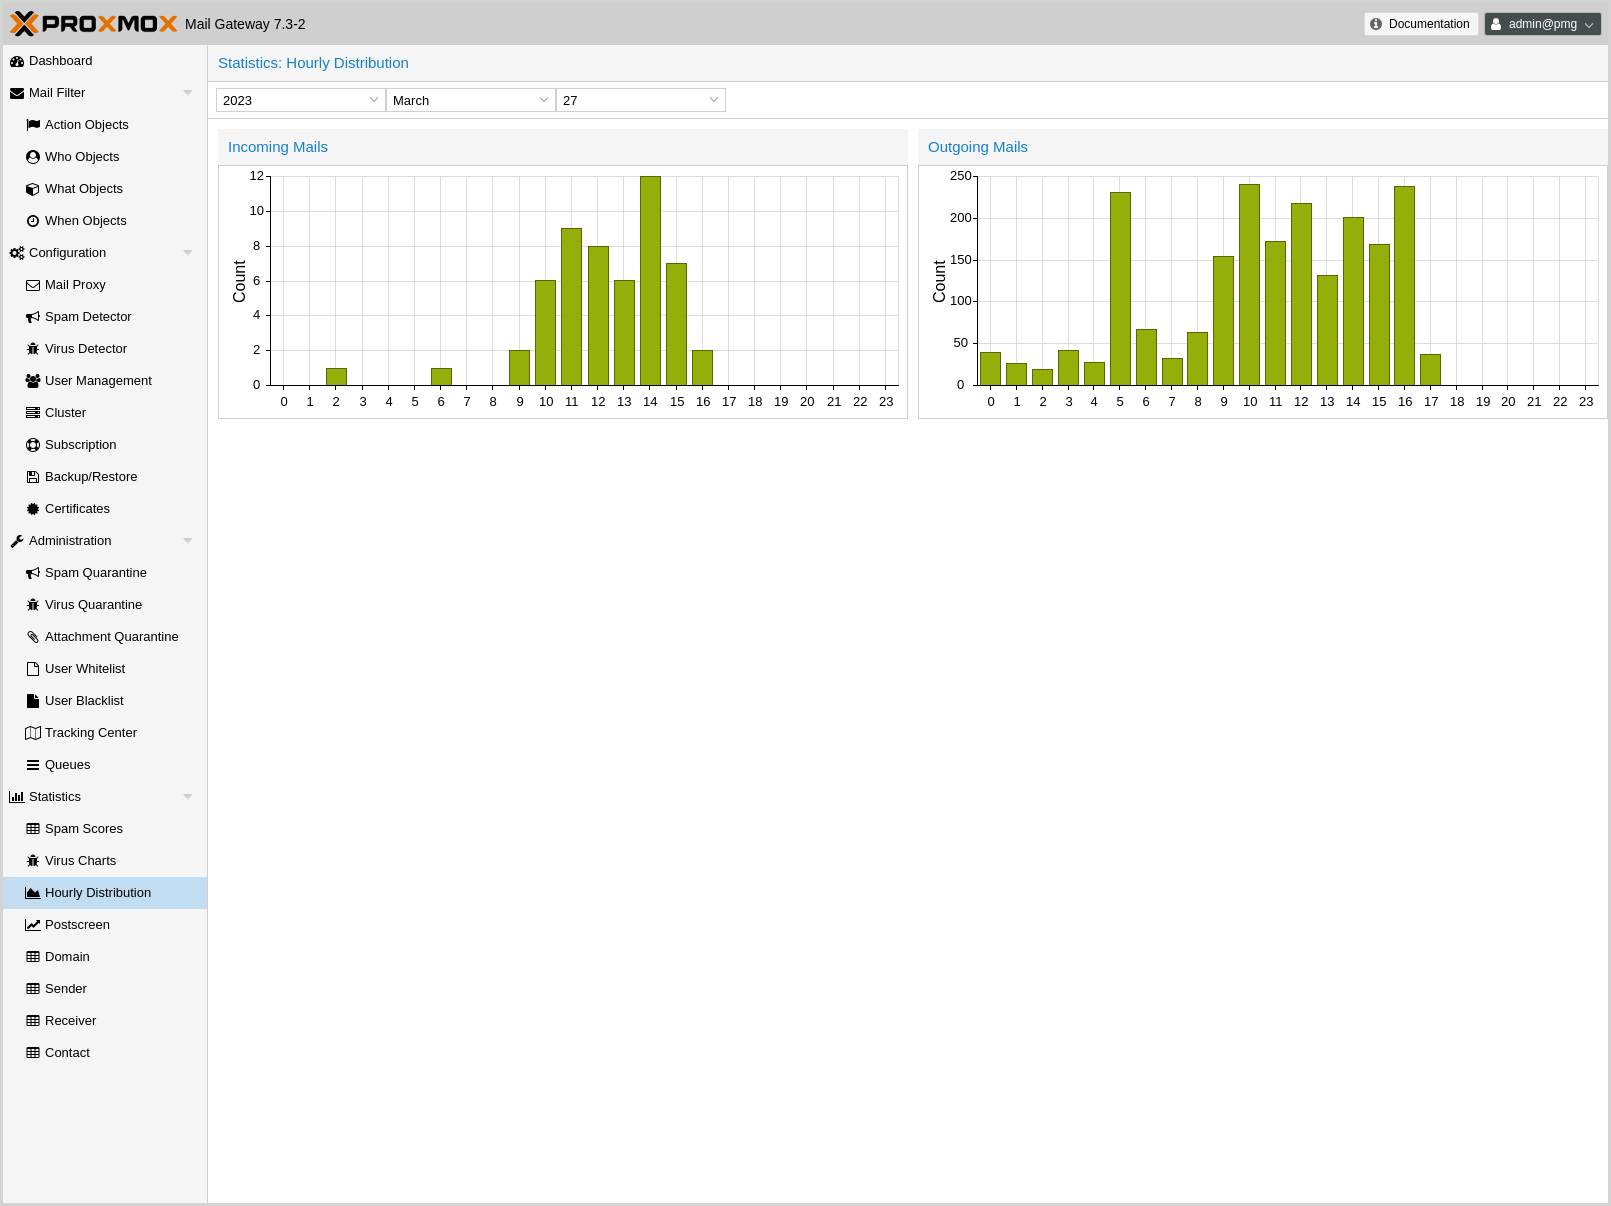
The Hourly Distribution shows the amount of incoming and outgoing mail per hour for the selected time period. For periods spanning a whole month or a whole year the arithmetic average of mail volume in an hour will be shown.
7.4. Postscreen
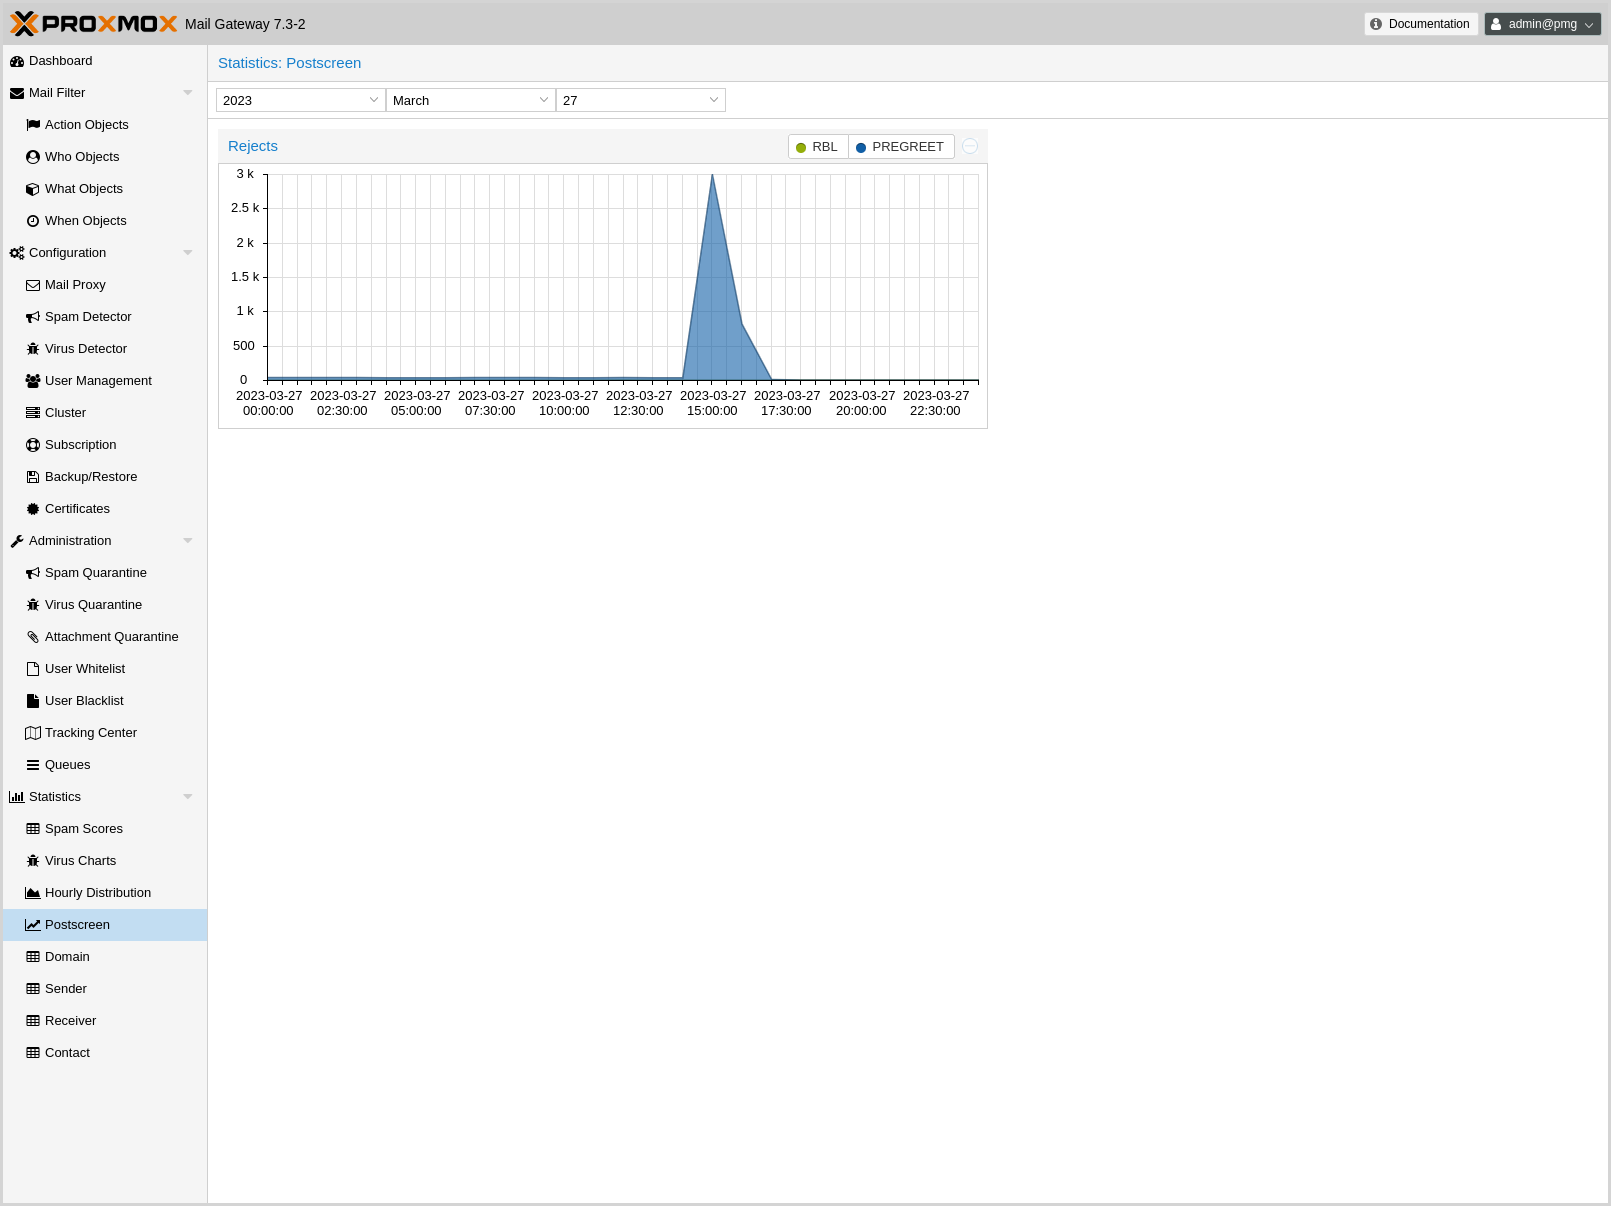
Contains a chart with the RBL (Real-time Blackhole Lists) and pregreet rejects for the selected time frame.
For each connection from an SMTP client, postscreen(8) performs a number of tests in the order as described below. Some tests introduce a delay of a few seconds. postscreen(8) maintains a temporary allowlist for clients that pass its tests; by allowing allowlisted clients to skip tests, postscreen(8) minimizes its impact on legitimate email traffic.
For more info about postscreen and pregreet tests, see the postscreen readme.
7.5. Domain
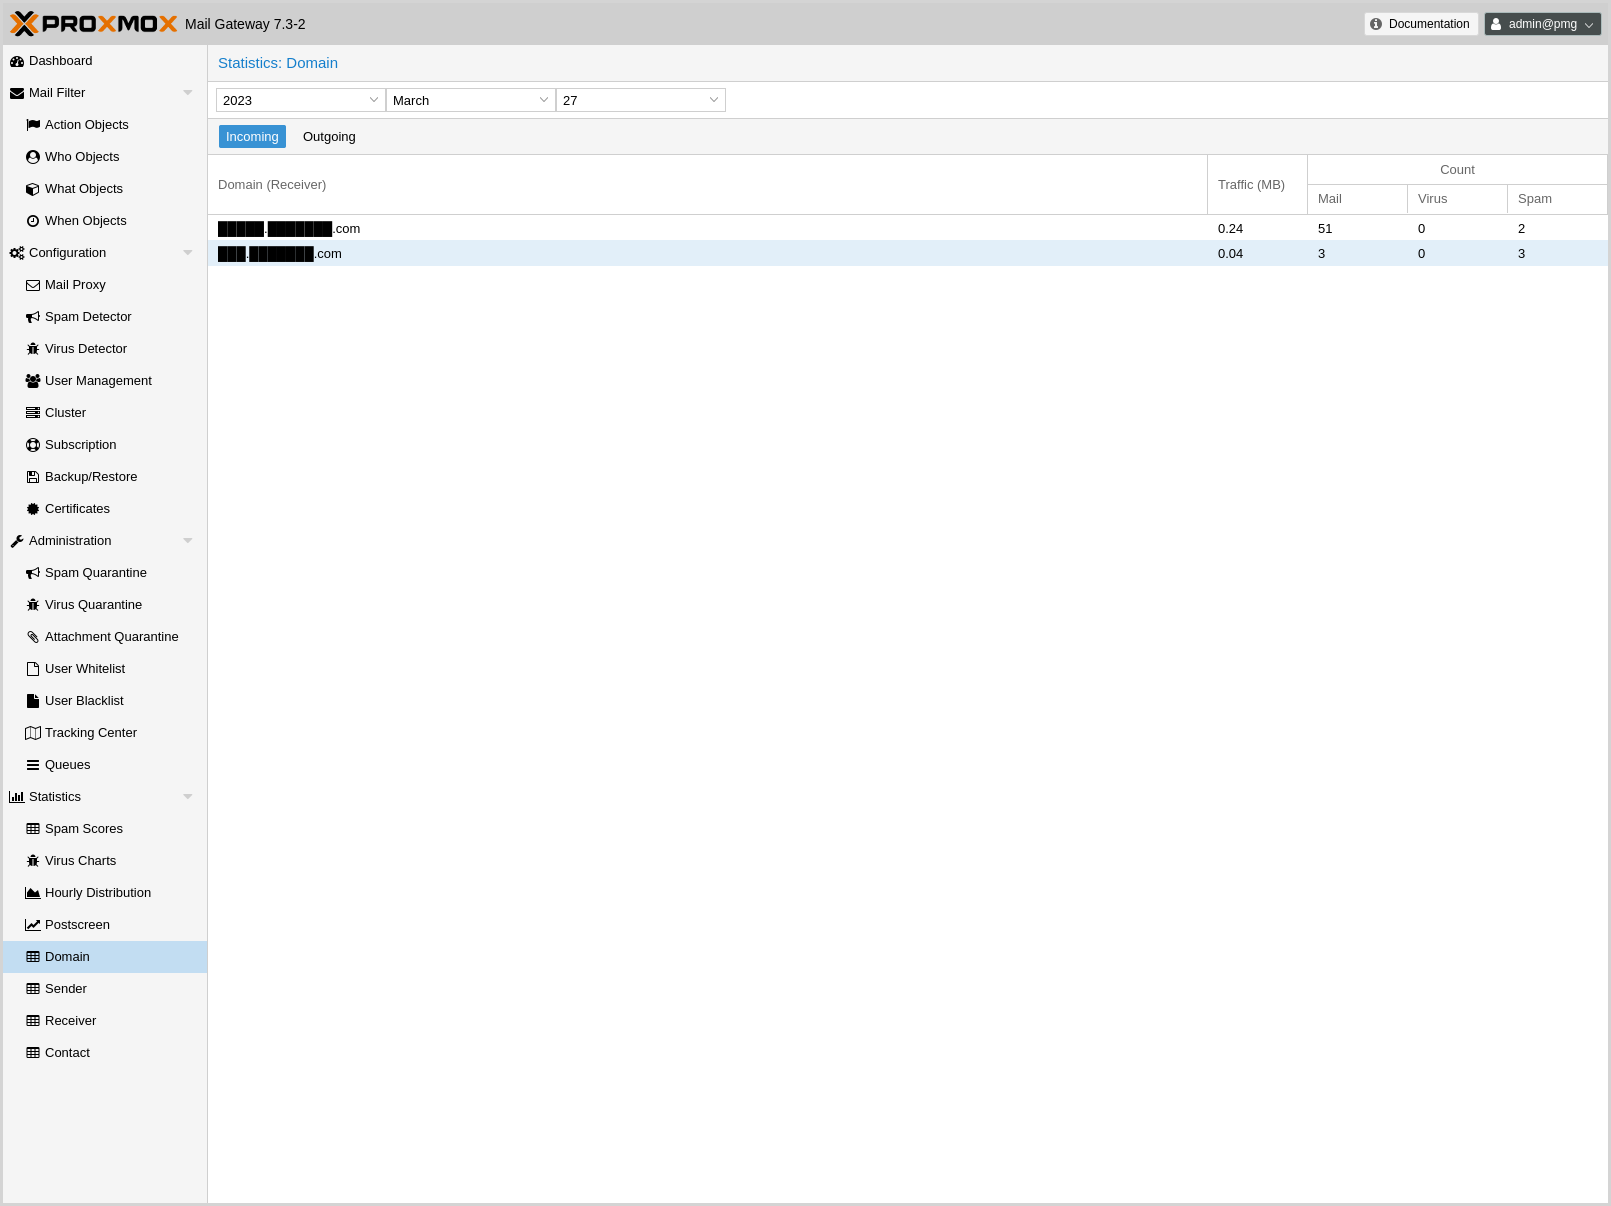
The Domain view is split into two tabs, one for incoming and one for outgoing mails.
Each tab shows a list of domains that received mails in a selected time frame, with stats for:
-
traffic amount
-
counts for:
-
mail flow to a domain
-
how many viruses were detected,
-
and how many mails were classified as spam
-
7.6. Sender
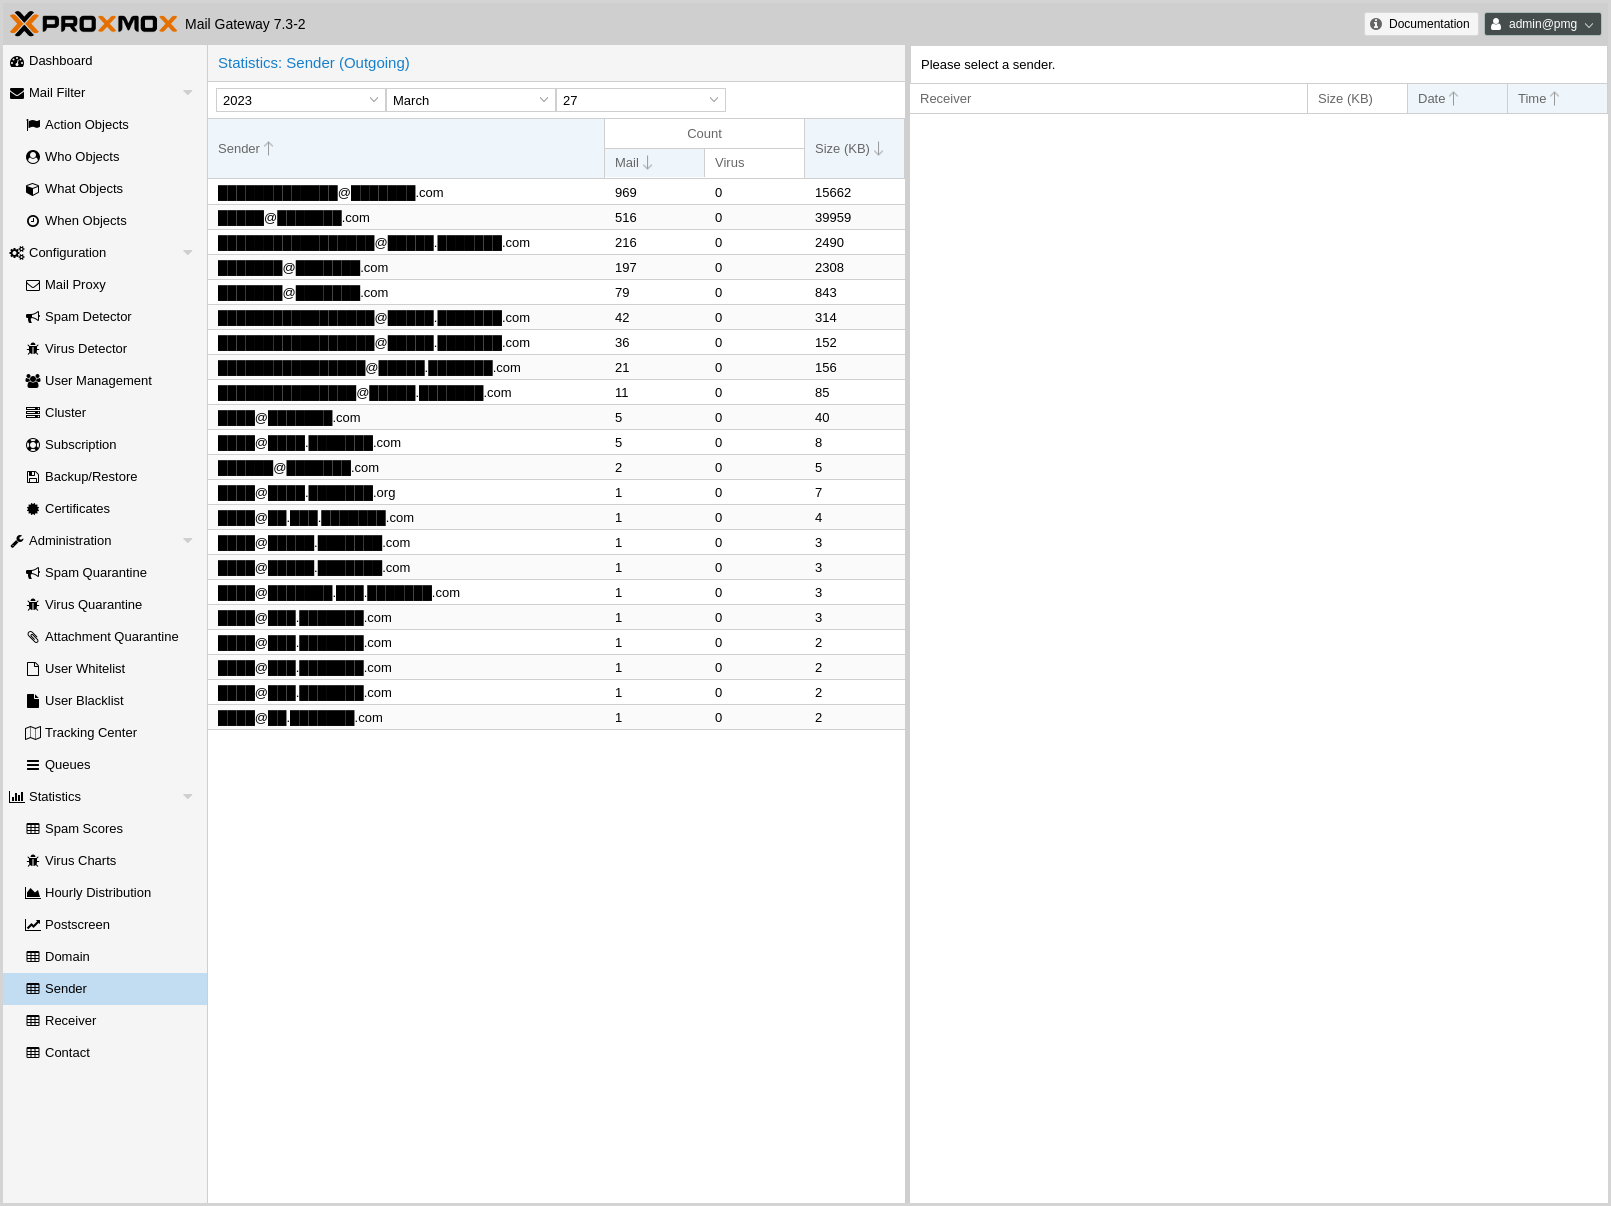
The Sender panel contains a list of e-mail addresses that sent mail out in the selected time frame, with a total count, how many viruses were detected and how big these mails were.
If you click on one of these e-mail addresses, you see a detailed list of recipients, complete with size, date and time.
7.7. Receiver
Similar to the Sender panel, this contains a list of e-mail addresses that received e-mails from outside, with a total, spam and virus count, as well as the total mail size.
If you click an entry, it shows a detailed list of mails with size, date, time, virus and spam score info.
If the Use advanced statistics filters option (Configurations -> Options) is enabled, only active accounts will be listed. Active accounts are those that sent mail during the selected time period or up to 90 days before.
7.8. Contact
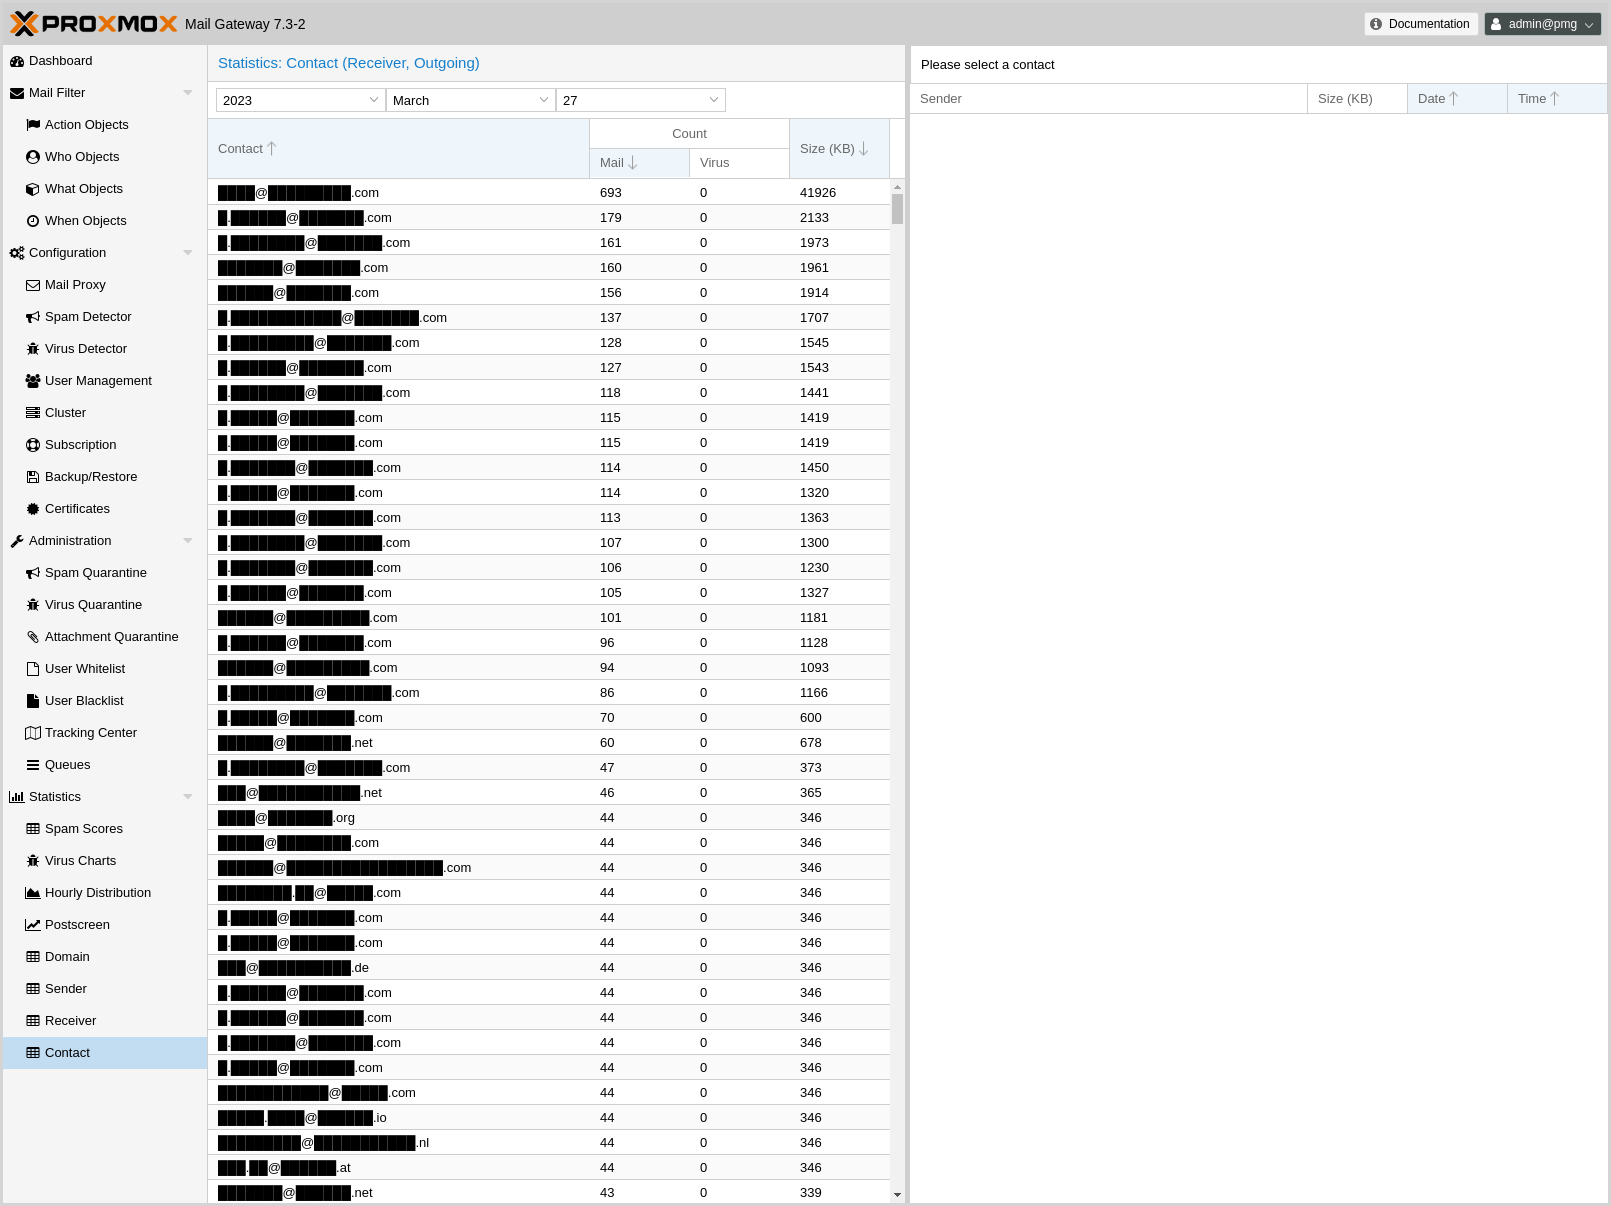
This contains the list of external recipients that received mail from this Proxmox Mail Gateway, coming in on the internal port, with total count, virus count and size.
If you click an entry, it shows a list of mails with size, date and time.
If the Use advanced statistics filters option (Configurations -> Options) is enabled, active accounts will be filtered out, since they can already be seen in the Receiver panel. Active accounts are those which sent mail in the selected time frame or up to 90 days before.
8. Backup and Restore
Proxmox Mail Gateway includes the ability to back up and restore the configuration. This includes the complete config from /etc/pmg/, the mail filter rules, and the statistic database.
|
|
The backup does not include the network setup, nor does it contain mail data from the postfix queue or the spam and virus quarantines. The mail logs that the Tracking Center is based on are not part of the backup either. |
Backups can be created locally or stored on a Proxmox Backup Server instance.
8.1. Local Backups
You can create a backup by simply pressing the Backup button in the Local Backup/Restore tab on the GUI, or by using the command-line interface:
# pmgbackup backup
starting backup to: /var/lib/pmg/backup/pmg-backup_2018_01_04_5A4E0436.tgz
backup finished
Local backups are stored inside directory /var/lib/pmg/backup/. It is usually best to mount a remote file system to that directory, so that the resulting backups get stored remotely.
You can list the contents of that directory with:
# pmgbackup list
....
pmg-backup_2017_11_10_5A05D4B9.tgz      17012
pmg-backup_2017_11_13_5A09676A.tgz      16831
pmg-backup_2018_01_04_5A4E0436.tgz      21514
Restores are also possible using the GUI or command line, and you can select which parts you want to restore:
- System Configuration
-
Basically the contents of /etc/pmg/. The cluster configuration (cluster.conf) is never restored, as the cluster membership is bound to the specific node; rejoin the node instead if needed.
- Rule Database
-
The mail filter rule database.
- Statistic
-
All statistical data.
|
|
Restoring the rule database recreates the complete database, including all statistical data. Existing statistics are removed and only restored if the backup contains them and the Statistic option is selected. |
For example, you can selectively restore the mail filter rules from an older backup:
# pmgbackup restore --filename pmg-backup_2018_01_04_5A4E0436.tgz --database
starting restore: /var/lib/pmg/backup/pmg-backup_2018_01_04_5A4E0436.tgz
config_backup.tar: OK
Proxmox_ruledb.sql: OK
Proxmox_statdb.sql: OK
version.txt: OK
Destroy existing rule database
Create new database
run analyze to speed up database queries
Analyzing/Upgrading existing Databases...done
restore finished
8.2. Proxmox Backup Server
In order to back up your Proxmox Mail Gateway configuration on a Proxmox Backup Server, you first need to configure the instance as a backup remote. You can then directly create and restore backups, as well as create a scheduled backup job to run regular backups.
8.2.1. Remotes
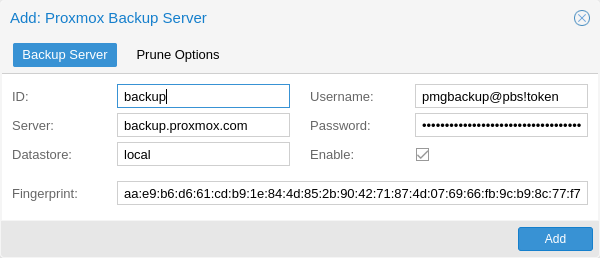
A Proxmox Backup Server remote can be configured using the Proxmox Backup Server panel in the Backup/Restore menu of the GUI, or by using the remote subcommand of pmgbackup.
|
|
You can use API Tokens in place of a username/password combination. |
# pmgbackup proxmox-backup remote add archive --datastore big --server backup.proxmox.com --user 'pmgbackup@pbs!token' --password --fingerprint 09:54:ef:..snip..:88:af:47:fe:4c:3b:cf:8b:26:88:0b:4e:3c:b2
Enter new password: ******
Retype new password: ******
The fingerprint is optional, if the certificate of the Proxmox Backup Server remote is signed by a CA trusted by Proxmox Mail Gateway.
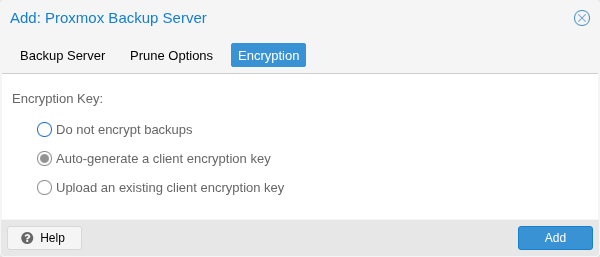
You can also encrypt backups, by autogenerating or providing an encryption key for a Proxmox Backup Server remote.
|
|
Keep a copy of the symmetric encryption key in a secure place, or print it out. Without the encryption key you will not be able to restore an encrypted backup. Alternatively, you can add a master public key to a remote’s configuration, so that a copy of the symmetric encryption key, encrypted with the master key, is stored in each backup. |
If you configured a master key and later lose the encryption key, you can recover it from any backup that was created while the master key was set. The backup holds a copy of the encryption key, encrypted with the master public key; extract and decrypt that copy with the master private key as described in the Proxmox Backup Server documentation. Afterwards, re-import the recovered key into the remote through the Encryption tab of its edit dialog in the GUI, and use it to restore the affected backups.
# pmgbackup proxmox-backup remote add shared-pbs --datastore public --server backup.cloud-provider.example --user 'pmgbackup@pbs!token' --password --encryption-key autogen
Enter new password: ******
Retype new password: ******
The encryption key is stored at /etc/pmg/pbs/<remote>.enc and, in a cluster, is synchronized to all nodes together with the other remote settings. Each backup snapshot is encrypted with the key that was active when it was created, so replacing or removing a remote’s key makes the snapshots created with the previous key unrecoverable. Only change the key when you no longer need to restore older backups.
Additionally, you can configure prune-settings for each remote, giving you flexible control over how many backups should be stored on the Proxmox Backup Server over a specific period of time.
# pmgbackup remote set archive --keep-last 3 --keep-daily 14 --keep-weekly 8 --keep-monthly 12 --keep-yearly 7
If prune settings are configured, the backup-group of Proxmox Mail Gateway is pruned automatically after each successful backup.
The notify and include-statistics settings of a remote define the defaults for notifications and whether to include the statistic database in backups. They are also used for scheduled backups.
The public settings are stored in /etc/pmg/pbs/pbs.conf. Sensitive settings, like passwords are stored in individual files named after the remote inside /etc/pmg/pbs/:
pbs: archive
        datastore big
        server backup.proxmox.com
        fingerprint 09:54:ef:..snip..:88:af:47:fe:4c:3b:cf:8b:26:88:0b:4e:3c:b2
        keep-daily 30
        keep-last 5
        keep-monthly 3
        keep-yearly 5
        username pmgbackup@pbs!token
8.2.2. Backup Jobs

With a configured remote, you can create backups using the GUI or the proxmox-backup backup subcommand of the pmgbackup CLI tool.
# pmgbackup proxmox-backup backup archive
starting update of current backup state
Starting backup: host/pmg/2020-11-16T16:38:39Z
Client name: pmg
Starting backup protocol: Mon Nov 16 16:38:39 2020
Upload directory '/var/lib/pmg/backup/current' to 'pmgbackup@pbs!token@backup.proxmox.com:8007:local' as pmgbackup.pxar.didx
pmgbackup.pxar: had to upload 188.33 KiB of 188.33 KiB in 0.00s, average speed 162.33 MiB/s).
Uploaded backup catalog (145 B)
Duration: 0.06s
End Time: Mon Nov 16 16:38:39 2020
backup finished
starting prune of host/pmg
prune finished
For restoring, you can optionally select a particular backup-snapshot to return to the state of configuration and rules at that time.
From the command line, you can get a list of available backup snapshots using the proxmox-backup list subcommand:
# pmgbackup proxmox-backup list archive
┌────────────┬──────────────────────┬────────┐
│ backup-id  │ backup-time          │   size │
╞════════════╪══════════════════════╪════════╡
│ pmg        │ 2020-11-16T14:03:04Z │ 121910 │
├────────────┼──────────────────────┼────────┤
  ...
└────────────┴──────────────────────┴────────┘
# pmgbackup proxmox-backup restore archive pmg 2020-11-16T14:03:04Z
starting restore of host/pmg/2020-11-16T14:03:04Z from backup
..snip..
restore finished
You can remove a particular snapshot by using the forget subcommand. This allows the Proxmox Backup Server to remove it during garbage collection.
# pmgbackup proxmox-backup forget archive pmg 2020-11-16T14:03:04Z
|
|
You can configure and access all backup-related functionality on both the web interface and the command-line interface. |
Scheduled Backups
You can create a Schedule for each remote, to periodically create backups of your Proxmox Mail Gateway - for example to run a daily backup at 03:50:00 with a randomized delay of 15 minutes each day:
# pmgbackup proxmox-backup job create archive --schedule '*-*-* 03:50:00' --delay '15 minutes'
The randomized delay can help to prevent load-peaks on the backup server, if you have multiple backups which should all start around the same time.
The schedules are systemd.timer units. See the systemd.time(7) man page for details on the time specification used.
9. Cluster Management
We are living in a world where email is becoming more and more important - failures in email systems are not acceptable. To meet these requirements, we developed the Proxmox HA (High Availability) Cluster.
The Proxmox Mail Gateway HA Cluster consists of a master node and several slave nodes (minimum one slave node). Configuration is done on the master, and data is synchronized to all cluster nodes via a VPN tunnel. This provides the following advantages:
-
centralized configuration management
-
fully redundant data storage
-
high availability
-
high performance
We use a unique application level clustering scheme, which provides extremely good performance. Special considerations were taken to make management as easy as possible. A complete cluster setup is done within minutes, and nodes automatically reintegrate after temporary failures, without any operator interaction.

9.1. Hardware Requirements
There are no special hardware requirements, although it is highly recommended to use fast and reliable server hardware, with redundant disks on all cluster nodes (Hardware RAID with BBU and write cache enabled).
The HA Cluster can also run in virtualized environments.
9.2. Subscriptions
Each node in a cluster has its own subscription. If you want support for a cluster, each cluster node needs to have a valid subscription. All nodes must have the same subscription level.
9.3. Load Balancing
It is usually advisable to distribute mail traffic among all cluster nodes. Please note that this is not always required, because it is also reasonable to use only one node to handle SMTP traffic. The second node can then be used as a quarantine host, that only provides the web interface to the user quarantine.
The normal mail delivery process looks up DNS Mail Exchange (MX) records to determine the destination host. An MX record tells the sending system where to deliver mail for a certain domain. It is also possible to have several MX records for a single domain, each of which can have different priorities. For example, our MX record looks like this:
# dig -t mx proxmox.com

;; ANSWER SECTION:
proxmox.com.            22879   IN      MX      10 mail.proxmox.com.

;; ADDITIONAL SECTION:
mail.proxmox.com.       22879   IN      A       213.129.239.114
Notice that there is a single MX record for the domain proxmox.com, pointing to mail.proxmox.com. The dig command automatically outputs the corresponding address record, if it exists. In our case it points to 213.129.239.114. The priority of our MX record is set to 10 (preferred default value).
9.3.1. Hot standby with backup MX records
Many people do not want to install two redundant mail proxies. Instead they use the mail proxy of their ISP as a fallback. This can be done by adding an additional MX record with a lower priority (higher number). Continuing from the example above, this would look like:
proxmox.com. 22879 IN MX 100 mail.provider.tld.
In such a setup, your provider must accept mails for your domain and forward them to you. Please note that this is not advisable, because spam detection needs to be done by the backup MX server as well, and external servers provided by ISPs usually don’t do this.
However, you will never lose mails with such a setup, because the sending Mail Transport Agent (MTA) will simply deliver the mail to the backup server (mail.provider.tld), if the primary server (mail.proxmox.com) is not available.
|
|
Any reasonable mail server retries mail delivery if the target server is not available. Proxmox Mail Gateway stores mail and retries delivery for up to one week. Thus, you will not lose emails if your mail server is down, even if you run a single server setup. |
9.3.2. Load balancing with MX records
Using your ISP’s mail server is not always a good idea, because many ISPs do not use advanced spam prevention techniques, or do not filter spam at all. It is often better to run a second server yourself to avoid lower spam detection rates.
It’s quite simple to set up a high-performance, load-balanced mail cluster using MX records. You just need to define two MX records with the same priority. The rest of this section will provide a complete example.
First, you need to have at least two working Proxmox Mail Gateway servers (mail1.example.com and mail2.example.com), configured as a cluster (see section Cluster Administration below), with each having its own IP address. Let us assume the following DNS address records:
mail1.example.com.       22879   IN      A       1.2.3.4
mail2.example.com.       22879   IN      A       1.2.3.5
It is always a good idea to add reverse lookup entries (PTR records) for those hosts, as many email systems nowadays reject mails from hosts without valid PTR records. Then you need to define your MX records:
example.com.            22879   IN      MX      10 mail1.example.com.
example.com.            22879   IN      MX      10 mail2.example.com.
This is all you need. Following this, you will receive mail on both hosts, load-balanced using round-robin scheduling. If one host fails, the other one is used.
9.3.3. Other ways
9.4. Cluster Administration
Cluster administration can be done from the GUI or by using the command-line utility pmgcm. The CLI tool is a bit more verbose, so we suggest to use that if you run into any problems.
|
|
Always set up the IP configuration, before adding a node to the cluster. IP address, network mask, gateway address and hostname can’t be changed later. |
9.4.1. Creating a Cluster
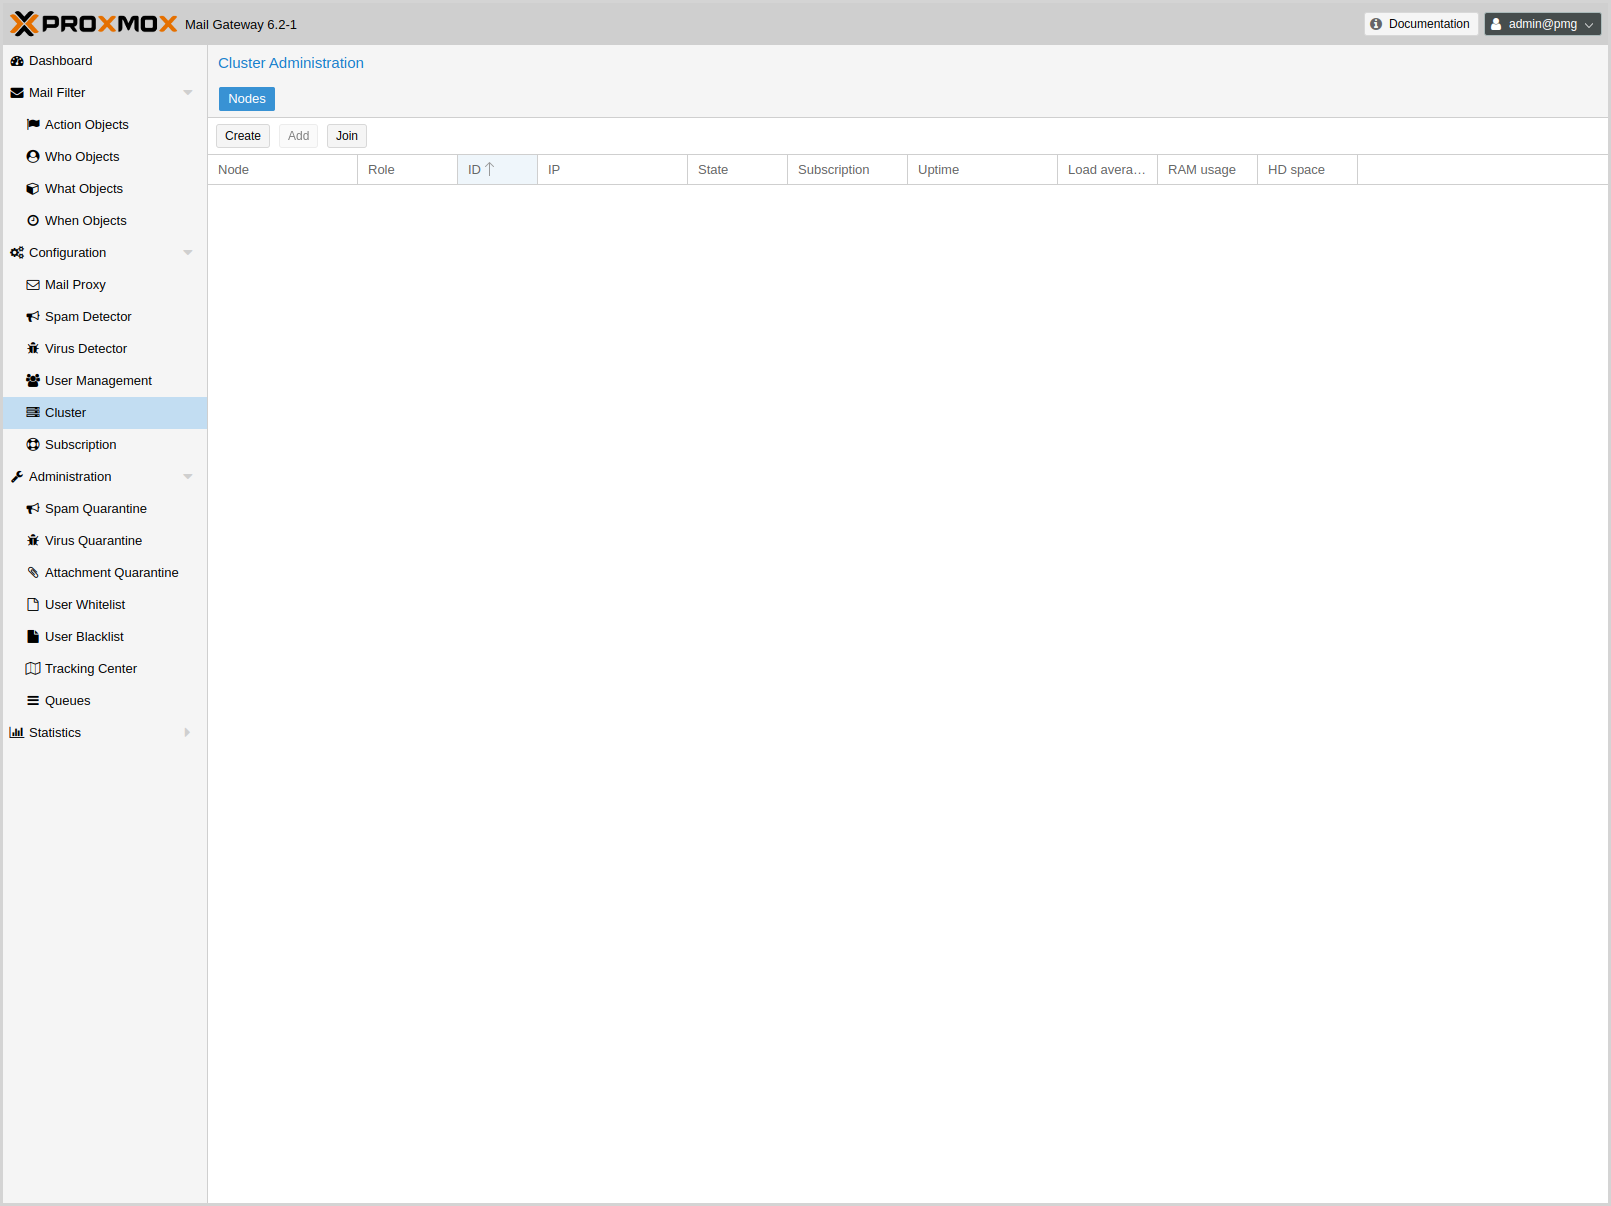
You can create a cluster from any existing Proxmox Mail Gateway host. All data is preserved.
-
make sure you have the right IP configuration (IP/MASK/GATEWAY/HOSTNAME), because you cannot change that later
-
press the create button on the GUI, or run the cluster creation command:
pmgcm create
|
|
The node where you run the cluster create command will be the master node. |
9.4.2. Show Cluster Status
The GUI shows the status of all cluster nodes. You can also view this using the command-line tool:
pmgcm status
--NAME(CID)--------------IPADDRESS----ROLE-STATE---------UPTIME---LOAD----MEM---DISK
pmg5(1)              192.168.2.127   master A       1 day 21:18   0.30    80%    41%
9.4.3. Adding Cluster Nodes
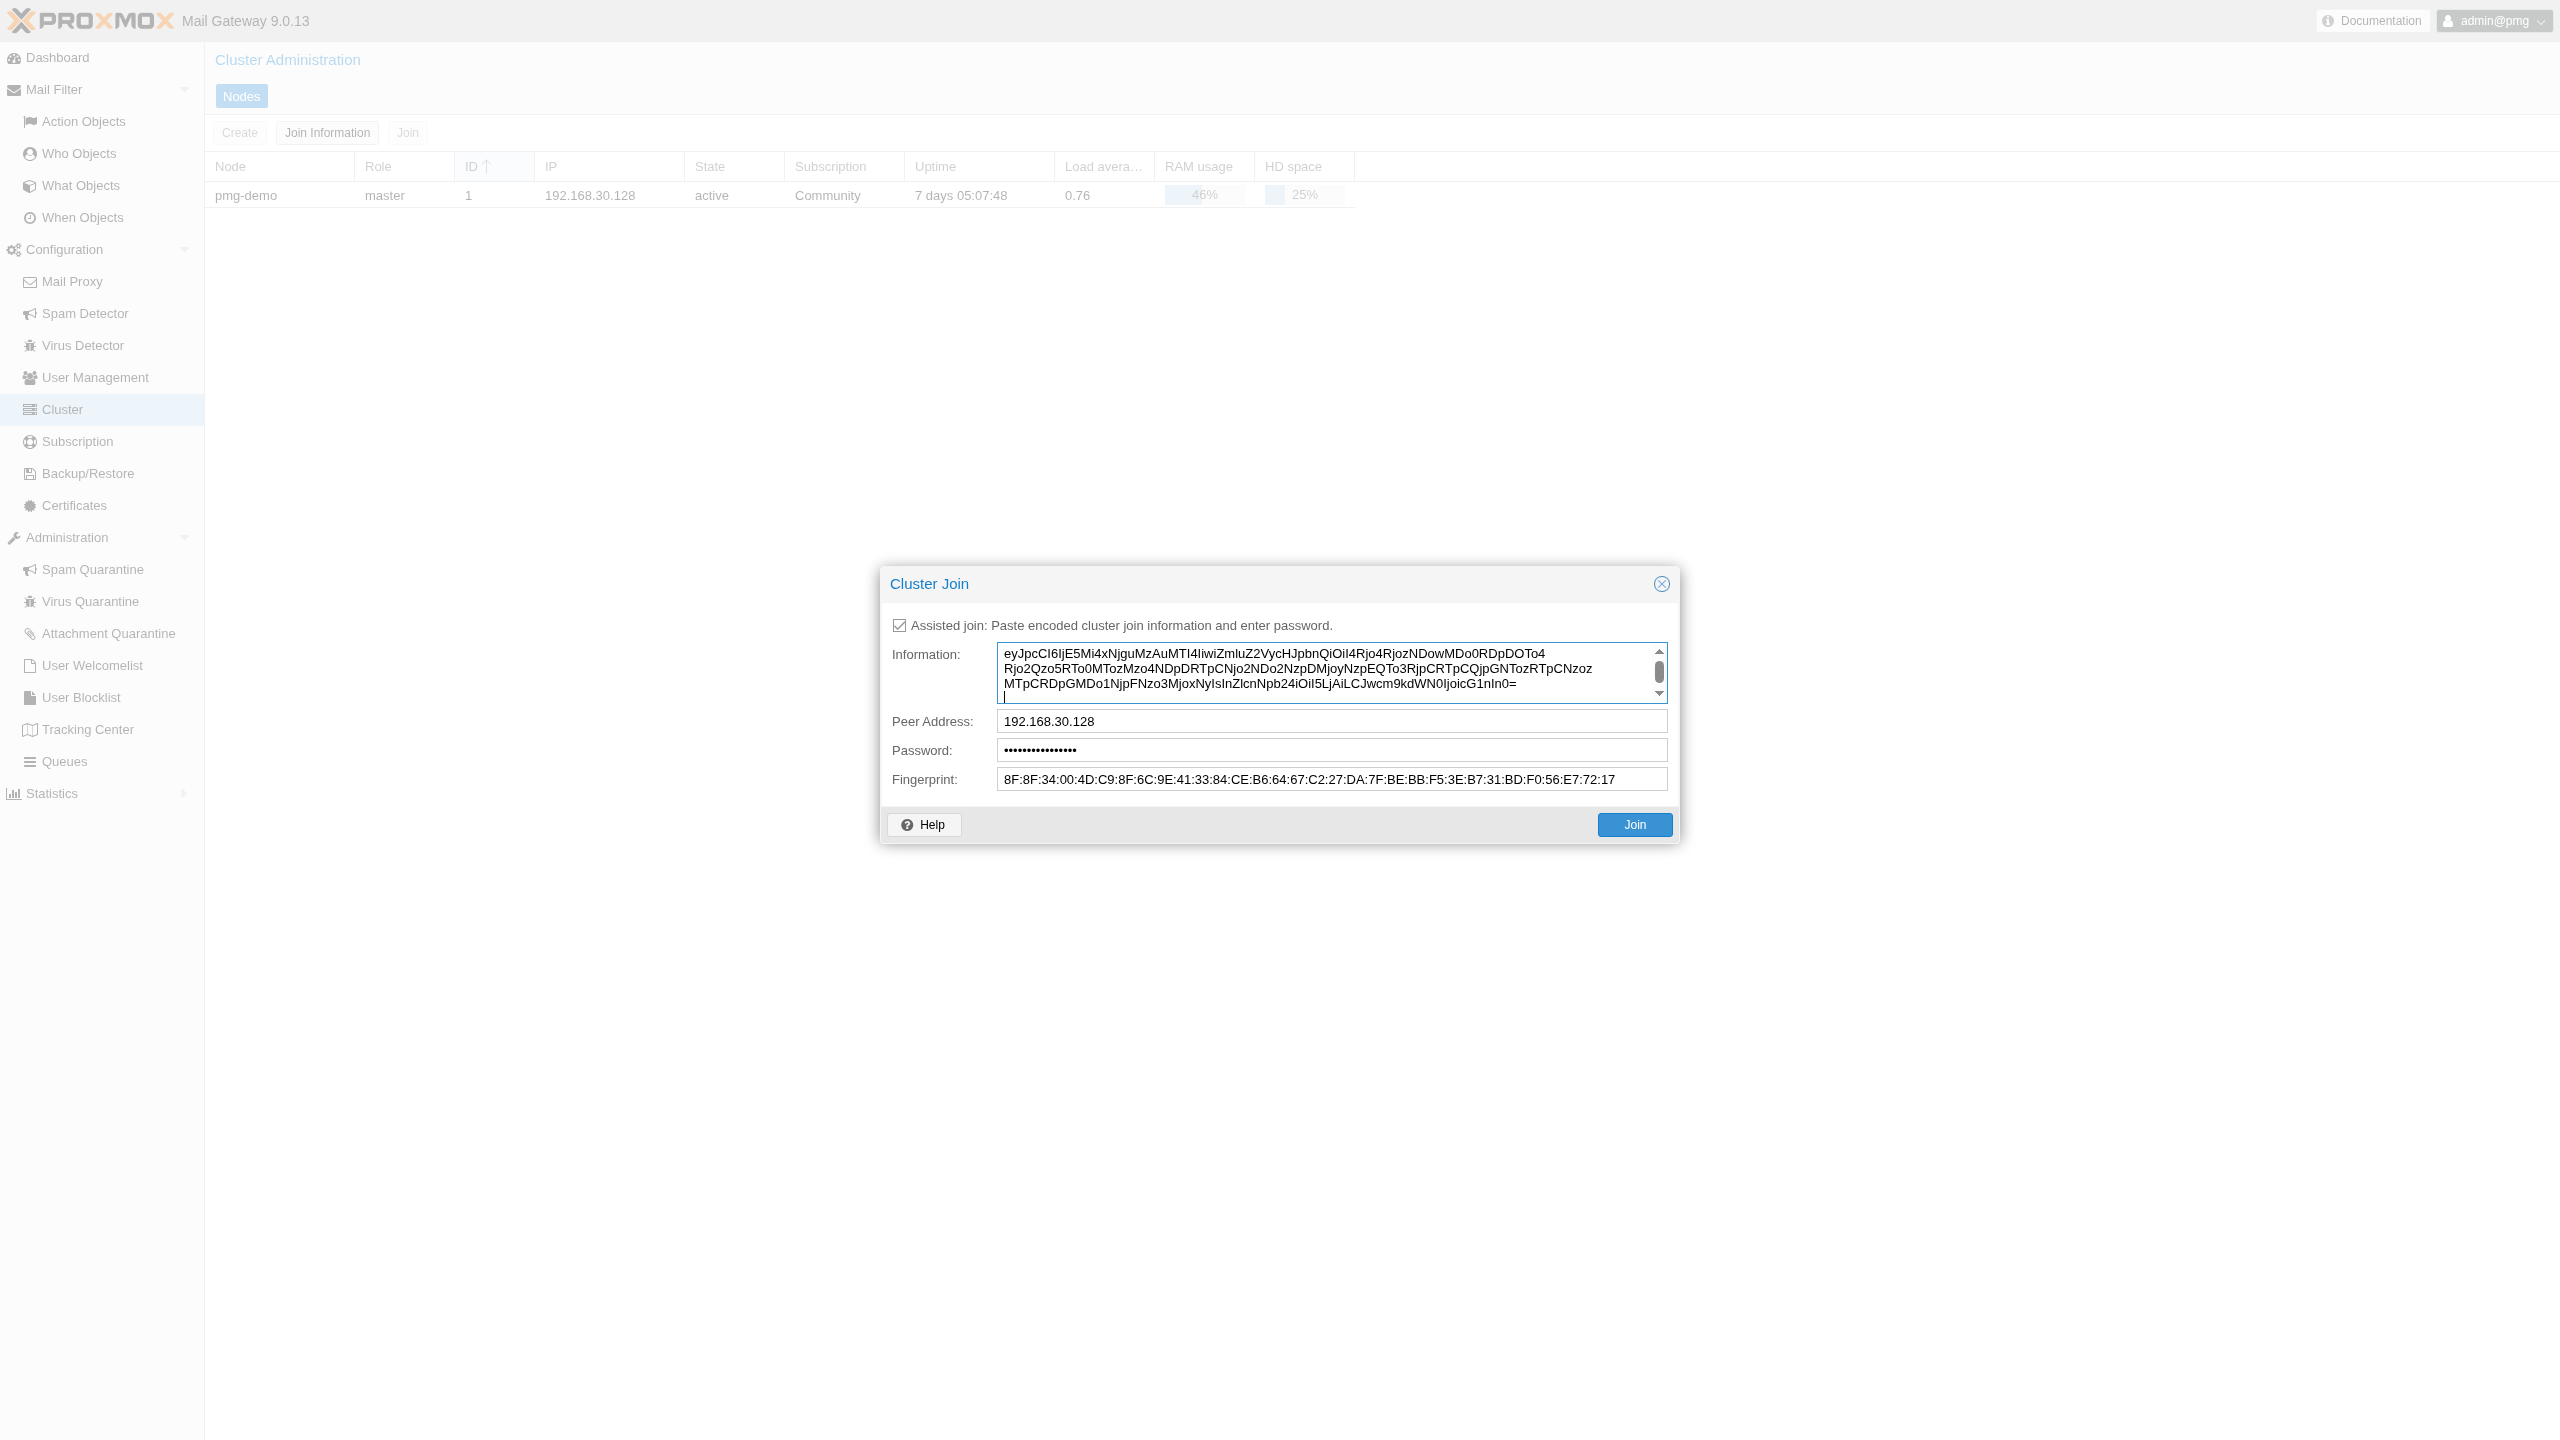
When you add a new node to a cluster (using join), all data on that node is destroyed. The whole database is initialized with the cluster data from the master.
-
make sure you have the right IP configuration
-
run the cluster join command (on the new node):
pmgcm join <master_ip>
You need to enter the root password of the master host, when asked for a password. When joining a cluster using the GUI, press the Join Information button on the master node to display its join information, copy that text, and paste it into the Join dialog on the new node. The dialog decodes the join information and fills in the master address and fingerprint automatically. You can still enter the address and fingerprint manually instead.
|
|
The join information records the product and release of the master. The Join dialog rejects join information from a different product and warns you if the releases differ. |
|
|
Joining a cluster with two-factor authentication enabled for the root user is not supported. Remove the second factor when joining the cluster. |
|
|
Node initialization deletes all existing databases, stops all services accessing the database and then restarts them. Therefore, do not add nodes which are already active and receive mail. |
Also note that joining a cluster can take several minutes, because the new node needs to synchronize all data from the master (although this is done in the background).
|
|
If you join a new node, existing quarantined items from the other nodes are not synchronized to the new node. |
9.4.4. Deleting Nodes
Please detach nodes from the cluster network, before removing them from the cluster configuration. Only then you should run the following command on the master node:
pmgcm delete <cid>
Parameter <cid> is the unique cluster node ID, as listed with pmgcm status.
9.4.5. Disaster Recovery
It is highly recommended to use redundant disks on all cluster nodes (RAID). So in almost any circumstance, you just need to replace the damaged hardware or disk. Proxmox Mail Gateway uses an asynchronous clustering algorithm, so you just need to reboot the repaired node, and everything will work again transparently.
The following scenarios only apply when you really lose the contents of the hard disk.
Single Node Failure
-
delete failed node on master
pmgcm delete <cid>
-
add (re-join) a new node
pmgcm join <master_ip>
10. Important Service Daemons
10.1. pmgdaemon - Proxmox Mail Gateway API Daemon
This daemon exposes the whole Proxmox Mail Gateway API on 127.0.0.1:85. It runs as root and has permission to do all privileged operations.
|
|
The daemon listens to a local address only, so you cannot access it from the outside. The pmgproxy daemon exposes the API to the outside world. |
10.2. pmgproxy - Proxmox Mail Gateway API Proxy Daemon
This daemon exposes the whole Proxmox Mail Gateway API on TCP port 8006, using HTTPS. It runs as user www-data and has very limited permissions. Operations requiring more permissions are forwarded to the local pmgdaemon.
Requests targeted at other nodes are automatically forwarded to those nodes. This means that you can manage your whole cluster by connecting to a single Proxmox Mail Gateway node.
10.2.1. Alternative HTTPS certificate
By default, pmgproxy uses the certificate /etc/pmg/pmg-api.pem for HTTPS connections. This certificate is self signed, and therefore not trusted by browsers and operating systems by default. You can simply replace this certificate with your own (include the key inside the .pem file) or obtain one from an ACME enabled CA (configurable in the GUI).
10.2.2. Host based Access Control
It is possible to configure “apache2”-like access control lists. Values are read from file /etc/default/pmgproxy. For example:
ALLOW_FROM="10.0.0.1-10.0.0.5,192.168.0.0/22"
DENY_FROM="all"
POLICY="allow"
IP addresses can be specified using any syntax understood by Net::IP. The name all is an alias for 0/0 and ::/0 (meaning all IPv4 and IPv6 addresses).
The default policy is allow.
| Match | POLICY=deny | POLICY=allow |
|---|---|---|
Match Allow only |
allow |
allow |
Match Deny only |
deny |
deny |
No match |
deny |
allow |
Match Both Allow & Deny |
deny |
allow |
10.2.3. Listening IP
By default the pmgproxy daemon listens on the wildcard address and accepts connections from both IPv4 and IPv6 clients.
By setting LISTEN_IP in /etc/default/pmgproxy, you can control which IP address the pmgproxy daemon binds to. The IP-address needs to be configured on the system.
Setting the sysctl net.ipv6.bindv6only to the non-default 1 will cause the daemons to only accept connections from IPv6 clients, while usually also causing lots of other issues. If you set this configuration, we recommend either removing the sysctl setting, or setting the LISTEN_IP to 0.0.0.0 (which will allow only IPv4 clients).
LISTEN_IP can be used to restrict the socket to an internal interface, thus leaving less exposure to the public internet, for example:
LISTEN_IP="192.0.2.1"
Similarly, you can also set an IPv6 address:
LISTEN_IP="2001:db8:85a3::1"
Note that if you want to specify a link-local IPv6 address, you need to provide the interface name itself. For example:
LISTEN_IP="fe80::c463:8cff:feb9:6a4e%vmbr0"
|
|
The nodes in a cluster need access to pmgproxy for communication, possibly across different subnets. It is not recommended to set LISTEN_IP on clustered systems. |
To apply the change you need to either reboot your node or fully restart the pmgproxy service:
systemctl restart pmgproxy.service
|
|
Unlike reload, a restart of the pmgproxy service can interrupt some long-running worker processes, for example, a running console. Therefore, you should set a maintenance window to bring this change into effect. |
10.2.4. SSL Cipher Suite
You can define the cipher list in /etc/default/pmgproxy, via the CIPHERS (TLS ⇐ 1.2) and CIPHERSUITES (TLS >= 1.3) keys.
For example:
CIPHERS="ECDHE-ECDSA-AES256-GCM-SHA384:ECDHE-RSA-AES256-GCM-SHA384:ECDHE-ECDSA-CHACHA20-POLY1305:ECDHE-RSA-CHACHA20-POLY1305:ECDHE-ECDSA-AES128-GCM-SHA256:ECDHE-RSA-AES128-GCM-SHA256:ECDHE-ECDSA-AES256-SHA384:ECDHE-RSA-AES256-SHA384:ECDHE-ECDSA-AES128-SHA256:ECDHE-RSA-AES128-SHA256"
The above is the default. See the ciphers(1) man page from the openssl package for a list of all available options.
The first of these ciphers that is available to both the client and pmgproxy will be used.
Additionally, you can allow the client to choose the cipher from the list above, by disabling the HONOR_CIPHER_ORDER option in /etc/default/pmgproxy:
HONOR_CIPHER_ORDER=0
10.2.5. Supported TLS versions
The insecure SSL versions 2 and 3 are unconditionally disabled for pmgproxy. TLS versions below 1.1 are disabled by default on recent OpenSSL versions, which is honored by pmgproxy (see /etc/ssl/openssl.cnf).
To disable TLS version 1.2, set the following in /etc/default/pmgproxy:
DISABLE_TLS_1_2=1
or, respectively, to disable TLS version 1.3:
DISABLE_TLS_1_3=1
|
|
Unless there is a specific reason to do so, it is not recommended to manually adjust the supported TLS versions. |
10.2.6. Diffie-Hellman Parameters
You can define the used Diffie-Hellman parameters in /etc/default/pmgproxy by setting DHPARAMS to the path of a file containing DH parameters in PEM format, for example:
DHPARAMS="/path/to/dhparams.pem"
If this option is not set, the built-in skip2048 parameters will be used.
|
|
DH parameters are only used if a cipher suite utilizing the DH key exchange algorithm is negotiated. |
10.3. pmg-smtp-filter - Proxmox SMTP Filter Daemon
The Proxmox SMTP Filter Daemon does the actual spam filtering, using SpamAssassin™ and the rule database. It listens on 127.0.0.1:10023 and 127.0.0.1:10024. The daemon listens to a local address only, so you cannot access it from the outside.
With our postfix configuration, incoming mails are sent to 127.0.0.1:10024. Outgoing (trusted) mails are sent to 127.0.0.1:10023. After filtering, mails are resent to Postfix at 127.0.0.1:10025.
10.4. pmgpolicy - Proxmox Mail Gateway Policy Daemon
This daemon implements the Postfix SMTP access policy delegation protocol on 127.0.0.1:10022. It listens to a local address only, so you cannot access it from the outside. We configure Postfix to use this service for greylisting and as an SPF policy server.
11. Useful Command-line Tools
11.1. pmgdb - Database Management Toolkit
The pmgdb toolkit is used to simplify common database management tasks. It is primarily used internally to create and initialize the default database. You can also use it to reset the filter rules to factory defaults:
pmgdb reset
Or you can dump a human-readable copy of the filter rules:
pmgdb dump
11.2. pmgsh - API Shell
The pmgsh tool can be used to access the Proxmox Mail Gateway API via the command line.
List entries:
# pmgsh ls /
Call the GET method on a specific API path:
# pmgsh get /version
View current mail configuration:
# pmgsh get /config/mail
Get help for a specific path:
# pmgsh help /config/mail -v
Disable option spf in /config/mail
# pmgsh set /config/mail -spf 0
Delete spf setting from /config/mail
# pmgsh set /config/mail -delete spf
11.3. pmgversion - Version Info
pmgversion prints detailed version information for Proxmox Mail Gateway packages.
Print Proxmox Mail Gateway version:
# pmgversion
List version details for important packages:
# pmgversion -v
Please use the Debian package manager for details about other packages:
# dpkg -l
11.4. pmgsubscription - Subscription Management
Proxmox Mail Gateway is free and open-source software. The company that develops it (Proxmox Server Solutions GmbH) offers support in many ways, with different support channels, levels, and pricing.
The tool pmgsubscription is used to handle Proxmox Mail Gateway subscriptions. Please use the GUI or the set command to upload a new key:
# pmgsubscription set <key>
|
|
Subscription keys are bound to specific servers (Server ID), so you can use them for exactly one server. Each server needs its own key. |
The get command is used to view the current subscription status:
# pmgsubscription get
key: pmgc-xxxxxxxxxx
level: c
productname: Proxmox Mail Gateway Trial Subscription 1 year
regdate: 2017-12-15 00:00:00
serverid: XXXXXXXXXXXXXXXXXXXXXXXXXXXXXXXX
status: Active
url: https://www.proxmox.com/en/proxmox-mail-gateway/pricing
11.5. pmgperf - Proxmox Simple Performance Benchmark
The command-line tool pmgperf gathers some general performance data. This is mostly useful for debugging and identifying performance bottlenecks. It computes the following metrics:
|
CPU BOGOMIPS
|
bogomips sum of all CPUs |
|
REGEX/SECOND
|
regular expressions per second (perl performance test), should be above 1000000. |
|
HD SIZE
|
hard disk size |
|
BUFFERED READS
|
simple HD read test. Modern HDs should reach at least 100 MB/sec |
|
AVERAGE SEEK TIME
|
tests average seek time. Fast SCSI HDs reach values < 8 milliseconds. Common IDE/SATA disks get values from 15 to 20 ms. SSD seek times should be below 1ms. |
|
FSYNCS/SECOND
|
value should be greater than 200 (you should enable write-back cache mode on you RAID controller - needs a battery backed cache (BBWC)). |
|
DNS EXT
|
average time to resolve an external DNS name |
|
DNS INT
|
average time to resolve a local DNS name |
Here is an example of the output generated by the tool:
# pmgperf
CPU BOGOMIPS:      16759.60
REGEX/SECOND:      1186304
HD SIZE:           60.78 GB (/dev/sda1)
BUFFERED READS:    209.84 MB/sec
AVERAGE SEEK TIME: 1.24 ms
FSYNCS/SECOND:     2198.79
DNS EXT:           35.69 ms
DNS INT:           1.41 ms (yourdomain.tld)
11.6. pmgqm - Quarantine Management Toolkit
Toolkit to manage spam and virus quarantine, and send spam report mails.
The possible timespans are week, yesterday, and today. The default pmgspamreport.service is run at 00:05 every day and calls the pmgqm command with the --timespan yesterday parameter. This will send a spam report if at least one new spam mail was moved to the quarantine since the beginning of the previous day.
The service can be edited, for example, to change the timespan to today or week, with the following command:
systemctl edit pmgspamreport.service
The timer can be edited with the command below:
systemctl edit pmgspamreport.timer
Note that adding another OnCalendar event will cause the report to be sent in addition to the default time. If you want to prevent the default email at 00:05, you must first reset the original OnCalendar setting. For example, to send the emails only at 06:00 you would enter the following lines when editing the timer unit:
[Timer]
OnCalendar=
OnCalendar=06:00
For details see the systemd man pages: systemd.unit(5), systemd.timer(5).
11.8. pmgupgrade - Upgrade Proxmox Mail Gateway
This is a small wrapper around apt full-upgrade. We use this to print additional information, like when a node reboot is required, due to a kernel update. Additionally, it can run an interactive shell after the update. This is used when starting an upgrade using the web GUI.
If you are already logged in on the console, it is preferable to invoke apt directly.
# apt update
# apt full-upgrade
11.9. pmg-log-tracker - Backend for the Tracking Center
pmg-log-tracker is the backend for the Tracking Center. It parses the syslog files in /var/log/ for mail information. You can specify a different file to parse, for example the mail log /var/log/mail.log, using the -i option.
As an example, parsing the mail.log file for everything between the 1st and 15th of July would be possible with the following command:
pmg-log-tracker -i /var/log/mail.log -s "2021-07-01 00:00:00" -e "2021-07-15 23:59:59"
To scan a whole rotated log series instead of a single file, use the --input-base option. For example, --input-base /var/log/mail.log parses /var/log/mail.log, /var/log/mail.log.1, /var/log/mail.log.2.gz, and so on. Prefer this over -i when the system logs mail events to a dedicated file and you want to cover rotated logs as well. Compression is detected per file, so custom logrotate compression settings are handled.
Start time -s and end time -e are optional. By default the end time will be the current time and the start time will be 0:00 of the current day.
With the --verbose option, additional info will be printed, such as the complete log for every mail.
It is also possible to filter the log entries based on hostname, from address, to address, and other parameters. For a complete overview of all available options, see pmg-log-tracker --help.
Postfix long queue IDs, as generated when the postfix option enable_long_queue_ids is set, are supported.
As a side effect of parsing the syslog, which doesn’t contain information about the year of the entries, the year passed to the -s and -e options has to be the current one, rather than the one in which the logs were actually created.
11.10. nmap - Port Scans
nmap is designed to allow system administrators to scan large networks, to determine which hosts are up and what services they offer. You can use nmap to test your firewall settings, for example, to see if the required ports are open.
# nmap -Pn -sS -p 2703 c301.cloudmark.com
Starting Nmap 7.70 ( https://nmap.org ) at 2020-04-14 12:20 CEST
Nmap scan report for c301.cloudmark.com (208.83.137.114)
Host is up (0.13s latency).

PORT     STATE SERVICE
2703/tcp open  sms-chat

Nmap done: 1 IP address (1 host up) scanned in 6.83 seconds
For more information about nmap usage, see the Nmap Reference Guide, also available as a manual page (man nmap).
12. Frequently Asked Questions
|
|
New FAQs are appended to the bottom of this section. |
-
What distribution is Proxmox Mail Gateway based on?
Proxmox Mail Gateway is based on Debian GNU/Linux
-
What license does the Proxmox Mail Gateway project use?
Proxmox Mail Gateway code is licensed under the GNU Affero General Public License, version 3 (as of the 5.0 release).
-
Will Proxmox Mail Gateway run on a 32bit processor?
Proxmox Mail Gateway works only on 64-bit CPUs (AMD or Intel). There is no plan for 32-bit platform support.
-
How long will my Proxmox Mail Gateway version be supported?
Proxmox Mail Gateway versions are supported at least as long as the corresponding Debian version is supported by the Debian Security Team, i.e. approximately 3 years after its initial release, see Debian lifespan. Proxmox Mail Gateway uses a rolling release model and using the latest stable version is always recommended.
Proxmox Mail Gateway Version Debian Version First Release Debian EOL Proxmox EOL Proxmox Mail Gateway 9.x
Debian 13 (Trixie)
2025-10
tba
tba
Proxmox Mail Gateway 8.x
Debian 12 (Bookworm)
2023-06
2026-07
2026-08
Proxmox Mail Gateway 7.x
Debian 11 (Bullseye)
2021-07
2024-07
2024-07
Proxmox Mail Gateway 6.x
Debian 10 (Buster)
2019-08
2022-07
2022-07
Proxmox Mail Gateway 5.x
Debian 9 (Stretch)
2018-01
2020-07
2020-07
|
|
Proxmox Mail Gateway releases before 5.0 are not listed here. As they are all EOL (End Of Life), it’s highly recommended to upgrade to a newer version, if still in use. |
- How can I upgrade Proxmox Mail Gateway to the next point release?
-
Minor version upgrades, for example, upgrading from Proxmox Mail Gateway version 5.1 to 5.2, can be done just like any normal update. But you should still check the release notes for any relevant notable, or breaking change.
For the update itself use either the Node → Updates panel or the command line with:
apt update
apt full-upgrade
Always ensure that you correctly set up the package repositories, and only continue with the actual upgrade if apt update did not hit any errors. - How can I upgrade Proxmox Mail Gateway to the next major release?
-
Major version upgrades, for example, going from Proxmox Mail Gateway 5.4 to 6.0, are also supported. They must be carefully planned and tested, and should never be started without having an up-to-date backup ready.
13. Bibliography
-
[Hertzog13] Raphaël Hertzog & Roland Mas. The Debian Administrator's Handbook: Debian Jessie from Discovery to Mastery, Freexian, 2013. ISBN 979-1091414050
-
[Bir96] Kenneth P. Birman. Building Secure and Reliable Network Applications. Manning Publications Co, 1996. ISBN 978-1884777295
-
[Walsh10] Norman Walsh. DocBook 5: The Definitive Guide. O’Reilly & Associates, 2010. ISBN 978-0596805029
-
[Richardson07] Leonard Richardson & Sam Ruby. RESTful Web Services. O’Reilly Media, 2007. ISBN 978-0596529260
-
[Friedl97] Jeffrey E. F. Friedl. Mastering Regular Expressions. O’Reilly & Associates, 2006. ISBN 978-0596528126
-
[Mauerer08] Wolfgang Mauerer. Professional Linux Kernel Architecture. John Wiley & Sons, 2008. ISBN 978-0470343432
-
[Loshin03] Pete Loshin, IPv6: Theory, Protocol, and Practice, 2nd Edition. Morgan Kaufmann, 2003. ISBN 978-1558608108
-
[Loeliger12] Jon Loeliger & Matthew McCullough. Version Control with Git: Powerful tools and techniques for collaborative software development. O’Reilly and Associates, 2012. ISBN 978-1449316389
-
[Ahmed16] Wasim Ahmed. Mastering Proxmox - Second Edition. Packt Publishing, 2016. ISBN 978-1785888243
14. Appendix A: Command-line Interface
14.1. pmgbackup - Proxmox Mail Gateway Backup and Restore Utility
Backup the system configuration.
- --notify <always | error | never> (default = never)
-
Specify when to notify via e-mail
- --statistic <boolean> (default = 1)
-
Backup statistic databases.
Get help about specified command.
- --extra-args <array>
-
Shows help for a specific command
- --verbose <boolean>
-
Verbose output format.
List all stored backups (files named proxmox-backup_Wed Jun 10 08:46:21 PM CEST 2026.tgz).
Create a new backup and prune the backup group afterwards, if configured.
- <remote>: <string>
-
Proxmox Backup Server ID.
- --notify <always | error | never> (default = never)
-
Specify when to notify via e-mail
- --statistic <boolean> (default = 1)
-
Backup statistic databases.
Forget a snapshot
- <remote>: <string>
-
Proxmox Backup Server ID.
- <backup-id>: <string>
-
ID (hostname) of backup snapshot
- <backup-time>: <string>
-
Backup time in RFC 3339 format
Create backup schedule
- <remote>: <string>
-
Proxmox Backup Server ID.
- --delay [0-9a-zA-Z. ]+ (default = 5min)
-
Randomized delay to add to the starttime (RandomizedDelaySec setting of the systemd.timer)
- --schedule [0-9a-zA-Z*.:,\-/ ]+ (default = daily)
-
Schedule for the backup (OnCalendar setting of the systemd.timer)
Delete backup schedule
- <remote>: <string>
-
Proxmox Backup Server ID.
Get timer specification
- <remote>: <string>
-
Proxmox Backup Server ID.
Get snapshots stored on remote.
- <remote>: <string>
-
Proxmox Backup Server ID.
Add Proxmox Backup Server remote instance.
- <remote>: <string>
-
Proxmox Backup Server ID.
- --datastore (?:[A-Za-z0-9_][A-Za-z0-9._\-]*)
-
Proxmox Backup Server datastore name.
- --disable <boolean>
-
Flag to disable (deactivate) the entry.
- --encryption-key a file containing an encryption key, or the special value "autogen"
-
Encryption key. Use autogen to generate one automatically without passphrase.
- --fingerprint ([A-Fa-f0-9]{2}:){31}[A-Fa-f0-9]{2}
-
Certificate SHA 256 fingerprint.
- --include-statistics <boolean>
-
Include statistics in scheduled backups
- --keep-daily <N>
-
Keep backups for the last <N> different days. If there is more than one backup for a single day, only the latest one is kept.
- --keep-hourly <N>
-
Keep backups for the last <N> different hours. If there is more than one backup for a single hour, only the latest one is kept.
- --keep-last <N>
-
Keep the last <N> backups.
- --keep-monthly <N>
-
Keep backups for the last <N> different months. If there is more than one backup for a single month, only the latest one is kept.
- --keep-weekly <N>
-
Keep backups for the last <N> different weeks. If there ismore than one backup for a single week, only the latest one is kept.
- --keep-yearly <N>
-
Keep backups for the last <N> different years. If there is more than one backup for a single year, only the latest one is kept.
- --master-pubkey a file containing a PEM-formatted master public key
-
Base64-encoded, PEM-formatted public RSA key. Used to encrypt a copy of the encryption-key which will be added to each encrypted backup.
- --namespace (?:(?:[A-Za-z0-9_][A-Za-z0-9._\-]*)/){0,7}(?:(?:[A-Za-z0-9_][A-Za-z0-9._\-]*))?
-
Proxmox Backup Server namespace in the datastore, defaults to the root NS.
- --notify <always | error | never>
-
Specify when to notify via e-mail
- --password <password>
-
Password or API token secret for the user on the Proxmox Backup Server.
- --port <integer> (1 - 65535) (default = 8007)
-
Non-default port for Proxmox Backup Server.
- --server <string>
-
Proxmox Backup Server address.
- --username (?:[^\s\\@]+\@[^\s\/\\@]+)
-
Username or API token ID on the Proxmox Backup Server
List all configured Proxmox Backup Server instances.
Delete an PBS remote
- <remote>: <string>
-
Profile ID.
Update PBS remote settings.
- <remote>: <string>
-
Proxmox Backup Server ID.
- --datastore (?:[A-Za-z0-9_][A-Za-z0-9._\-]*)
-
Proxmox Backup Server datastore name.
- --delete <string>
-
A list of settings you want to delete.
- --digest <string>
-
Prevent changes if current configuration file has a different digest. This can be used to prevent concurrent modifications.
- --disable <boolean>
-
Flag to disable (deactivate) the entry.
- --encryption-key a file containing an encryption key, or the special value "autogen"
-
Encryption key. Use autogen to generate one automatically without passphrase.
- --fingerprint ([A-Fa-f0-9]{2}:){31}[A-Fa-f0-9]{2}
-
Certificate SHA 256 fingerprint.
- --include-statistics <boolean>
-
Include statistics in scheduled backups
- --keep-daily <N>
-
Keep backups for the last <N> different days. If there is more than one backup for a single day, only the latest one is kept.
- --keep-hourly <N>
-
Keep backups for the last <N> different hours. If there is more than one backup for a single hour, only the latest one is kept.
- --keep-last <N>
-
Keep the last <N> backups.
- --keep-monthly <N>
-
Keep backups for the last <N> different months. If there is more than one backup for a single month, only the latest one is kept.
- --keep-weekly <N>
-
Keep backups for the last <N> different weeks. If there ismore than one backup for a single week, only the latest one is kept.
- --keep-yearly <N>
-
Keep backups for the last <N> different years. If there is more than one backup for a single year, only the latest one is kept.
- --master-pubkey a file containing a PEM-formatted master public key
-
Base64-encoded, PEM-formatted public RSA key. Used to encrypt a copy of the encryption-key which will be added to each encrypted backup.
- --namespace (?:(?:[A-Za-z0-9_][A-Za-z0-9._\-]*)/){0,7}(?:(?:[A-Za-z0-9_][A-Za-z0-9._\-]*))?
-
Proxmox Backup Server namespace in the datastore, defaults to the root NS.
- --notify <always | error | never>
-
Specify when to notify via e-mail
- --password <password>
-
Password or API token secret for the user on the Proxmox Backup Server.
- --port <integer> (1 - 65535) (default = 8007)
-
Non-default port for Proxmox Backup Server.
- --server <string>
-
Proxmox Backup Server address.
- --username (?:[^\s\\@]+\@[^\s\/\\@]+)
-
Username or API token ID on the Proxmox Backup Server
Restore the system configuration.
- <remote>: <string>
-
Proxmox Backup Server ID.
- <backup-id>: <string>
-
backup-id (hostname) of backup snapshot
- <backup-time>: <string>
-
backup-time to restore
- --config <boolean> (default = 0)
-
Restore system configuration.
- --database <boolean> (default = 1)
-
Restore the rule database. This is the default.
- --statistic <boolean> (default = 0)
-
Restore statistic databases. Only considered when you restore the database.
Restore the system configuration.
- --config <boolean> (default = 0)
-
Restore system configuration.
- --database <boolean> (default = 1)
-
Restore the rule database. This is the default.
- --filename pmg-backup_[0-9A-Za-z_-]+\.tgz
-
The backup file name.
- --statistic <boolean> (default = 0)
-
Restore statistic databases. Only considered when you restore the database.
14.2. pmgcm - Proxmox Mail Gateway Cluster Management Toolkit
Create initial cluster config with current node as master.
Remove a node from the cluster.
- <cid>: <integer> (1 - N)
-
Cluster Node ID.
Get help about specified command.
- --extra-args <array>
-
Shows help for a specific command
- --verbose <boolean>
-
Verbose output format.
Join a new node to an existing cluster.
- <master_ip>: <string>
-
IP address.
- --fingerprint ([A-Fa-f0-9]{2}:){31}[A-Fa-f0-9]{2}
-
Certificate SHA 256 fingerprint.
Prints the command for joining an new node to the cluster. You need to execute the command on the new node.
An alias for pmgcm join-cmd.
Promote current node to become the new master.
Cluster node status.
- --list_single_node <boolean> (default = 0)
-
List local node if there is no cluster defined. Please note that RSA keys and fingerprint are not valid in that case.
Synchronize cluster configuration.
- --master_ip <string>
-
Optional IP address for master node.
Notify master to refresh all certificate fingerprints
14.3. pmgsh - API Shell
Interactive session:
pmgsh
Directly call API functions:
pmgsh (get|set|create|help) <path> [OPTIONS]
14.4. pmgperf - Proxmox Simple Performance Benchmark
Proxmox benchmark.
- <path>: <string> (default = /)
-
File system location to test.
14.5. pmgconfig - Configuration Management Toolkit
Deactivate existing ACME account at CA.
- <name>: <name> (default = default)
-
ACME account config file name.
- --force <boolean> (default = 0)
-
Delete account data even if the server refuses to deactivate the account.
Return existing ACME account information.
- <name>: <name> (default = default)
-
ACME account config file name.
ACME account index.
Register a new ACME account with a compatible CA.
- <name>: <name> (default = default)
-
ACME account config file name.
- <contact>: <string>
-
Contact email addresses.
- --directory ^https?://.*
-
URL of ACME CA directory endpoint.
Update existing ACME account information with CA. Note: not specifying any new account information triggers a refresh.
- <name>: <name> (default = default)
-
ACME account config file name.
- --contact <string>
-
Contact email addresses.
Order a new certificate from ACME-compatible CA.
- <type>: <api | smtp>
-
The TLS certificate type (API or SMTP certificate).
- --force <boolean> (default = 0)
-
Overwrite existing custom certificate.
Renew existing certificate from CA.
- <type>: <api | smtp>
-
The TLS certificate type (API or SMTP certificate).
- --force <boolean> (default = 0)
-
Force renewal even if expiry is more than 30 days away.
Revoke existing certificate from CA.
- <type>: <api | smtp>
-
The TLS certificate type (API or SMTP certificate).
Add ACME plugin configuration.
- <type>: <dns | standalone>
-
ACME challenge type.
- <id>: <string>
-
ACME Plugin ID name
- --api <1984hosting | acmedns | acmeproxy | active24 | ad | ali | alviy | anx | artfiles | arvan | aurora | autodns | aws | azion | azure | beget | bookmyname | bunny | cf | clouddns | cloudns | cn | conoha | constellix | cpanel | curanet | cyon | da | ddnss | desec | df | dgon | dnsexit | dnshome | dnsimple | dnsservices | doapi | domeneshop | dp | dpi | dreamhost | duckdns | durabledns | dyn | dynu | dynv6 | easydns | edgecenter | edgedns | euserv | exoscale | fornex | freedns | freemyip | gandi_livedns | gcloud | gcore | gd | geoscaling | googledomains | he | he_ddns | hetzner | hetznercloud | hexonet | hostingde | huaweicloud | infoblox | infomaniak | internetbs | inwx | ionos | ionos_cloud | ipv64 | ispconfig | jd | joker | kappernet | kas | kinghost | knot | la | leaseweb | lexicon | limacity | linode | linode_v4 | loopia | lua | maradns | me | miab | mijnhost | misaka | myapi | mydevil | mydnsjp | mythic_beasts | namecheap | namecom | namesilo | nanelo | nederhost | neodigit | netcup | netlify | nic | njalla | nm | nsd | nsone | nsupdate | nw | oci | omglol | one | online | openprovider | openprovider_rest | openstack | opnsense | ovh | pdns | pleskxml | pointhq | porkbun | rackcorp | rackspace | rage4 | rcode0 | regru | scaleway | schlundtech | selectel | selfhost | servercow | simply | spaceship | technitium | tele3 | tencent | timeweb | transip | udr | ultra | unoeuro | variomedia | veesp | vercel | vscale | vultr | websupport | west_cn | world4you | yandex360 | yc | zilore | zone | zoneedit | zonomi>
-
API plugin name
- --data File with one key-value pair per line, will be base64url encode for storage in plugin config.
-
DNS plugin data. (base64 encoded)
- --disable <boolean>
-
Flag to disable the config.
- --nodes <string>
-
List of cluster node names.
- --validation-delay <integer> (0 - 172800) (default = 30)
-
Extra delay in seconds to wait before requesting validation. Allows to cope with a long TTL of DNS records.
Get ACME plugin configuration.
- <id>: <string>
-
Unique identifier for ACME plugin instance.
ACME plugin index.
- --type <dns | standalone>
-
Only list ACME plugins of a specific type
Delete ACME plugin configuration.
- <id>: <string>
-
Unique identifier for ACME plugin instance.
Update ACME plugin configuration.
- <id>: <string>
-
ACME Plugin ID name
- --api <1984hosting | acmedns | acmeproxy | active24 | ad | ali | alviy | anx | artfiles | arvan | aurora | autodns | aws | azion | azure | beget | bookmyname | bunny | cf | clouddns | cloudns | cn | conoha | constellix | cpanel | curanet | cyon | da | ddnss | desec | df | dgon | dnsexit | dnshome | dnsimple | dnsservices | doapi | domeneshop | dp | dpi | dreamhost | duckdns | durabledns | dyn | dynu | dynv6 | easydns | edgecenter | edgedns | euserv | exoscale | fornex | freedns | freemyip | gandi_livedns | gcloud | gcore | gd | geoscaling | googledomains | he | he_ddns | hetzner | hetznercloud | hexonet | hostingde | huaweicloud | infoblox | infomaniak | internetbs | inwx | ionos | ionos_cloud | ipv64 | ispconfig | jd | joker | kappernet | kas | kinghost | knot | la | leaseweb | lexicon | limacity | linode | linode_v4 | loopia | lua | maradns | me | miab | mijnhost | misaka | myapi | mydevil | mydnsjp | mythic_beasts | namecheap | namecom | namesilo | nanelo | nederhost | neodigit | netcup | netlify | nic | njalla | nm | nsd | nsone | nsupdate | nw | oci | omglol | one | online | openprovider | openprovider_rest | openstack | opnsense | ovh | pdns | pleskxml | pointhq | porkbun | rackcorp | rackspace | rage4 | rcode0 | regru | scaleway | schlundtech | selectel | selfhost | servercow | simply | spaceship | technitium | tele3 | tencent | timeweb | transip | udr | ultra | unoeuro | variomedia | veesp | vercel | vscale | vultr | websupport | west_cn | world4you | yandex360 | yc | zilore | zone | zoneedit | zonomi>
-
API plugin name
- --data File with one key-value pair per line, will be base64url encode for storage in plugin config.
-
DNS plugin data. (base64 encoded)
- --delete <string>
-
A list of settings you want to delete.
- --digest <string>
-
Prevent changes if current configuration file has a different digest. This can be used to prevent concurrent modifications.
- --disable <boolean>
-
Flag to disable the config.
- --nodes <string>
-
List of cluster node names.
- --validation-delay <integer> (0 - 172800) (default = 30)
-
Extra delay in seconds to wait before requesting validation. Allows to cope with a long TTL of DNS records.
Generate /etc/pmg/pmg-api.pem (self signed certificate for GUI and REST API).
- --force <boolean> (default = 0)
-
Overwrite existing certificate.
DELETE custom certificate chain and key.
- <type>: <api | smtp>
-
The TLS certificate type (API or SMTP certificate).
- <restart>: <boolean> (default = 0)
-
Restart pmgproxy.
Get information about the node’s certificates.
Upload or update custom certificate chain and key.
- <type>: <api | smtp>
-
The TLS certificate type (API or SMTP certificate).
- <certificates>: <string>
-
PEM encoded certificate (chain).
- <key>: <string>
-
PEM encoded private key.
- --force <boolean> (default = 0)
-
Overwrite existing custom or ACME certificate files.
- --restart <boolean> (default = 0)
-
Restart services.
Get the public key for the configured selector, prepared as DKIM TXT record
Generate a new private key for selector. All future mail will be signed with the new key!
- --force <boolean>
-
Overwrite existing key
- --keysize <integer> (1024 - N)
-
Number of bits for the RSA-Key
- --selector <string>
-
DKIM Selector
Print configuration setting which can be used in templates.
Get help about specified command.
- --extra-args <array>
-
Shows help for a specific command
- --verbose <boolean>
-
Verbose output format.
Generate required files in /etc/pmg/
Synchronize the LDAP database.
Synchronize Proxmox Mail Gateway configurations with system configuration.
- --restart <boolean> (default = 0)
-
Restart services if necessary.
Generate /etc/pmg/pmg-tls.pem (self signed certificate for encrypted SMTP traffic).
- --force <boolean> (default = 0)
-
Overwrite existing certificate.
14.6. pmgdb - Database Management Toolkit
Delete PMG rule database.
Print the PMG rule database.
- --rules <active | all | inactive> (default = all)
-
Which rules should be printed
Get help about specified command.
- --extra-args <array>
-
Shows help for a specific command
- --verbose <boolean>
-
Verbose output format.
Initialize/Upgrade the PMG rule database.
- --force <boolean> (default = 0)
-
Delete existing database.
- --statistics <boolean> (default = 0)
-
Reset and update statistic database.
Reset PMG rule database back to factory defaults.
Update the PMG statistic database.
15. Appendix B: Service Daemons
15.1. pmgdaemon - Proxmox Mail Gateway API Daemon
Get help about specified command.
- --extra-args <array>
-
Shows help for a specific command
- --verbose <boolean>
-
Verbose output format.
Restart the daemon (or start if not running).
Start the daemon.
- --debug <boolean> (default = 0)
-
Debug mode - stay in foreground
Get daemon status.
Stop the daemon.
15.2. pmgproxy - Proxmox Mail Gateway API Proxy Daemon
Get help about specified command.
- --extra-args <array>
-
Shows help for a specific command
- --verbose <boolean>
-
Verbose output format.
Restart the daemon (or start if not running).
Start the daemon.
- --debug <boolean> (default = 0)
-
Debug mode - stay in foreground
Get daemon status.
Stop the daemon.
15.3. pmg-smtp-filter - Proxmox SMTP Filter Daemon
Please use systemd tools to manage this service.
systemctl (start|stop|restart|reload|status) pmg-smtp-filter
15.4. pmgpolicy - Proxmox Mail Gateway Policy Daemon
Please use systemd tools to manage this service.
systemctl (start|stop|restart|reload|status) pmgpolicy
15.5. pmgtunnel - Cluster Tunnel Daemon
Get help about specified command.
- --extra-args <array>
-
Shows help for a specific command
- --verbose <boolean>
-
Verbose output format.
Restart the Cluster Tunnel Daemon
Start the Cluster Tunnel Daemon
- --debug <boolean> (default = 0)
-
Debug mode - stay in foreground
Print cluster tunnel status.
Stop the Cluster Tunnel Daemon
15.6. pmgmirror - Database Mirror Daemon
Get help about specified command.
- --extra-args <array>
-
Shows help for a specific command
- --verbose <boolean>
-
Verbose output format.
Restart the Database Mirror Daemon
Start the Database Mirror Daemon
- --debug <boolean> (default = 0)
-
Debug mode - stay in foreground
Stop the Database Mirror Daemon
16. Appendix C: Available Macros for the Rule System
It is possible to use macros inside most fields of action objects. That way it is possible to access and include data contained in the original mail, get envelope sender and receivers addresses or include additional information about Viruses and Spam. Currently the following macros are defined:
| Macro | Comment |
|---|---|
__SENDER__ |
(envelope) sender mail address |
__RECEIVERS__ |
(envelope) receiver mail address list |
__ADMIN__ |
Email address of the administrator |
__TARGETS__ |
Subset of receivers matched by the rule |
__SUBJECT__ |
Subject of the message |
__MSGID__ |
The message ID |
__RULE__ |
Name of the matching rule |
__RULE_INFO__ |
Additional information about the matching rule |
__VIRUS_INFO__ |
Additional information about detected viruses |
__SPAMLEVEL__ |
Computed spam level |
__SPAM_INFO__ |
Additional information why message is spam |
__SENDER_IP__ |
IP address of sending host |
__VERSION__ |
The current software version (proxmox mail gateway) |
__FILENAME__ |
Attachment file name |
__SPAMSTARS__ |
A series of "*" characters where each one represents a full score (SPAMLEVEL) point |
17. Appendix D: Configuration Files
17.1. Proxmox Mail Gateway Main Configuration
The file /etc/pmg/pmg.conf is the main configuration.
17.1.1. File Format
The file is divided into several sections. Each section has the following format:
section: NAME
         OPTION value
         ...
Blank lines in the file separate sections, and lines starting with a # character are treated as comments and are also ignored.
17.1.2. Options
- admin-mail-from: ^\p{PosixPrint}{1,998}$ (default = Proxmox Mail Gateway <postmaster>)
-
Text for From header in admin mails and bounces.
- advfilter: <boolean> (default = 0)
-
Enable advanced filters for statistic.
If this is enabled, the receiver statistic are limited to active ones (receivers which also sent out mail in the 90 days before), and the contact statistic will not contain these active receivers.
- avast: <boolean> (default = 0)
-
Use Avast Virus Scanner (/usr/bin/scan). You need to buy and install Avast Core Security before you can enable this feature.
- clamav: <boolean> (default = 1)
-
Use ClamAV Virus Scanner. This is the default virus scanner and is enabled by default.
- consent-text: <string> (default = ``)
-
Consent text that is displayed before logging in.
- custom_check: <boolean> (default = 0)
-
Use Custom Check Script. The script has to take the defined arguments and can return Virus findings or a Spamscore.
- custom_check_path: ^/([^/\0]+\/)+[^/\0]+$ (default = /usr/local/bin/pmg-custom-check)
-
Absolute Path to the Custom Check Script
- dailyreport: <boolean> (default = 1)
-
Send daily reports.
- demo: <boolean> (default = 0)
-
Demo mode - do not start SMTP filter.
- dkim-use-domain: <envelope | header> (default = envelope)
-
Whether to sign using the domain found in the header or the envelope.
- dkim_selector: <string>
-
Default DKIM selector
- dkim_sign: <boolean> (default = 0)
-
DKIM sign outbound mails with the configured Selector.
- dkim_sign_all_mail: <boolean> (default = 0)
-
DKIM sign all outgoing mails irrespective of the Envelope From domain.
- email: <string> (default = admin@domain.tld)
-
Administrator E-Mail address.
- http_proxy: http://.*
-
Specify external http proxy which is used for downloads (example: http://username:password@host:port/)
- statlifetime: <integer> (1 - N) (default = 7)
-
User Statistics Lifetime (days)
- archiveblockencrypted: <boolean> (default = 0)
-
Whether to mark encrypted archives and documents as heuristic virus match. A match does not necessarily result in an immediate block, it just raises the Spam Score by clamav_heuristic_score.
- archivemaxfiles: <integer> (0 - N) (default = 1000)
-
Number of files to be scanned within an archive, a document, or any other kind of container. Warning: disabling this limit or setting it too high may result in severe damage to the system.
- archivemaxrec: <integer> (1 - N) (default = 5)
-
Nested archives are scanned recursively, e.g. if a ZIP archive contains a TAR file, all files within it will also be scanned. This options specifies how deeply the process should be continued. Warning: setting this limit too high may result in severe damage to the system.
- archivemaxsize: <integer> (1000000 - N) (default = 25000000)
-
Files larger than this limit (in bytes) won’t be scanned.
- dbmirror: <string> (default = database.clamav.net)
-
ClamAV database mirror server.
- maxcccount: <integer> (0 - N) (default = 0)
-
This option sets the lowest number of Credit Card or Social Security numbers found in a file to generate a detect.
- maxscansize: <integer> (1000000 - N) (default = 100000000)
-
Sets the maximum amount of data (in bytes) to be scanned for each input file.
- scriptedupdates: <boolean> (default = 1)
-
Enables ScriptedUpdates (incremental download of signatures)
- accept-broken-mime: <boolean> (default = 0)
-
Accept e-mails with broken MIME structure (insecure). If enabled, a X-Proxmox-Broken-Message header is added to each mail with broken MIME structure.
- banner: <string> (default = ESMTP Proxmox)
-
ESMTP banner.
- before_queue_filtering: <boolean> (default = 0)
-
Enable before queue filtering by pmg-smtp-filter
- conn_count_limit: <integer> (0 - N) (default = 50)
-
How many simultaneous connections any client is allowed to make to this service. To disable this feature, specify a limit of 0.
- conn_rate_limit: <integer> (0 - N) (default = 0)
-
The maximal number of connection attempts any client is allowed to make to this service per minute. To disable this feature, specify a limit of 0.
- dnsbl_sites: <string>
-
Optional list of DNS welcome/blocklist domains (postfix option postscreen_dnsbl_sites).
- dnsbl_threshold: <integer> (0 - N) (default = 1)
-
The inclusive lower bound for blocking a remote SMTP client, based on its combined DNSBL score (postfix option postscreen_dnsbl_threshold).
- dwarning: <integer> (0 - N) (default = 4)
-
SMTP delay warning time (in hours). (postfix option delay_warning_time)
- ext_port: <integer> (1 - 65535) (default = 25)
-
SMTP port number for incoming mail (untrusted). This must be a different number than int_port.
- filter-timeout: <integer> (2 - 86400) (default = 600)
-
Timeout for the processing of one mail (in seconds) (postfix option smtpd_proxy_timeout and lmtp_data_done_timeout)
- greylist: <boolean> (default = 1)
-
Use Greylisting for IPv4.
- greylist6: <boolean> (default = 0)
-
Use Greylisting for IPv6.
- greylistmask4: <integer> (0 - 32) (default = 24)
-
Netmask to apply for greylisting IPv4 hosts
- greylistmask6: <integer> (0 - 128) (default = 64)
-
Netmask to apply for greylisting IPv6 hosts
- helotests: <boolean> (default = 0)
-
Use SMTP HELO tests. (postfix option smtpd_helo_restrictions)
- hide_received: <boolean> (default = 0)
-
Hide received header in outgoing mails.
- int_port: <integer> (1 - 65535) (default = 26)
-
SMTP port number for outgoing mail (trusted).
- log-headers: <boolean> (default = 0)
-
Log the envelope sender and recipient together with the decoded From, To, and Subject headers of each processed mail to the mail log. This eases auditing and tracing, but writes potentially personal data, such as mail subjects and addresses, to the host log. Make sure this is compatible with your data-protection obligations before enabling it.
- max_filters: <integer> (3 - 40) (default = 38)
-
Maximum number of pmg-smtp-filter processes.
- max_policy: <integer> (2 - 10) (default = 5)
-
Maximum number of pmgpolicy processes.
- max_smtpd_in: <integer> (3 - 100) (default = 100)
-
Maximum number of SMTP daemon processes (in).
- max_smtpd_out: <integer> (3 - 100) (default = 100)
-
Maximum number of SMTP daemon processes (out).
- maxsize: <integer> (1024 - N) (default = 10485760)
-
Maximum email size. Larger mails are rejected. (postfix option message_size_limit)
- message_rate_limit: <integer> (0 - N) (default = 0)
-
The maximal number of message delivery requests that any client is allowed to make to this service per minute.To disable this feature, specify a limit of 0.
- ndr_on_block: <boolean> (default = 0)
-
Send out NDR when mail gets blocked
- queue-lifetime: <integer> (1 - 100)
-
Maximum time (in days) a deferred message is kept in the queue before it is returned to the sender as undeliverable. Also applies to bounce (notification) messages. (postfix options maximal_queue_lifetime and bounce_queue_lifetime)
- rejectunknown: <boolean> (default = 0)
-
Reject unknown clients. (postfix option reject_unknown_client_hostname)
- rejectunknownsender: <boolean> (default = 0)
-
Reject unknown senders. (postfix option reject_unknown_sender_domain)
- relay: <string>
-
The default mail delivery transport (incoming mails).
- relaynomx: <boolean> (default = 0)
-
Disable MX lookups for default relay (SMTP only, ignored for LMTP).
- relayport: <integer> (1 - 65535) (default = 25)
-
SMTP/LMTP port number for relay host.
- relayprotocol: <lmtp | smtp> (default = smtp)
-
Transport protocol for relay host.
- smarthost: <string>
-
When set, all outgoing mails are delivered to the specified smarthost. (postfix option default_transport)
- smarthostport: <integer> (1 - 65535) (default = 25)
-
SMTP port number for smarthost. (postfix option default_transport)
- smtputf8: <boolean> (default = 1)
-
Enable SMTPUTF8 support in Postfix and detection for locally generated mail (postfix option smtputf8_enable)
- spf: <boolean> (default = 1)
-
Use Sender Policy Framework.
- tls: <boolean> (default = 0)
-
Enable TLS.
- tlsheader: <boolean> (default = 0)
-
Add TLS received header.
- tlslog: <boolean> (default = 0)
-
Enable TLS Logging.
- verifyreceivers: <450 | 550>
-
Enable receiver verification. The value specifies the numerical reply code when the Postfix SMTP server rejects a recipient address. (postfix options reject_unknown_recipient_domain, reject_unverified_recipient, and unverified_recipient_reject_code)
- bounce_score: <integer> (0 - 1000) (default = 0)
-
Additional score for bounce mails.
- clamav_heuristic_score: <integer> (0 - 1000) (default = 3)
-
Score for ClamAV heuristics (Encrypted Archives/Documents, PhishingScanURLs, …).
- extract_text: <boolean> (default = 0)
-
Extract text from attachments (doc, pdf, rtf, images) and scan for spam.
- languages: (all|([a-z][a-z])+( ([a-z][a-z])+)*) (default = all)
-
This option is used to specify which languages are considered OK for incoming mail.
- maxspamsize: <integer> (64 - N) (default = 262144)
-
Maximum size of spam messages in bytes.
- rbl_checks: <boolean> (default = 1)
-
Enable real time blocklists (RBL) checks.
- use_awl: <boolean> (default = 0)
-
Use the Auto-Welcomelist plugin.
- use_bayes: <boolean> (default = 0)
-
Whether to use the naive-Bayesian-style classifier.
- use_razor: <boolean> (default = 1)
-
Whether to use Razor2, if it is available.
- wl_bounce_relays: <string>
-
Welcomelist legitimate bounce relays.
- allowhrefs: <boolean> (default = 1)
-
Allow to view hyperlinks. When disabled hyperlinks will be displayed as plain-text.
- authmode: <ldap | ldapticket | ticket> (default = ticket)
-
Authentication mode to access the quarantine interface. Mode ticket allows login using tickets sent with the daily spam report. Mode ldap requires to login using an LDAP account. Finally, mode ldapticket allows both ways.
- hostname: <string>
-
Quarantine Host. Useful if you run a Cluster and want users to connect to a specific host.
- lifetime: <integer> (1 - N) (default = 7)
-
Quarantine life time (days)
- mailfrom: <string>
-
Text for From header in daily spam report mails.
- port: <integer> (1 - 65535) (default = 8006)
-
Quarantine Port. Useful if you have a reverse proxy or port forwarding for the webinterface. Only used for the generated Spam report.
- protocol: <http | https> (default = https)
-
Quarantine Webinterface Protocol. Useful if you have a reverse proxy for the webinterface. Only used for the generated Spam report.
- quarantinelink: <boolean> (default = 0)
-
Enables user self-service for Quarantine Links. Caution: this is accessible without authentication
- reportstyle: <custom | none | short | verbose> (default = verbose)
-
Spam report style.
- viewimages: <0 | 1 | on-demand> (default = 1)
-
Control how images in quarantined mails are displayed. 1 shows all images, including externally hosted ones; 0 hides all images; on-demand shows only embedded images and lets the user load externally hosted ones manually (avoids leaking that a mail was opened).
- allowhrefs: <boolean> (default = 1)
-
Allow to view hyperlinks. When disabled hyperlinks will be displayed as plain-text.
- lifetime: <integer> (1 - N) (default = 7)
-
Quarantine life time (days)
- viewimages: <0 | 1 | on-demand> (default = 1)
-
Control how images in quarantined mails are displayed. 1 shows all images, including externally hosted ones; 0 hides all images; on-demand shows only embedded images and lets the user load externally hosted ones manually (avoids leaking that a mail was opened).
17.2. Cluster Configuration
The file /etc/pmg/cluster.conf contains the cluster configuration.
17.2.1. File Format
The file is divided into several sections. There is one master and several node sections.
master: <cid>
         OPTION value
         ...

node: <cid>
         OPTION value
         ...
Blank lines in the file separate sections, and lines starting with a # character are treated as comments and are also ignored.
17.2.2. Options
- cid: <integer> (1 - N)
-
Cluster Node ID.
- fingerprint: ([A-Fa-f0-9]{2}:){31}[A-Fa-f0-9]{2}
-
Certificate SHA 256 fingerprint.
- hostrsapubkey: ^[A-Za-z0-9\.\/\+=]{200,}$
-
Public SSH RSA key for the host.
- ip: <string>
-
IP address.
- maxcid: <integer> (1 - N)
-
Maximum used cluster node ID (used internally, do not modify).
- name: <string>
-
Node name.
- rootrsapubkey: ^[A-Za-z0-9\.\/\+=]{200,}$
-
Public SSH RSA key for the root user.
17.3. User Configuration
The file /etc/pmg/user.conf contains the user configuration.
17.3.1. File Format
The file has the following format for each user:
# comment
userid:enable:expire:crypt_pass:role:email:firstname:lastname:keys:
17.3.2. Options
- comment: <string>
-
Comment.
- crypt_pass: \$\d\$[a-zA-Z0-9\.\/]+\$[a-zA-Z0-9\.\/]+
-
Encrypted password (see man crypt)
- email: <string>
-
Users E-Mail address.
- enable: <boolean> (default = 0)
-
Flag to enable or disable the account.
- expire: <integer> (0 - N) (default = 0)
-
Account expiration date (seconds since epoch). 0 means no expiration date.
- firstname: <string>
-
First name.
- keys: <string>
-
Keys for two factor auth (yubico).
- lastname: <string>
-
Last name.
- password: <string>
-
Password
- realm: <string> (default = pmg)
-
Authentication realm.
- role: <admin | audit | helpdesk | qmanager | root>
-
User role. Role root is reserved for the Unix Superuser.
- userid: <string>
-
User ID
17.4. LDAP Configuration
The file /etc/pmg/ldap.conf contains the LDAP configuration.
17.4.1. File Format
The file is divided into a section for each LDAP profile. Each section has the following format:
ldap: NAME
         OPTION value
         ...
Blank lines in the file separate sections, and lines starting with a # character are treated as comments and are also ignored.
17.4.2. Options
- accountattr: <string> (default = sAMAccountName, uid)
-
Account attribute name name.
- basedn: <string>
-
Base domain name.
- binddn: <string>
-
Bind domain name.
- bindpw: <string>
-
Bind password.
- cafile: <string>
-
Path to CA file. Only useful with option verify
- comment: <string>
-
Description.
- disable: <boolean>
-
Flag to disable/deactivate the entry.
- filter: <string>
-
LDAP filter.
- groupbasedn: <string>
-
Base domain name for groups.
- groupclass: <string> (default = group, univentionGroup, ipausergroup)
-
List of objectclasses for groups.
- mailattr: <string> (default = mail, userPrincipalName, proxyAddresses, othermailbox, mailAlternativeAddress)
-
List of mail attribute names.
- mode: <ldap | ldap+starttls | ldaps> (default = ldap)
-
LDAP protocol mode (ldap, ldaps or ldap+starttls).
- port: <integer> (1 - 65535)
-
Specify the port to connect to.
- profile: <string>
-
Profile ID.
- server1: <string>
-
Server address.
- server2: <string>
-
Fallback server address. Userd when the first server is not available.
- verify: <boolean> (default = 0)
-
Verify server certificate. Only useful with ldaps or ldap+starttls.
18. Appendix E: GNU Free Documentation License
Version 1.3, 3 November 2008
Copyright © 2000, 2001, 2002, 2007, 2008 Free Software Foundation, Inc. https://fsf.org/
Everyone is permitted to copy and distribute verbatim copies of this license document, but changing it is not allowed.
The purpose of this License is to make a manual, textbook, or other functional and useful document "free" in the sense of freedom: to assure everyone the effective freedom to copy and redistribute it, with or without modifying it, either commercially or noncommercially. Secondarily, this License preserves for the author and publisher a way to get credit for their work, while not being considered responsible for modifications made by others.
This License is a kind of "copyleft", which means that derivative works of the document must themselves be free in the same sense. It complements the GNU General Public License, which is a copyleft license designed for free software.
We have designed this License in order to use it for manuals for free software, because free software needs free documentation: a free program should come with manuals providing the same freedoms that the software does. But this License is not limited to software manuals; it can be used for any textual work, regardless of subject matter or whether it is published as a printed book. We recommend this License principally for works whose purpose is instruction or reference.
This License applies to any manual or other work, in any medium, that contains a notice placed by the copyright holder saying it can be distributed under the terms of this License. Such a notice grants a world-wide, royalty-free license, unlimited in duration, to use that work under the conditions stated herein. The "Document", below, refers to any such manual or work. Any member of the public is a licensee, and is addressed as "you". You accept the license if you copy, modify or distribute the work in a way requiring permission under copyright law.
A "Modified Version" of the Document means any work containing the Document or a portion of it, either copied verbatim, or with modifications and/or translated into another language.
A "Secondary Section" is a named appendix or a front-matter section of the Document that deals exclusively with the relationship of the publishers or authors of the Document to the Document’s overall subject (or to related matters) and contains nothing that could fall directly within that overall subject. (Thus, if the Document is in part a textbook of mathematics, a Secondary Section may not explain any mathematics.) The relationship could be a matter of historical connection with the subject or with related matters, or of legal, commercial, philosophical, ethical or political position regarding them.
The "Invariant Sections" are certain Secondary Sections whose titles are designated, as being those of Invariant Sections, in the notice that says that the Document is released under this License. If a section does not fit the above definition of Secondary then it is not allowed to be designated as Invariant. The Document may contain zero Invariant Sections. If the Document does not identify any Invariant Sections then there are none.
The "Cover Texts" are certain short passages of text that are listed, as Front-Cover Texts or Back-Cover Texts, in the notice that says that the Document is released under this License. A Front-Cover Text may be at most 5 words, and a Back-Cover Text may be at most 25 words.
A "Transparent" copy of the Document means a machine-readable copy, represented in a format whose specification is available to the general public, that is suitable for revising the document straightforwardly with generic text editors or (for images composed of pixels) generic paint programs or (for drawings) some widely available drawing editor, and that is suitable for input to text formatters or for automatic translation to a variety of formats suitable for input to text formatters. A copy made in an otherwise Transparent file format whose markup, or absence of markup, has been arranged to thwart or discourage subsequent modification by readers is not Transparent. An image format is not Transparent if used for any substantial amount of text. A copy that is not "Transparent" is called "Opaque".
Examples of suitable formats for Transparent copies include plain ASCII without markup, Texinfo input format, LaTeX input format, SGML or XML using a publicly available DTD, and standard-conforming simple HTML, PostScript or PDF designed for human modification. Examples of transparent image formats include PNG, XCF and JPG. Opaque formats include proprietary formats that can be read and edited only by proprietary word processors, SGML or XML for which the DTD and/or processing tools are not generally available, and the machine-generated HTML, PostScript or PDF produced by some word processors for output purposes only.
The "Title Page" means, for a printed book, the title page itself, plus such following pages as are needed to hold, legibly, the material this License requires to appear in the title page. For works in formats which do not have any title page as such, "Title Page" means the text near the most prominent appearance of the work’s title, preceding the beginning of the body of the text.
The "publisher" means any person or entity that distributes copies of the Document to the public.
A section "Entitled XYZ" means a named subunit of the Document whose title either is precisely XYZ or contains XYZ in parentheses following text that translates XYZ in another language. (Here XYZ stands for a specific section name mentioned below, such as "Acknowledgements", "Dedications", "Endorsements", or "History".) To "Preserve the Title" of such a section when you modify the Document means that it remains a section "Entitled XYZ" according to this definition.
The Document may include Warranty Disclaimers next to the notice which states that this License applies to the Document. These Warranty Disclaimers are considered to be included by reference in this License, but only as regards disclaiming warranties: any other implication that these Warranty Disclaimers may have is void and has no effect on the meaning of this License.
You may copy and distribute the Document in any medium, either commercially or noncommercially, provided that this License, the copyright notices, and the license notice saying this License applies to the Document are reproduced in all copies, and that you add no other conditions whatsoever to those of this License. You may not use technical measures to obstruct or control the reading or further copying of the copies you make or distribute. However, you may accept compensation in exchange for copies. If you distribute a large enough number of copies you must also follow the conditions in section 3.
You may also lend copies, under the same conditions stated above, and you may publicly display copies.
If you publish printed copies (or copies in media that commonly have printed covers) of the Document, numbering more than 100, and the Document’s license notice requires Cover Texts, you must enclose the copies in covers that carry, clearly and legibly, all these Cover Texts: Front-Cover Texts on the front cover, and Back-Cover Texts on the back cover. Both covers must also clearly and legibly identify you as the publisher of these copies. The front cover must present the full title with all words of the title equally prominent and visible. You may add other material on the covers in addition. Copying with changes limited to the covers, as long as they preserve the title of the Document and satisfy these conditions, can be treated as verbatim copying in other respects.
If the required texts for either cover are too voluminous to fit legibly, you should put the first ones listed (as many as fit reasonably) on the actual cover, and continue the rest onto adjacent pages.
If you publish or distribute Opaque copies of the Document numbering more than 100, you must either include a machine-readable Transparent copy along with each Opaque copy, or state in or with each Opaque copy a computer-network location from which the general network-using public has access to download using public-standard network protocols a complete Transparent copy of the Document, free of added material. If you use the latter option, you must take reasonably prudent steps, when you begin distribution of Opaque copies in quantity, to ensure that this Transparent copy will remain thus accessible at the stated location until at least one year after the last time you distribute an Opaque copy (directly or through your agents or retailers) of that edition to the public.
It is requested, but not required, that you contact the authors of the Document well before redistributing any large number of copies, to give them a chance to provide you with an updated version of the Document.
You may copy and distribute a Modified Version of the Document under the conditions of sections 2 and 3 above, provided that you release the Modified Version under precisely this License, with the Modified Version filling the role of the Document, thus licensing distribution and modification of the Modified Version to whoever possesses a copy of it. In addition, you must do these things in the Modified Version:
-
Use in the Title Page (and on the covers, if any) a title distinct from that of the Document, and from those of previous versions (which should, if there were any, be listed in the History section of the Document). You may use the same title as a previous version if the original publisher of that version gives permission.
-
List on the Title Page, as authors, one or more persons or entities responsible for authorship of the modifications in the Modified Version, together with at least five of the principal authors of the Document (all of its principal authors, if it has fewer than five), unless they release you from this requirement.
-
State on the Title page the name of the publisher of the Modified Version, as the publisher.
-
Preserve all the copyright notices of the Document.
-
Add an appropriate copyright notice for your modifications adjacent to the other copyright notices.
-
Include, immediately after the copyright notices, a license notice giving the public permission to use the Modified Version under the terms of this License, in the form shown in the Addendum below.
-
Preserve in that license notice the full lists of Invariant Sections and required Cover Texts given in the Document’s license notice.
-
Include an unaltered copy of this License.
-
Preserve the section Entitled "History", Preserve its Title, and add to it an item stating at least the title, year, new authors, and publisher of the Modified Version as given on the Title Page. If there is no section Entitled "History" in the Document, create one stating the title, year, authors, and publisher of the Document as given on its Title Page, then add an item describing the Modified Version as stated in the previous sentence.
-
Preserve the network location, if any, given in the Document for public access to a Transparent copy of the Document, and likewise the network locations given in the Document for previous versions it was based on. These may be placed in the "History" section. You may omit a network location for a work that was published at least four years before the Document itself, or if the original publisher of the version it refers to gives permission.
-
For any section Entitled "Acknowledgements" or "Dedications", Preserve the Title of the section, and preserve in the section all the substance and tone of each of the contributor acknowledgements and/or dedications given therein.
-
Preserve all the Invariant Sections of the Document, unaltered in their text and in their titles. Section numbers or the equivalent are not considered part of the section titles.
-
Delete any section Entitled "Endorsements". Such a section may not be included in the Modified Version.
-
Do not retitle any existing section to be Entitled "Endorsements" or to conflict in title with any Invariant Section.
-
Preserve any Warranty Disclaimers.
If the Modified Version includes new front-matter sections or appendices that qualify as Secondary Sections and contain no material copied from the Document, you may at your option designate some or all of these sections as invariant. To do this, add their titles to the list of Invariant Sections in the Modified Version’s license notice. These titles must be distinct from any other section titles.
You may add a section Entitled "Endorsements", provided it contains nothing but endorsements of your Modified Version by various parties—for example, statements of peer review or that the text has been approved by an organization as the authoritative definition of a standard.
You may add a passage of up to five words as a Front-Cover Text, and a passage of up to 25 words as a Back-Cover Text, to the end of the list of Cover Texts in the Modified Version. Only one passage of Front-Cover Text and one of Back-Cover Text may be added by (or through arrangements made by) any one entity. If the Document already includes a cover text for the same cover, previously added by you or by arrangement made by the same entity you are acting on behalf of, you may not add another; but you may replace the old one, on explicit permission from the previous publisher that added the old one.
The author(s) and publisher(s) of the Document do not by this License give permission to use their names for publicity for or to assert or imply endorsement of any Modified Version.
You may combine the Document with other documents released under this License, under the terms defined in section 4 above for modified versions, provided that you include in the combination all of the Invariant Sections of all of the original documents, unmodified, and list them all as Invariant Sections of your combined work in its license notice, and that you preserve all their Warranty Disclaimers.
The combined work need only contain one copy of this License, and multiple identical Invariant Sections may be replaced with a single copy. If there are multiple Invariant Sections with the same name but different contents, make the title of each such section unique by adding at the end of it, in parentheses, the name of the original author or publisher of that section if known, or else a unique number. Make the same adjustment to the section titles in the list of Invariant Sections in the license notice of the combined work.
In the combination, you must combine any sections Entitled "History" in the various original documents, forming one section Entitled "History"; likewise combine any sections Entitled "Acknowledgements", and any sections Entitled "Dedications". You must delete all sections Entitled "Endorsements".
You may make a collection consisting of the Document and other documents released under this License, and replace the individual copies of this License in the various documents with a single copy that is included in the collection, provided that you follow the rules of this License for verbatim copying of each of the documents in all other respects.
You may extract a single document from such a collection, and distribute it individually under this License, provided you insert a copy of this License into the extracted document, and follow this License in all other respects regarding verbatim copying of that document.
A compilation of the Document or its derivatives with other separate and independent documents or works, in or on a volume of a storage or distribution medium, is called an "aggregate" if the copyright resulting from the compilation is not used to limit the legal rights of the compilation’s users beyond what the individual works permit. When the Document is included in an aggregate, this License does not apply to the other works in the aggregate which are not themselves derivative works of the Document.
If the Cover Text requirement of section 3 is applicable to these copies of the Document, then if the Document is less than one half of the entire aggregate, the Document’s Cover Texts may be placed on covers that bracket the Document within the aggregate, or the electronic equivalent of covers if the Document is in electronic form. Otherwise they must appear on printed covers that bracket the whole aggregate.
Translation is considered a kind of modification, so you may distribute translations of the Document under the terms of section 4. Replacing Invariant Sections with translations requires special permission from their copyright holders, but you may include translations of some or all Invariant Sections in addition to the original versions of these Invariant Sections. You may include a translation of this License, and all the license notices in the Document, and any Warranty Disclaimers, provided that you also include the original English version of this License and the original versions of those notices and disclaimers. In case of a disagreement between the translation and the original version of this License or a notice or disclaimer, the original version will prevail.
If a section in the Document is Entitled "Acknowledgements", "Dedications", or "History", the requirement (section 4) to Preserve its Title (section 1) will typically require changing the actual title.
You may not copy, modify, sublicense, or distribute the Document except as expressly provided under this License. Any attempt otherwise to copy, modify, sublicense, or distribute it is void, and will automatically terminate your rights under this License.
However, if you cease all violation of this License, then your license from a particular copyright holder is reinstated (a) provisionally, unless and until the copyright holder explicitly and finally terminates your license, and (b) permanently, if the copyright holder fails to notify you of the violation by some reasonable means prior to 60 days after the cessation.
Moreover, your license from a particular copyright holder is reinstated permanently if the copyright holder notifies you of the violation by some reasonable means, this is the first time you have received notice of violation of this License (for any work) from that copyright holder, and you cure the violation prior to 30 days after your receipt of the notice.
Termination of your rights under this section does not terminate the licenses of parties who have received copies or rights from you under this License. If your rights have been terminated and not permanently reinstated, receipt of a copy of some or all of the same material does not give you any rights to use it.
The Free Software Foundation may publish new, revised versions of the GNU Free Documentation License from time to time. Such new versions will be similar in spirit to the present version, but may differ in detail to address new problems or concerns. See https://www.gnu.org/copyleft/.
Each version of the License is given a distinguishing version number. If the Document specifies that a particular numbered version of this License "or any later version" applies to it, you have the option of following the terms and conditions either of that specified version or of any later version that has been published (not as a draft) by the Free Software Foundation. If the Document does not specify a version number of this License, you may choose any version ever published (not as a draft) by the Free Software Foundation. If the Document specifies that a proxy can decide which future versions of this License can be used, that proxy’s public statement of acceptance of a version permanently authorizes you to choose that version for the Document.
"Massive Multiauthor Collaboration Site" (or "MMC Site") means any World Wide Web server that publishes copyrightable works and also provides prominent facilities for anybody to edit those works. A public wiki that anybody can edit is an example of such a server. A "Massive Multiauthor Collaboration" (or "MMC") contained in the site means any set of copyrightable works thus published on the MMC site.
"CC-BY-SA" means the Creative Commons Attribution-Share Alike 3.0 license published by Creative Commons Corporation, a not-for-profit corporation with a principal place of business in San Francisco, California, as well as future copyleft versions of that license published by that same organization.
"Incorporate" means to publish or republish a Document, in whole or in part, as part of another Document.
An MMC is "eligible for relicensing" if it is licensed under this License, and if all works that were first published under this License somewhere other than this MMC, and subsequently incorporated in whole or in part into the MMC, (1) had no cover texts or invariant sections, and (2) were thus incorporated prior to November 1, 2008.
The operator of an MMC Site may republish an MMC contained in the site under CC-BY-SA on the same site at any time before August 1, 2009, provided the MMC is eligible for relicensing.