SYNOPSIS
Deactivate existing ACME account at CA.
- <name>: <name> (default = default)
-
ACME account config file name.
- --force <boolean> (default = 0)
-
Delete account data even if the server refuses to deactivate the account.
Return existing ACME account information.
- <name>: <name> (default = default)
-
ACME account config file name.
ACME account index.
Register a new ACME account with a compatible CA.
- <name>: <name> (default = default)
-
ACME account config file name.
- <contact>: <string>
-
Contact email addresses.
- --directory ^https?://.*
-
URL of ACME CA directory endpoint.
Update existing ACME account information with CA. Note: not specifying any new account information triggers a refresh.
- <name>: <name> (default = default)
-
ACME account config file name.
- --contact <string>
-
Contact email addresses.
Order a new certificate from ACME-compatible CA.
- <type>: <api | smtp>
-
The TLS certificate type (API or SMTP certificate).
- --force <boolean> (default = 0)
-
Overwrite existing custom certificate.
Renew existing certificate from CA.
- <type>: <api | smtp>
-
The TLS certificate type (API or SMTP certificate).
- --force <boolean> (default = 0)
-
Force renewal even if expiry is more than 30 days away.
Revoke existing certificate from CA.
- <type>: <api | smtp>
-
The TLS certificate type (API or SMTP certificate).
Add ACME plugin configuration.
- <type>: <dns | standalone>
-
ACME challenge type.
- <id>: <string>
-
ACME Plugin ID name
- --api <1984hosting | acmedns | acmeproxy | active24 | ad | ali | alviy | anx | artfiles | arvan | aurora | autodns | aws | azion | azure | beget | bookmyname | bunny | cf | clouddns | cloudns | cn | conoha | constellix | cpanel | curanet | cyon | da | ddnss | desec | df | dgon | dnsexit | dnshome | dnsimple | dnsservices | doapi | domeneshop | dp | dpi | dreamhost | duckdns | durabledns | dyn | dynu | dynv6 | easydns | edgecenter | edgedns | euserv | exoscale | fornex | freedns | freemyip | gandi_livedns | gcloud | gcore | gd | geoscaling | googledomains | he | he_ddns | hetzner | hetznercloud | hexonet | hostingde | huaweicloud | infoblox | infomaniak | internetbs | inwx | ionos | ionos_cloud | ipv64 | ispconfig | jd | joker | kappernet | kas | kinghost | knot | la | leaseweb | lexicon | limacity | linode | linode_v4 | loopia | lua | maradns | me | miab | mijnhost | misaka | myapi | mydevil | mydnsjp | mythic_beasts | namecheap | namecom | namesilo | nanelo | nederhost | neodigit | netcup | netlify | nic | njalla | nm | nsd | nsone | nsupdate | nw | oci | omglol | one | online | openprovider | openprovider_rest | openstack | opnsense | ovh | pdns | pleskxml | pointhq | porkbun | rackcorp | rackspace | rage4 | rcode0 | regru | scaleway | schlundtech | selectel | selfhost | servercow | simply | spaceship | technitium | tele3 | tencent | timeweb | transip | udr | ultra | unoeuro | variomedia | veesp | vercel | vscale | vultr | websupport | west_cn | world4you | yandex360 | yc | zilore | zone | zoneedit | zonomi>
-
API plugin name
- --data File with one key-value pair per line, will be base64url encode for storage in plugin config.
-
DNS plugin data. (base64 encoded)
- --disable <boolean>
-
Flag to disable the config.
- --nodes <string>
-
List of cluster node names.
- --validation-delay <integer> (0 - 172800) (default = 30)
-
Extra delay in seconds to wait before requesting validation. Allows to cope with a long TTL of DNS records.
Get ACME plugin configuration.
- <id>: <string>
-
Unique identifier for ACME plugin instance.
ACME plugin index.
- --type <dns | standalone>
-
Only list ACME plugins of a specific type
Delete ACME plugin configuration.
- <id>: <string>
-
Unique identifier for ACME plugin instance.
Update ACME plugin configuration.
- <id>: <string>
-
ACME Plugin ID name
- --api <1984hosting | acmedns | acmeproxy | active24 | ad | ali | alviy | anx | artfiles | arvan | aurora | autodns | aws | azion | azure | beget | bookmyname | bunny | cf | clouddns | cloudns | cn | conoha | constellix | cpanel | curanet | cyon | da | ddnss | desec | df | dgon | dnsexit | dnshome | dnsimple | dnsservices | doapi | domeneshop | dp | dpi | dreamhost | duckdns | durabledns | dyn | dynu | dynv6 | easydns | edgecenter | edgedns | euserv | exoscale | fornex | freedns | freemyip | gandi_livedns | gcloud | gcore | gd | geoscaling | googledomains | he | he_ddns | hetzner | hetznercloud | hexonet | hostingde | huaweicloud | infoblox | infomaniak | internetbs | inwx | ionos | ionos_cloud | ipv64 | ispconfig | jd | joker | kappernet | kas | kinghost | knot | la | leaseweb | lexicon | limacity | linode | linode_v4 | loopia | lua | maradns | me | miab | mijnhost | misaka | myapi | mydevil | mydnsjp | mythic_beasts | namecheap | namecom | namesilo | nanelo | nederhost | neodigit | netcup | netlify | nic | njalla | nm | nsd | nsone | nsupdate | nw | oci | omglol | one | online | openprovider | openprovider_rest | openstack | opnsense | ovh | pdns | pleskxml | pointhq | porkbun | rackcorp | rackspace | rage4 | rcode0 | regru | scaleway | schlundtech | selectel | selfhost | servercow | simply | spaceship | technitium | tele3 | tencent | timeweb | transip | udr | ultra | unoeuro | variomedia | veesp | vercel | vscale | vultr | websupport | west_cn | world4you | yandex360 | yc | zilore | zone | zoneedit | zonomi>
-
API plugin name
- --data File with one key-value pair per line, will be base64url encode for storage in plugin config.
-
DNS plugin data. (base64 encoded)
- --delete <string>
-
A list of settings you want to delete.
- --digest <string>
-
Prevent changes if current configuration file has a different digest. This can be used to prevent concurrent modifications.
- --disable <boolean>
-
Flag to disable the config.
- --nodes <string>
-
List of cluster node names.
- --validation-delay <integer> (0 - 172800) (default = 30)
-
Extra delay in seconds to wait before requesting validation. Allows to cope with a long TTL of DNS records.
Generate /etc/pmg/pmg-api.pem (self signed certificate for GUI and REST API).
- --force <boolean> (default = 0)
-
Overwrite existing certificate.
DELETE custom certificate chain and key.
- <type>: <api | smtp>
-
The TLS certificate type (API or SMTP certificate).
- <restart>: <boolean> (default = 0)
-
Restart pmgproxy.
Get information about the node’s certificates.
Upload or update custom certificate chain and key.
- <type>: <api | smtp>
-
The TLS certificate type (API or SMTP certificate).
- <certificates>: <string>
-
PEM encoded certificate (chain).
- <key>: <string>
-
PEM encoded private key.
- --force <boolean> (default = 0)
-
Overwrite existing custom or ACME certificate files.
- --restart <boolean> (default = 0)
-
Restart services.
Get the public key for the configured selector, prepared as DKIM TXT record
Generate a new private key for selector. All future mail will be signed with the new key!
- --force <boolean>
-
Overwrite existing key
- --keysize <integer> (1024 - N)
-
Number of bits for the RSA-Key
- --selector <string>
-
DKIM Selector
Print configuration setting which can be used in templates.
Get help about specified command.
- --extra-args <array>
-
Shows help for a specific command
- --verbose <boolean>
-
Verbose output format.
Generate required files in /etc/pmg/
Synchronize the LDAP database.
Synchronize Proxmox Mail Gateway configurations with system configuration.
- --restart <boolean> (default = 0)
-
Restart services if necessary.
Generate /etc/pmg/pmg-tls.pem (self signed certificate for encrypted SMTP traffic).
- --force <boolean> (default = 0)
-
Overwrite existing certificate.
DESCRIPTION
Proxmox Mail Gateway is usually configured using the web-based Graphical User Interface (GUI), but it is also possible to directly edit the configuration files, using the REST API over https or the command-line tool pmgsh.
The command-line tool pmgconfig is used to simplify some common configuration tasks, such as generating certificates and rewriting service configuration files.

|
We use a Postgres database to store mail filter rules and statistical data. See chapter Database Management for more information. |
Configuration files overview
- /etc/network/interfaces
-
Network setup. We never modify this file directly. Instead, we write changes to /etc/network/interfaces.new. When you reboot, Proxmox Mail Gateway renames the file to /etc/network/interfaces, thus applying the changes.
- /etc/resolv.conf
-
DNS search domain and nameserver setup. Proxmox Mail Gateway uses the search domain setting to create the FQDN and domain name used in the postfix configuration.
- /etc/hostname
-
The system’s hostname. Proxmox Mail Gateway uses the hostname to create the FQDN used in the postfix configuration.
- /etc/hosts
-
Static table lookup for hostnames.
- /etc/pmg/pmg.conf
-
Stores common administration options, such as the spam and mail proxy configuration.
- /etc/pmg/cluster.conf
-
The cluster setup.
- /etc/pmg/domains
-
The list of relay domains.
- /etc/pmg/dkim/domains
-
The list of domains for outbound DKIM signing.
- /etc/pmg/fetchmailrc
-
Fetchmail configuration (POP3 and IMAP setup).
- /etc/pmg/ldap.conf
-
LDAP configuration.
- /etc/pmg/mynetworks
-
List of local (trusted) networks.
- /etc/pmg/subscription
-
Stores your subscription key and status.
- /etc/pmg/tls_policy
-
TLS policy for outbound connections.
- /etc/pmg/tls_inbound_domains
-
Sender domains for which TLS is enforced on inbound connections.
- /etc/pmg/transport
-
Message delivery transport setup.
- /etc/pmg/user.conf
-
GUI user configuration.
- /etc/pmg/realms.conf
-
Login realm configuration.
- /etc/mail/spamassassin/custom.cf
-
Custom SpamAssassin™ setup.
- /etc/mail/spamassassin/pmg-scores.cf
-
Custom SpamAssassin™ rule scores.
Keys and Certificates
- /etc/pmg/pmg-api.pem
-
Key and certificate (combined) used by the HTTPS server (API).
- /etc/pmg/pmg-authkey.key
-
Private key used to generate authentication tickets.
- /etc/pmg/pmg-authkey.pub
-
Public key used to verify authentication tickets.
- /etc/pmg/pmg-csrf.key
-
Internally used to generate CSRF tokens.
- /etc/pmg/pmg-tls.pem
-
Key and certificate (combined) to encrypt mail traffic (TLS).
- /etc/pmg/dkim/<selector>.private
-
Key for DKIM signing mails with selector <selector>.
Service Configuration Templates
Proxmox Mail Gateway uses various services to implement mail filtering, for example, the Postfix Mail Transport Agent (MTA), the ClamAV® antivirus engine, and the Apache SpamAssassin™ project. These services use separate configuration files, so we need to rewrite those files when the configuration is changed.
Proxmox Mail Gateway also features support for customizing the email-based reports and notifications it can send to administrators and users. These can be adjusted in the same way as configuration files. For some reports and notifications, both HTML and plain-text variants exist, which will be sent together as multi-part mail. These can be recognized by being suffixed using .tt, for the html part for historic reasons or .plain.tt, for the plain-text part respectively, and should be modified together if available to present a consistent experience to users. Dropping either part to get a single-part mail can be done by creating an empty file as override.
We use a template-based approach to generate these files. The Template Toolkit is a well known, fast and flexible template processing system. You can find the default templates in /var/lib/pmg/templates/. Please do not modify these directly, otherwise your modifications will be lost on the next update. Instead, copy the template you wish to change to /etc/pmg/templates/, then apply your changes there.
Templates can access any configuration settings, and you can use the pmgconfig dump command to get a list of all variable names:
# pmgconfig dump
...
dns.domain = yourdomain.tld
dns.hostname = pmg
ipconfig.int_ip = 192.168.2.127
pmg.admin.advfilter = 1
...
The same tool is used to force the regeneration of all template-based configuration files. You need to run the following after modifying a template, or when you directly edit configuration files:
# pmgconfig sync --restart 1
The above command also restarts services if the underlying configuration files are changed. Please note that this is automatically done when you change the configuration using the GUI or API.
|
|
Modified templates from /etc/pmg/templates/ are automatically synced from the master node to all cluster members. |
Welcome- and Blocklists
Proxmox Mail Gateway has multiple welcome- and blocklists. It differentiates between the SMTP Welcomelist, the rule-based welcomelist and the user welcomelist. In addition to the welcomelists, there are two separate blocklists: the rule-based blocklist and the user blocklist.
SMTP Welcomelist
The SMTP Welcomelist is responsible for disabling greylisting, as well as SPF and DNSBL checks. These are done during the SMTP dialogue.
Rule-based Welcome-/Blocklist
The rule-based welcome- and blocklists are predefined rules. They work by checking the attached Who objects, containing, for example, a domain or a mail address for a match. If it matches, the assigned action is used, which by default is Accept for the welcomelist rule and Block for the blocklist rule. In the default setup, the blocklist rule has priority over the welcomelist rule and spam checks.
User Welcome-/Blocklist
The user welcome- and blocklist are user specific. Every user can add mail addresses to their welcome- and blocklist. When a user adds a mail address to the welcomelist, the result of the spam analysis will be discarded for that recipient. This can help in the mail being accepted, but what happens next still depends on the other rules. In the default setup, this results in the mail being accepted for this recipient.
For mail addresses on a user’s blocklist, the spam score will be increased by 100. What happens when a high spam score is encountered still depends on the rule system. In the default setup, it will be recognized as spam and quarantined (spam score of 3 or higher).
System Configuration
Network and Time
As network and time are configured in the installer, these generally do not need to be configured again in the GUI.
The default setup uses a single Ethernet adapter and static IP assignment. The configuration is stored at /etc/network/interfaces, and the actual network setup is done the standard Debian way, using the package ifupdown.
source /etc/network/interfaces.d/*

auto lo
iface lo inet loopback

auto ens18
iface ens18 inet static
        address  192.168.2.127
        netmask  255.255.240.0
        gateway  192.168.2.1
Overriding network device names
When upgrading kernels, adding PCIe devices or updating your BIOS, automatically generated network interface names can change. To alleviate this issues, Proxmox Mail Gateway provides a tool for automatically generating systemd .link files for overriding the name of network devices. It also automatically replaces the occurrences of the old interface name in /etc/network/interfaces.
|
|
Pinning network interfaces in many container environments, including Proxmox VE is not supported, as the container stack handles network configuration. |
The generated link files are stored in /usr/local/lib/systemd/network. For the interfaces file a new file will be generated in the same place with a .new suffix. This way you can inspect the changes made to the configuration by using diff (or another diff viewer of your choice):
diff -y /etc/network/interfaces /etc/network/interfaces.new
If you see any problematic changes or want to revert the changes made by the pinning tool before rebooting, simply delete all .new files and the respective link files from /usr/local/lib/systemd/network.
The following command will generate a .link file for all physical network interfaces that do not yet have a .link file and update selected Proxmox VE configuration files (see above). The generated names will use the default prefix nic, so the resulting interface names will be nic1, nic2, …
proxmox-network-interface-pinning generate
You can override the default prefix with the --prefix flag:
proxmox-network-interface-pinning generate --prefix myprefix
It is also possible to pin only a specific interface:
proxmox-network-interface-pinning generate --interface enp1s0
When pinning a specific interface, you can specify the exact name that the interface should be pinned to:
proxmox-network-interface-pinning generate --interface enp1s0 --target-name if42
In order to apply the changes made by proxmox-network-interface-pinning to the network configuration, the host needs to be rebooted.
Many tests to detect SPAM mails use DNS queries, so it is important to have a fast and reliable DNS server. We also query some publicly available DNS Blackholelists. Most of them apply rate limits for clients, so they simply will not work if you use a public DNS server (because they are usually blocked). We recommend to use your own DNS server, which needs to be configured in recursive mode.
Options
These settings are saved to the admin subsection in /etc/pmg/pmg.conf, using the following configuration keys:
- admin-mail-from: ^\p{PosixPrint}{1,998}$ (default = Proxmox Mail Gateway <postmaster>)
-
Text for From header in admin mails and bounces.
- advfilter: <boolean> (default = 0)
-
Enable advanced filters for statistic.
If this is enabled, the receiver statistic are limited to active ones (receivers which also sent out mail in the 90 days before), and the contact statistic will not contain these active receivers.
- avast: <boolean> (default = 0)
-
Use Avast Virus Scanner (/usr/bin/scan). You need to buy and install Avast Core Security before you can enable this feature.
- clamav: <boolean> (default = 1)
-
Use ClamAV Virus Scanner. This is the default virus scanner and is enabled by default.
- consent-text: <string> (default = ``)
-
Consent text that is displayed before logging in.
- custom_check: <boolean> (default = 0)
-
Use Custom Check Script. The script has to take the defined arguments and can return Virus findings or a Spamscore.
- custom_check_path: ^/([^/\0]+\/)+[^/\0]+$ (default = /usr/local/bin/pmg-custom-check)
-
Absolute Path to the Custom Check Script
- dailyreport: <boolean> (default = 1)
-
Send daily reports.
- demo: <boolean> (default = 0)
-
Demo mode - do not start SMTP filter.
- dkim-use-domain: <envelope | header> (default = envelope)
-
Whether to sign using the domain found in the header or the envelope.
- dkim_selector: <string>
-
Default DKIM selector
- dkim_sign: <boolean> (default = 0)
-
DKIM sign outbound mails with the configured Selector.
- dkim_sign_all_mail: <boolean> (default = 0)
-
DKIM sign all outgoing mails irrespective of the Envelope From domain.
- email: <string> (default = admin@domain.tld)
-
Administrator E-Mail address.
- http_proxy: http://.*
-
Specify external http proxy which is used for downloads (example: http://username:password@host:port/)
- statlifetime: <integer> (1 - N) (default = 7)
-
User Statistics Lifetime (days)
Certificate Management
Access to the web-based administration interface is always encrypted through https. Each Proxmox Mail Gateway host creates by default its own (self-signed) certificate. This certificate is used for encrypted communication with the host’s pmgproxy service, for any API call between a user and the web-interface or between nodes in a cluster.
Certificate verification in a Proxmox Mail Gateway cluster is done based on pinning the certificate fingerprints in the cluster configuration and verifying that they match on connection.
Certificates for the API and SMTP
Proxmox Mail Gateway uses two different certificates:
-
/etc/pmg/pmg-api.pem: the required certificate used for Proxmox Mail Gateway API requests.
-
/etc/pmg/pmg-tls.pem: the optional certificate used for SMTP TLS connections, see mailproxy TLS configuration for details.
You have the following options for these certificates:
-
Keep using the default self-signed certificate in /etc/pmg/pmg-api.pem.
-
Use an externally provided certificate (for example, signed by a commercial Certificate Authority (CA)).
-
Use an ACME provider like Let’s Encrypt to get a trusted certificate with automatic renewal; this is also integrated in the Proxmox Mail Gateway API and web interface.
Certificates are managed through the Proxmox Mail Gateway web-interface/API or using the pmgconfig CLI tool.
Upload Custom Certificate
If you already have a certificate which you want to use for a Proxmox Mail Gateway host, you can simply upload that certificate over the web interface.
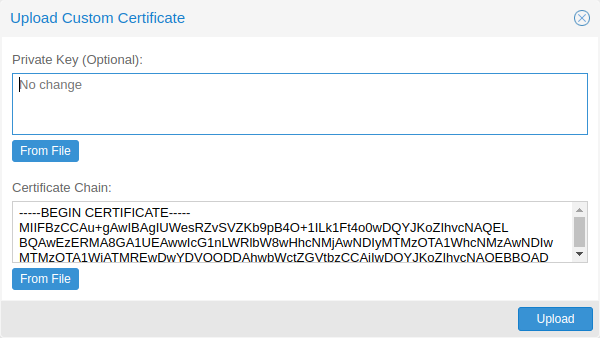
Note that any certificate key files must not be password protected.
Trusted certificates via Let’s Encrypt (ACME)
Proxmox Mail Gateway includes an implementation of the Automatic Certificate Management Environment (ACME) protocol, allowing Proxmox Mail Gateway admins to use an ACME provider like Let’s Encrypt for easy setup of TLS certificates, which are accepted and trusted by modern operating systems and web browsers out of the box.
Currently, the two ACME endpoints implemented are the Let’s Encrypt (LE) production and staging environments. Our ACME client supports validation of http-01 challenges using a built-in web server and validation of dns-01 challenges using a DNS plugin supporting all the DNS API endpoints acme.sh does.
ACME Account
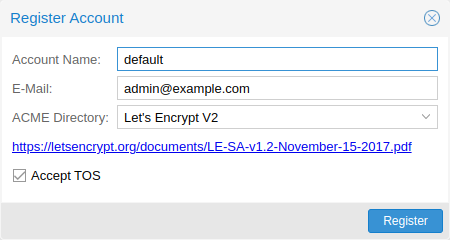
You need to register an ACME account per cluster, with the endpoint you want to use. The email address used for that account will serve as the contact point for renewal-due or similar notifications from the ACME endpoint.
You can register or deactivate ACME accounts over the web interface Certificates -> ACME Accounts or using the pmgconfig command-line tool.
pmgconfig acme account register <account-name> <mail@example.com>

|
Because of rate-limits you should use LE staging for experiments or if you use ACME for the very first time until all is working there, and only then switch over to the production directory. |
ACME Plugins
The ACME plugin’s role is to provide automatic verification that you, and thus the Proxmox Mail Gateway cluster under your operation, are the real owner of a domain. This is the basic building block of automatic certificate management.
The ACME protocol specifies different types of challenges, for example the http-01, where a web server provides a file with a specific token to prove that it controls a domain. Sometimes this isn’t possible, either because of technical limitations or if the address of a record is not reachable from the public internet. The dns-01 challenge can be used in such cases. This challenge is fulfilled by creating a certain DNS record in the domain’s zone.
Proxmox Mail Gateway supports both of those challenge types out of the box, you can configure plugins either over the web interface under Certificates -> ACME Challenges, or using the pmgconfig acme plugin add command.
ACME Plugin configurations are stored in /etc/pmg/acme/plugins.cfg. A plugin is available for all nodes in the cluster.
Domains
You can add new or manage existing domain entries under Certificates, or using the pmgconfig command.
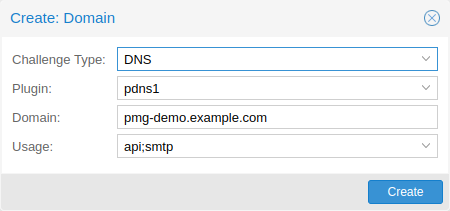
After configuring the desired domain(s) for a node and ensuring that the desired ACME account is selected, you can order your new certificate over the web-interface. On success, the interface will reload after roughly 10 seconds.
Renewal will happen automatically.
ACME HTTP Challenge Plugin
There is always an implicitly configured standalone plugin for validating http-01 challenges via the built-in web server spawned on port 80.
|
|
The name standalone means that it can provide the validation on its own, without any third party service. So this plugin also works for cluster nodes. |
There are a few prerequisites to use this for certificate management with Let’s Encrypts ACME.
-
You have to accept the ToS of Let’s Encrypt to register an account.
-
Port 80 of the node needs to be reachable from the internet.
-
There must be no other listener on port 80.
-
The requested (sub)domain needs to resolve to a public IP of the Proxmox Mail Gateway host.
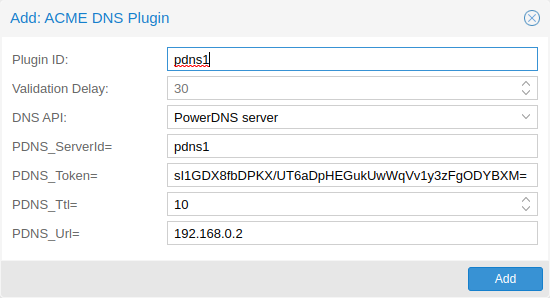
ACME DNS API Challenge Plugin
On systems where external access for validation via the http-01 method is not possible or desired, it is possible to use the dns-01 validation method. This validation method requires a DNS server that allows provisioning of TXT records via an API.
Configuring ACME DNS APIs for validation
Proxmox Mail Gateway re-uses the DNS plugins developed for the acme.sh
[acme.sh https://github.com/acmesh-official/acme.sh]
project. Please
refer to its documentation for details on configuration of specific APIs.
The easiest way to configure a new plugin with the DNS API is using the web interface (Certificates -> ACME Accounts/Challenges).
Here you can add a new challenge plugin by selecting your API provider and entering the credential data to access your account over their API.
|
|
See the acme.sh How to use DNS API wiki for more detailed information about getting API credentials for your provider. Configuration values do not need to be quoted with single or double quotes; for some plugins that is even an error. |
As there are many DNS providers and API endpoints, Proxmox Mail Gateway automatically generates the form for the credentials, but not all providers are annotated yet. For those you will see a bigger text area, into which you simply need to copy all the credential’s KEY=VALUE pairs.
DNS Validation through CNAME Alias
A special alias mode can be used to handle validation on a different domain/DNS server, in case your primary/real DNS does not support provisioning via an API. Manually set up a permanent CNAME record for _acme-challenge.domain1.example pointing to _acme-challenge.domain2.example, and set the alias property in the Proxmox Mail Gateway node configuration file /etc/pmg/node.conf to domain2.example to allow the DNS server of domain2.example to validate all challenges for domain1.example.
Wildcard Certificates
Wildcard DNS names start with a *. prefix and are considered valid for all (one-level) subdomain names of the verified domain. So a certificate for *.domain.example is valid for foo.domain.example and bar.domain.example, but not for baz.foo.domain.example.
Currently, you can only create wildcard certificates with the DNS challenge type.
Combination of Plugins
Combining http-01 and dns-01 validation is possible in case your node is reachable via multiple domains with different requirements / DNS provisioning capabilities. Mixing DNS APIs from multiple providers or instances is also possible by specifying different plugin instances per domain.
|
|
Accessing the same service over multiple domains increases complexity and should be avoided if possible. |
Automatic renewal of ACME certificates
If a node has been successfully configured with an ACME-provided certificate (either via pmgconfig or via the web-interface/API), the certificate will be renewed automatically by the pmg-daily.service. Currently, renewal is triggered if the certificate either has already expired or if it will expire in the next 30 days.
Manually Change Certificate over the Command Line
If you want to get rid of certificate verification warnings, you have to
generate a valid certificate for your server.

Log in to your {pmg} via ssh or use the console:

----
openssl req -newkey rsa:2048 -nodes -keyout key.pem -out req.pem
----

Follow the instructions on the screen, for example:

----
Country Name (2 letter code) [AU]: AT
State or Province Name (full name) [Some-State]:Vienna
Locality Name (eg, city) []:Vienna
Organization Name (eg, company) [Internet Widgits Pty Ltd]: Proxmox GmbH
Organizational Unit Name (eg, section) []:Proxmox Mail Gateway
Common Name (eg, YOUR name) []: yourproxmox.yourdomain.com
Email Address []:support@yourdomain.com

Please enter the following 'extra' attributes to be sent with your certificate request
A challenge password []: not necessary
An optional company name []: not necessary
----

After you have finished the certificate request, you have to send the file
`req.pem` to your Certification Authority (CA). The CA will issue the
certificate (BASE64 encoded), based on your request – save this file as
`cert.pem` to your {pmg}.

To activate the new certificate, do the following on your {pmg}:

----
cat key.pem cert.pem >/etc/pmg/pmg-api.pem
----

Then restart the API servers:

----
systemctl restart pmgproxy
----

Test your new certificate, using your browser.

NOTE: To transfer files to and from your {pmg}, you can use secure copy: If your
desktop runs Linux, you can use the `scp` command-line tool. If your desktop PC
runs windows, please use an scp client like WinSCP (see https://winscp.net/).

Change Certificate for Cluster Setups
If you change the API certificate of an active cluster node manually, you also need to update the pinned fingerprint inside the cluster configuration.
You can do that by executing the following command on the host where the certificate changed:
pmgcm update-fingerprints
Note, this will be done automatically if using the integrated ACME (for example, through Let’s Encrypt) feature.
Mail Proxy Configuration
Relaying
These settings are saved to the mail subsection in /etc/pmg/pmg.conf. Some of these correspond to postfix options in the main.cf (see the postconf documentation).
They use the following configuration keys:
- relay: <string>
-
The default mail delivery transport (incoming mails).
- relaynomx: <boolean> (default = 0)
-
Disable MX lookups for default relay (SMTP only, ignored for LMTP).
- relayport: <integer> (1 - 65535) (default = 25)
-
SMTP/LMTP port number for relay host.
- relayprotocol: <lmtp | smtp> (default = smtp)
-
Transport protocol for relay host.
- smarthost: <string>
-
When set, all outgoing mails are delivered to the specified smarthost. (postfix option default_transport)
- smarthostport: <integer> (1 - 65535) (default = 25)
-
SMTP port number for smarthost. (postfix option default_transport)
Relay Domains
A list of relayed mail domains, that is, what destination domains this system will relay mail to. The system will reject incoming mails to other domains.
Ports
These settings are saved to the mail subsection in /etc/pmg/pmg.conf. Many of these correspond to postfix options in the main.cf (see the postconf documentation).
They use the following configuration keys:
- ext_port: <integer> (1 - 65535) (default = 25)
-
SMTP port number for incoming mail (untrusted). This must be a different number than int_port.
- int_port: <integer> (1 - 65535) (default = 26)
-
SMTP port number for outgoing mail (trusted).
Options
These settings are saved to the mail subsection in /etc/pmg/pmg.conf, using the following configuration keys:
- accept-broken-mime: <boolean> (default = 0)
-
Accept e-mails with broken MIME structure (insecure). If enabled, a X-Proxmox-Broken-Message header is added to each mail with broken MIME structure.
- banner: <string> (default = ESMTP Proxmox)
-
ESMTP banner.
- before_queue_filtering: <boolean> (default = 0)
-
Enable before queue filtering by pmg-smtp-filter
- conn_count_limit: <integer> (0 - N) (default = 50)
-
How many simultaneous connections any client is allowed to make to this service. To disable this feature, specify a limit of 0.
- conn_rate_limit: <integer> (0 - N) (default = 0)
-
The maximal number of connection attempts any client is allowed to make to this service per minute. To disable this feature, specify a limit of 0.
- dnsbl_sites: <string>
-
Optional list of DNS welcome/blocklist domains (postfix option postscreen_dnsbl_sites).
- dnsbl_threshold: <integer> (0 - N) (default = 1)
-
The inclusive lower bound for blocking a remote SMTP client, based on its combined DNSBL score (postfix option postscreen_dnsbl_threshold).
- dwarning: <integer> (0 - N) (default = 4)
-
SMTP delay warning time (in hours). (postfix option delay_warning_time)
- filter-timeout: <integer> (2 - 86400) (default = 600)
-
Timeout for the processing of one mail (in seconds) (postfix option smtpd_proxy_timeout and lmtp_data_done_timeout)
- greylist: <boolean> (default = 1)
-
Use Greylisting for IPv4.
- greylist6: <boolean> (default = 0)
-
Use Greylisting for IPv6.
- greylistmask4: <integer> (0 - 32) (default = 24)
-
Netmask to apply for greylisting IPv4 hosts
- greylistmask6: <integer> (0 - 128) (default = 64)
-
Netmask to apply for greylisting IPv6 hosts
- helotests: <boolean> (default = 0)
-
Use SMTP HELO tests. (postfix option smtpd_helo_restrictions)
- hide_received: <boolean> (default = 0)
-
Hide received header in outgoing mails.
- log-headers: <boolean> (default = 0)
-
Log the envelope sender and recipient together with the decoded From, To, and Subject headers of each processed mail to the mail log. This eases auditing and tracing, but writes potentially personal data, such as mail subjects and addresses, to the host log. Make sure this is compatible with your data-protection obligations before enabling it.
- maxsize: <integer> (1024 - N) (default = 10485760)
-
Maximum email size. Larger mails are rejected. (postfix option message_size_limit)
- message_rate_limit: <integer> (0 - N) (default = 0)
-
The maximal number of message delivery requests that any client is allowed to make to this service per minute.To disable this feature, specify a limit of 0.
- ndr_on_block: <boolean> (default = 0)
-
Send out NDR when mail gets blocked
- queue-lifetime: <integer> (1 - 100)
-
Maximum time (in days) a deferred message is kept in the queue before it is returned to the sender as undeliverable. Also applies to bounce (notification) messages. (postfix options maximal_queue_lifetime and bounce_queue_lifetime)
- rejectunknown: <boolean> (default = 0)
-
Reject unknown clients. (postfix option reject_unknown_client_hostname)
- rejectunknownsender: <boolean> (default = 0)
-
Reject unknown senders. (postfix option reject_unknown_sender_domain)
- smtputf8: <boolean> (default = 1)
-
Enable SMTPUTF8 support in Postfix and detection for locally generated mail (postfix option smtputf8_enable)
- spf: <boolean> (default = 1)
-
Use Sender Policy Framework.
- verifyreceivers: <450 | 550>
-
Enable receiver verification. The value specifies the numerical reply code when the Postfix SMTP server rejects a recipient address. (postfix options reject_unknown_recipient_domain, reject_unverified_recipient, and unverified_recipient_reject_code)
Logging Mail Header Information
For auditing and troubleshooting, you can enable the log-headers option in the mail proxy settings. Proxmox Mail Gateway then logs the envelope sender and recipient together with the decoded From, To, and Subject headers of each processed mail to the mail log, in addition to the queue and rule information that is always logged.
|
|
The logged headers can contain personal data, such as mail subjects and sender or recipient addresses. Make sure that logging this information, and keeping it in the system logs, is compatible with your data-protection obligations before you enable this option. It is disabled by default. |
Before and After Queue scanning
Email scanning can happen at two different stages of mail-processing:
-
Before-queue filtering: During the SMTP session, after the complete message has been received (after the DATA command).
-
After-queue filtering: After initially accepting the mail and putting it on a queue for further processing.
Before-queue filtering has the advantage that the system can reject a mail (by sending a permanent reject code 554), and leave the task of notifying the original sender to the other mail server. This is of particular advantage if the processed mail is a spam message or contains a virus and has a forged sender address. Sending out a notification in this situation leads to so-called backscatter mail, which might cause your server to get listed as spamming on RBLs (Real-time Blackhole List).
After-queue filtering has the advantage of providing faster delivery of mails for the sending servers, since queuing emails is much faster than analyzing them for spam and viruses.
If a mail is addressed to multiple recipients (for example, when multiple addresses are subscribed to the same mailing list), the situation is more complicated; your mail server can only reject or accept the mail for all recipients, after having received the complete message, while your rule setup might accept the mail for part of the recipients and reject it for others. This can be due to a complicated rule setup, or if your users use the User Welcome- and Blocklist feature.
If the resulting action of the rule system is the same for all recipients, Proxmox Mail Gateway responds accordingly, if configured for before-queue filtering (sending 554 for a blocked mail and 250 for an accepted or quarantined mail). If some mailboxes accept the mail and some reject it, the system has to accept the mail.
Whether Proxmox Mail Gateway notifies the sender that delivery failed for some recipients by sending a non-delivery report, depends on the ndr_on_block setting in /etc/pmg/pmg.conf. If enabled, an NDR is sent. Keeping this disabled prevents NDRs being sent to the (possibly forged) sender and thus minimizes the chance of getting your IP listed on an RBL. However in certain environments, it can be unacceptable not to inform the sender about a rejected mail.
The setting has the same effect if after-queue filtering is configured, with the exception that an NDR is always sent out, even if all recipients block the mail, since the mail already got accepted before being analyzed.
The details of integrating the mail proxy with Postfix in both setups are explained in Postfix Before-Queue Content Filter and Postfix After-Queue Content Filter respectively.
Greylisting
Greylisting is a technique for preventing unwanted messages from reaching the resource intensive stages of content analysis (virus detection and spam detection). By initially replying with a temporary failure code (450) to each new email, Proxmox Mail Gateway tells the sending server that it should queue the mail and retry delivery at a later point. Since certain kinds of spam get sent out by software which has no provisioning for queuing, these mails are dropped without reaching Proxmox Mail Gateway or your mailbox.
The downside of greylisting is the delay introduced by the initial deferral of the email, which usually amounts to less than 30 minutes.
In order to prevent unnecessary delays in delivery from known sources, emails coming from a source for a recipient, which have passed greylisting in the past are directly passed on: For each email the triple <sender network, sender email, recipient email> is stored in a list, along with the time when delivery was attempted. If an email fits an already existing triple, the timestamp for that triple is updated, and the email is accepted for further processing.
As long as a sender and recipient communicate frequently, there is no delay introduced by enabling greylisting. A triple is removed after a longer period of time, if no mail fitting that triple has been seen. The timeouts in Proxmox Mail Gateway are:
-
2 days for the retry of the first delivery
-
36 days for a known triple
Mails with an empty envelope sender are always delayed.
Some email service providers send out emails for one domain from multiple servers. To prevent delays due to an email coming in from two separate IPs of the same provider, the triples store a network (cidr) instead of a single IP. For certain large providers, the default network size might be too small. You can configure the netmask applied to an IP for the greylist lookup in /etc/pmg/pmg.conf or in the GUI with the settings greylistmask for IPv4 and greylistmask6 for IPv6 respectively.
Transports
You can use Proxmox Mail Gateway to send emails to different internal email servers. For example, you can send emails addressed to domain.com to your first email server and emails addressed to subdomain.domain.com to a second one.
You can add the IP addresses, hostname, transport protocol (smtp/lmtp), transport ports and mail domains (or just single email addresses) of your additional email servers. When transport protocol is set to lmtp, the option Use MX is useless and will automatically be set to No.
Networks
You can add additional internal (trusted) IP networks or hosts. All hosts in this list are allowed to relay.
|
|
Hosts in the same subnet as Proxmox Mail Gateway can relay by default and don’t need to be added to this list. |
TLS
Transport Layer Security (TLS) provides certificate-based authentication and encrypted sessions. An encrypted session protects the information that is transmitted with SMTP mail. When you activate TLS, Proxmox Mail Gateway automatically generates a new self signed certificate for you (/etc/pmg/pmg-tls.pem).
Proxmox Mail Gateway uses opportunistic TLS encryption by default. The SMTP transaction is encrypted if the STARTTLS ESMTP feature is supported by the remote server. Otherwise, messages are sent unencrypted.
You can set a different TLS policy per destination. A destination is either a remote domain or a next-hop destination, as specified in /etc/pmg/transport. This can be used if you need to prevent email delivery without encryption, or to work around a broken STARTTLS ESMTP implementation. See Postfix TLS Readme for details on the supported policies.
Additionally, TLS can also be enforced on incoming connections on the external port for specific sender domains by creating a TLS inbound domains entry. Mails with matching domains must use an encrypted SMTP session, otherwise they are rejected. All domains on this list have an entry of reject_plaintext_session in a check_sender_access table.
- Enable TLS logging
-
To get additional information about SMTP TLS activity, you can enable TLS logging. In this case, information about TLS sessions and used certificates is logged via syslog.
- Add TLS received header
-
Set this option to include information about the protocol and cipher used, as well as the client and issuer CommonName into the "Received:" message header.
Those settings are saved to subsection mail in /etc/pmg/pmg.conf, using the following configuration keys:
- tls: <boolean> (default = 0)
-
Enable TLS.
- tlsheader: <boolean> (default = 0)
-
Add TLS received header.
- tlslog: <boolean> (default = 0)
-
Enable TLS Logging.
DKIM Signing
DomainKeys Identified Mail (DKIM) Signatures (see RFC 6376) is a method to cryptographically authenticate a mail as originating from a particular domain. Before sending the mail, a hash over certain header fields and the body is computed, signed with a private key and added in the DKIM-Signature header of the mail. The selector (a short identifier chosen by you, used to identify which system and private key were used for signing) is also included in the DKIM-Signature header.
The verification is done by the receiver. The public key is fetched via DNS TXT lookup for yourselector._domainkey.yourdomain.example and used for verifying the hash. You can publish multiple selectors for your domain, each used by a system which sends email from your domain, without the need to share the private key.
Proxmox Mail Gateway verifies DKIM Signatures for inbound mail in the Spam Filter by default.
Additionally, it supports conditionally signing outbound mail, if configured. It uses one private key and selector per Proxmox Mail Gateway deployment (all nodes in a cluster use the same key). The key has a minimal size of 1024 bits and rsa-sha256 is used as the signing algorithm.
The headers included in the signature are taken from the list of Mail::DKIM::Signer. Additionally Content-Type (if present), From, To, CC, Reply-To and Subject get oversigned.
You can either sign all mails received on the internal port using the domain of the envelope sender address or create a list of domains, for which emails should be signed, defaulting to the list of relay domains.
Mails generated by Proxmox Mail Gateway itself, like notifications and reports, usually have an empty envelope. Thus they will only be signed if you have selected header as the source of the signing domain and have set an RFC5322.From with a domain that would be signed as a From: setting in the spam quarantine options for spam reports and quarantine links, and in the system options for other mails sent by Proxmox Mail Gateway.
- Enable DKIM Signing
-
Controls whether outbound mail should get DKIM signed.
- Selector
-
The selector used for signing the mail. The private key used for signing is saved under /etc/pmg/dkim/yourselector.private. You can display the DNS TXT record which you need to add to all domains signed by Proxmox Mail Gateway by clicking on the View DNS Record Button.
- Sign all Outgoing Mail
-
Controls whether all outbound mail should get signed or only mails from domains listed in /etc/pmg/dkim/domains, if it exists and /etc/pmg/domains otherwise.
- Select Signing Domain
-
Determines whether to DKIM sign emails using the domain found in the envelope from or the from header of the email. The envelope from is also known as reverse-path and RFC5321.MailFrom (see RFC 5321 section 3.3). The from header is also known as RFC5322.From (see RFC 5322 section 3.6.2).
The envelope from of certain emails, bounces for example, can be empty. In these cases it is desirable to sign them using the domain found in the from header.
Additionally, DMARC (see RFC 7489 section 3.1.1) needs the domain found in the from header in certain situations.
These settings are saved to the admin subsection in /etc/pmg/pmg.conf, using the following configuration keys:
- dkim-use-domain: <envelope | header> (default = envelope)
-
Whether to sign using the domain found in the header or the envelope.
- dkim_selector: <string>
-
Default DKIM selector
- dkim_sign: <boolean> (default = 0)
-
DKIM sign outbound mails with the configured Selector.
- dkim_sign_all_mail: <boolean> (default = 0)
-
DKIM sign all outgoing mails irrespective of the Envelope From domain.
Handling of Messages With Broken MIME Structure
Messages with broken MIME structure and ambiguous content can be used to bypass security checks. Therefore, they are rejected by Proxmox Mail Gateway before being passed to the rule system.
As some legitimate messages also have a broken MIME structure, you can optionally allow broken messages to be accepted by the parser by enabling the accept-broken-mime setting in the mail subsection in /etc/pmg/pmg.conf.
If enabled, a X-Proxmox-Broken-Message header is added to each suspicious message. This header can be used in the rule system to selectively accept or block such messages.
Welcomelist
All SMTP checks are disabled for those entries (e.g. Greylisting, SPF, DNSBL, …)
DNSBL checks are done by postscreen, which works on IP addresses and networks. This means it can only make use of the IP Address and IP Network entries.
|
|
If you use a backup MX server (for example, your ISP offers this service for you) you should always add those servers here. |
|
|
To disable DNSBL checks entirely, remove any DNSBL Sites entries in Mail Proxy Options. |
Spam Detector Configuration
Options
Proxmox Mail Gateway uses a wide variety of local and network tests to identify spam signatures. This makes it harder for spammers to identify one aspect which they can craft their messages to work around the spam filter.
Every single email will be analyzed and have a spam score assigned. The system attempts to optimize the efficiency of the rules that are run in terms of minimizing the number of false positives and false negatives.
- bounce_score: <integer> (0 - 1000) (default = 0)
-
Additional score for bounce mails.
- clamav_heuristic_score: <integer> (0 - 1000) (default = 3)
-
Score for ClamAV heuristics (Encrypted Archives/Documents, PhishingScanURLs, …).
- extract_text: <boolean> (default = 0)
-
Extract text from attachments (doc, pdf, rtf, images) and scan for spam.
- languages: (all|([a-z][a-z])+( ([a-z][a-z])+)*) (default = all)
-
This option is used to specify which languages are considered OK for incoming mail.
- maxspamsize: <integer> (64 - N) (default = 262144)
-
Maximum size of spam messages in bytes.
- rbl_checks: <boolean> (default = 1)
-
Enable real time blocklists (RBL) checks.
- use_awl: <boolean> (default = 0)
-
Use the Auto-Welcomelist plugin.
- use_bayes: <boolean> (default = 0)
-
Whether to use the naive-Bayesian-style classifier.
- use_razor: <boolean> (default = 1)
-
Whether to use Razor2, if it is available.
- wl_bounce_relays: <string>
-
Welcomelist legitimate bounce relays.
Quarantine
Proxmox Mail Gateway analyses all incoming email messages and decides for each email if it is ham or spam (or virus). Good emails are delivered to the inbox and spam messages are moved into the spam quarantine.
The system can be configured to send daily reports to inform users about personal spam messages received in the last day. The report is only sent if there are new messages in the quarantine.
Some options are only available in the config file /etc/pmg/pmg.conf, and not in the web interface.
- allowhrefs: <boolean> (default = 1)
-
Allow to view hyperlinks. When disabled hyperlinks will be displayed as plain-text.
- authmode: <ldap | ldapticket | ticket> (default = ticket)
-
Authentication mode to access the quarantine interface. Mode ticket allows login using tickets sent with the daily spam report. Mode ldap requires to login using an LDAP account. Finally, mode ldapticket allows both ways.
- hostname: <string>
-
Quarantine Host. Useful if you run a Cluster and want users to connect to a specific host.
- lifetime: <integer> (1 - N) (default = 7)
-
Quarantine life time (days)
- mailfrom: <string>
-
Text for From header in daily spam report mails.
- port: <integer> (1 - 65535) (default = 8006)
-
Quarantine Port. Useful if you have a reverse proxy or port forwarding for the webinterface. Only used for the generated Spam report.
- protocol: <http | https> (default = https)
-
Quarantine Webinterface Protocol. Useful if you have a reverse proxy for the webinterface. Only used for the generated Spam report.
- quarantinelink: <boolean> (default = 0)
-
Enables user self-service for Quarantine Links. Caution: this is accessible without authentication
- reportstyle: <custom | none | short | verbose> (default = verbose)
-
Spam report style.
- viewimages: <0 | 1 | on-demand> (default = 1)
-
Control how images in quarantined mails are displayed. 1 shows all images, including externally hosted ones; 0 hides all images; on-demand shows only embedded images and lets the user load externally hosted ones manually (avoids leaking that a mail was opened).
Customization of Rulescores
While the default scoring of SpamAssassin™'s ruleset provides very good detection rates, sometimes your particular environment can benefit from slightly adjusting the score of a particular rule. Two examples:
-
Your system receives spam mails which are scored at 4.9 and you have a rule which puts all mails above 5 in the quarantine. The one thing the spam mails have in common is that they all hit URIBL_BLACK. By increasing the score of this rule by 0.2 points the spam mails would all be quarantined instead of being sent to your users
-
Your system tags many legitimate mails from a partner organization as spam, because the organization has a policy that each mail has to start with Dear madam or sir (generating 1.9 points through the rule DEAR_SOMETHING). By setting the score of this rule to 0, you can disable it completely.
The system logs all the rules which a particular mail hits. Analyzing the logs can lead to finding such a pattern in your environment.
You can adjust the score of a rule by creating a new Custom Rule Score entry in the GUI and entering a SpamAssassin™ rule as the name.
|
|
In general, it is strongly recommended not to make large changes to the default scores. |
Virus Detector Configuration
Options
All mails are automatically passed to the included virus detector (ClamAV®). The default settings are considered safe, so it is usually not required to change them.
ClamAV® related settings are saved to subsection clamav in /etc/pmg/pmg.conf, using the following configuration keys:
- archiveblockencrypted: <boolean> (default = 0)
-
Whether to mark encrypted archives and documents as heuristic virus match. A match does not necessarily result in an immediate block, it just raises the Spam Score by clamav_heuristic_score.
- archivemaxfiles: <integer> (0 - N) (default = 1000)
-
Number of files to be scanned within an archive, a document, or any other kind of container. Warning: disabling this limit or setting it too high may result in severe damage to the system.
- archivemaxrec: <integer> (1 - N) (default = 5)
-
Nested archives are scanned recursively, e.g. if a ZIP archive contains a TAR file, all files within it will also be scanned. This options specifies how deeply the process should be continued. Warning: setting this limit too high may result in severe damage to the system.
- archivemaxsize: <integer> (1000000 - N) (default = 25000000)
-
Files larger than this limit (in bytes) won’t be scanned.
- dbmirror: <string> (default = database.clamav.net)
-
ClamAV database mirror server.
- maxcccount: <integer> (0 - N) (default = 0)
-
This option sets the lowest number of Credit Card or Social Security numbers found in a file to generate a detect.
- maxscansize: <integer> (1000000 - N) (default = 100000000)
-
Sets the maximum amount of data (in bytes) to be scanned for each input file.
- scriptedupdates: <boolean> (default = 1)
-
Enables ScriptedUpdates (incremental download of signatures)
Please note that the virus signature database is automatically updated. You can see the database status in the GUI, and also trigger manual updates from there.
Quarantine
Identified virus mails are automatically moved to the virus quarantine. The administrator can view these mails from the GUI, and choose to deliver them, in case of false positives. Proxmox Mail Gateway does not notify individual users about received virus mails.
Virus quarantine related settings are saved to subsection virusquar in /etc/pmg/pmg.conf, using the following configuration keys:
- allowhrefs: <boolean> (default = 1)
-
Allow to view hyperlinks. When disabled hyperlinks will be displayed as plain-text.
- lifetime: <integer> (1 - N) (default = 7)
-
Quarantine life time (days)
- viewimages: <0 | 1 | on-demand> (default = 1)
-
Control how images in quarantined mails are displayed. 1 shows all images, including externally hosted ones; 0 hides all images; on-demand shows only embedded images and lets the user load externally hosted ones manually (avoids leaking that a mail was opened).
Custom SpamAssassin configuration
This is only for advanced users. SpamAssassin™'s rules and their associated scores get updated regularly and are trained on a huge corpus, which gets classified by experts. In most cases, adding a rule for matching a particular keyword is the wrong approach, leading to many false positives. Usually bad detection rates are better addressed by properly setting up DNS than by adding a custom rule - watch out for matches to URIBL_BLOCKED in the logs or spam-headers - see the SpamAssassin DNSBL documentation.
To add or change the Proxmox SpamAssassin™ configuration, log in to the console via SSH and change to the /etc/mail/spamassassin/ directory. In this directory there are several files (init.pre, local.cf, …) - do not change them, as init.pre, v310.pre, v320.pre, local.cf will be overwritten by the template engine, while the others can get updated by any SpamAssassin™ package upgrade.
To add your custom configuration, you have to create a new file named custom.cf (in /etc/mail/spamassassin/), then add your configuration there. Make sure to use the correct SpamAssassin rule syntax and test it with:
# spamassassin -D --lint
The change to the configuration will be picked up when pmg-smtp-filter gets restarted. To directly have it enabled you need to restart manually, after editing the custom configuration:
# systemctl restart pmg-smtp-filter.service
If you run a cluster, the custom.cf file is synchronized from the master node to all cluster members and the relevant services are restarted automatically on the cluster members.
To adjust the score assigned to a particular rule, you can also use the Custom Rule Score settings in the GUI.
Custom Check Interface
For use-cases which are not handled by the Proxmox Mail Gateway Virus Detector and SpamAssassin™ configuration, advanced users can create a custom check executable which, if enabled will be called before the Virus Detector and before passing an email through the Rule System. The custom check API is kept as simple as possible, while still providing a great deal of control over the treatment of an email. Its input is passed via two CLI arguments:
-
the api-version (currently v1) - for potential future change of the invocation
-
the queue-file-name - a filename, which contains the complete email as rfc822/eml file
The expected output needs to be printed to STDOUT and consists of two lines:
-
the api-version (currently v1) - see above
-
one of the following 3 results:
-
OK - email is OK
-
VIRUS: <virusdescription> - email is treated as if it contained a virus (the virus description is logged and added to the email’s headers)
-
SCORE: <number> - <number> is added (negative numbers are also possible) to the email’s spamscore
-
The check is run with a 5 minute timeout - if this is exceeded, the check executable is killed and the email is treated as OK.
All output written to STDERR by the check is written with priority err to the journal/mail.log.
Below is a simple sample script following the API (and yielding a random result) for reference:
#!/bin/sh

echo "called with $*" 1>&2

if [ "$#" -ne 2 ]; then
  echo "usage: $0 APIVERSION QUEUEFILENAME" 1>&2
  exit 1
fi

apiver="$1"
shift

if [ "$apiver" != "v1" ]; then
  echo "wrong APIVERSION: $apiver" 1>&2
  exit 2
fi

queue_file="$1"

echo "v1"

choice=$(shuf -i 0-3 -n1)

case "$choice" in
  0)
    echo OK
    ;;
  1)
    echo SCORE: 4
    ;;
  2)
    echo VIRUS: Random Virus
    ;;
  3) #timeout-test
    for i in $(seq 1 7); do
      echo "custom checking mail: $queue_file - minute $i" 1>&2
      sleep 60
    done
    ;;
esac

exit 0
The custom check needs to be enabled in the admin section of /etc/pmg/pmg.conf
section: admin
    custom_check 1
The location of the custom check executable can also be set there with the key custom_check_path and defaults to /usr/local/bin/pmg-custom-check.
|
|
The custom check executable runs as the unprivileged pmg-smtp-filter daemon user. It cannot elevate privileges with tools like sudo, as the service runs with the systemd NoNewPrivileges hardening enabled. |
User Management
User management in Proxmox Mail Gateway consists of three types of users/accounts:
Local Users
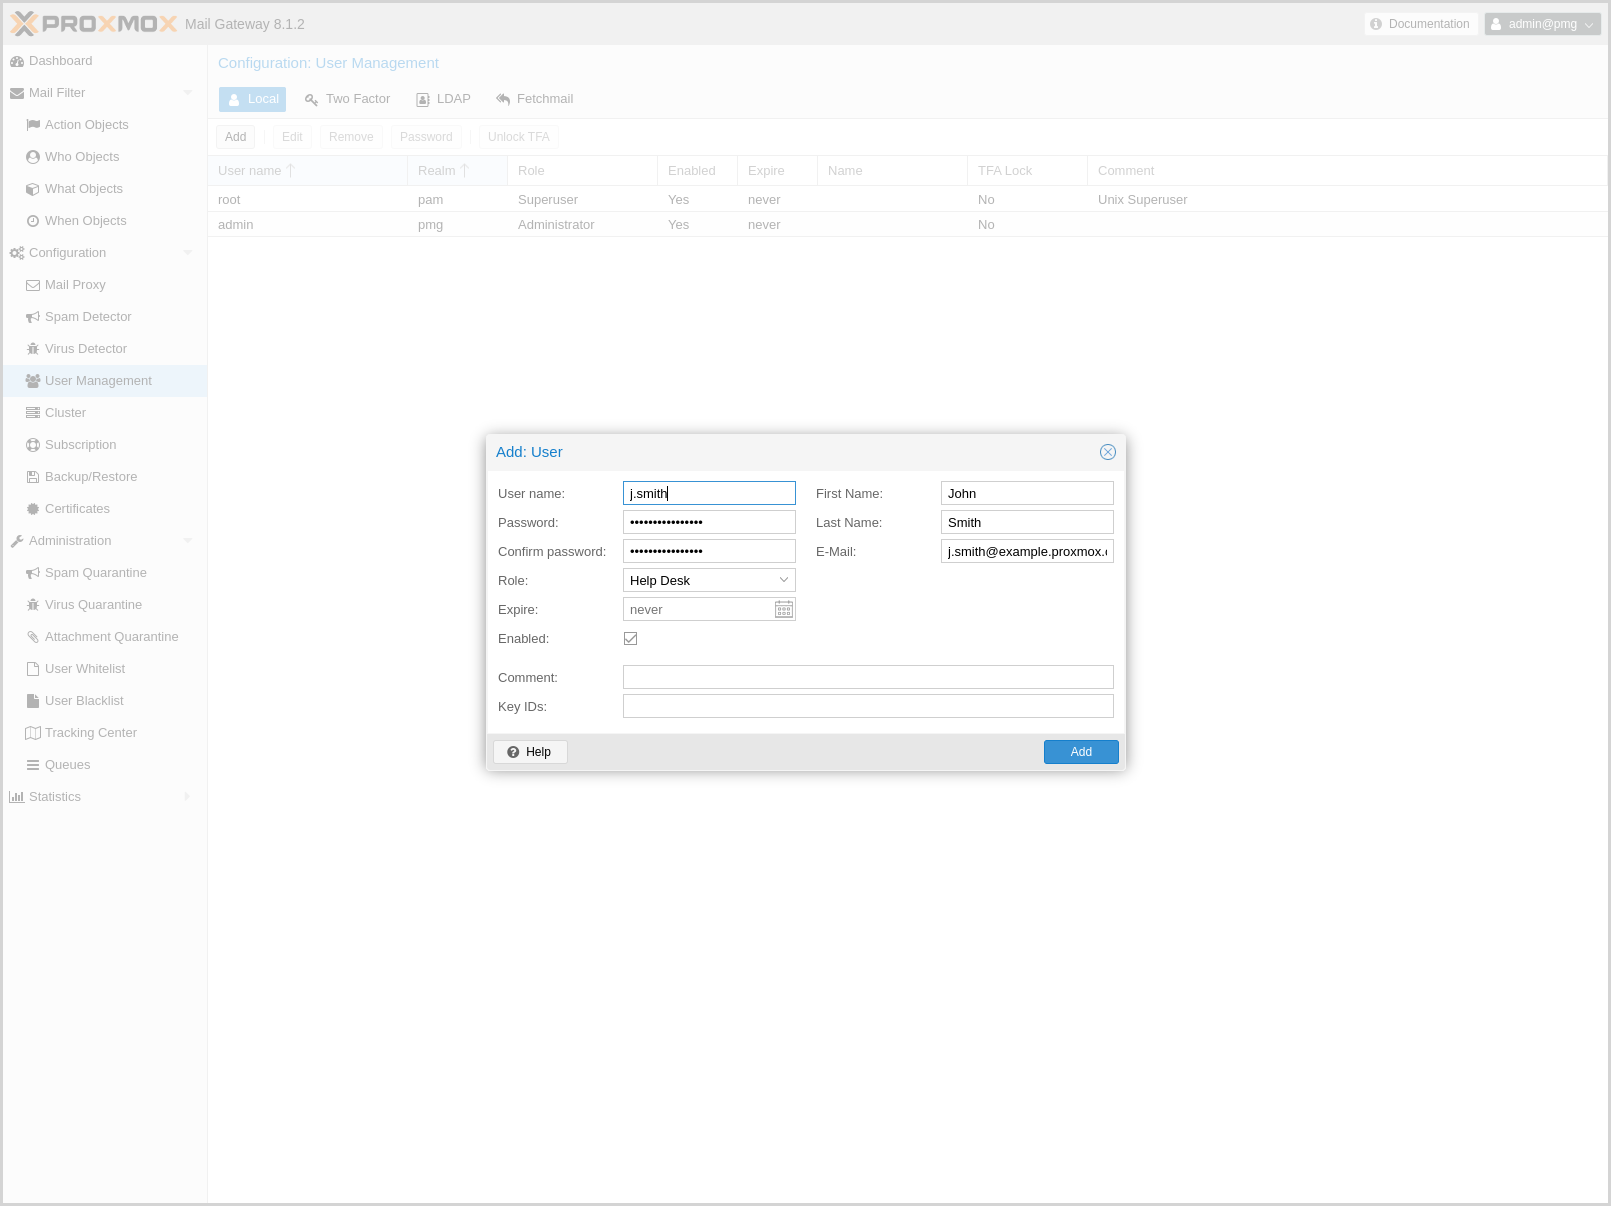
Local users can manage and audit Proxmox Mail Gateway. They can login on the management web interface.
There are four roles:
- Administrator
-
Is allowed to manage settings of Proxmox Mail Gateway, excluding some tasks like network configuration and upgrading.
- Quarantine manager
-
Is allowed to manage quarantines, blocklists and welcomelists, but not other settings. Has no right to view any other data.
- Auditor
-
With this role, the user is only allowed to view data and configuration, but not to edit it.
- Helpdesk
-
Combines permissions of the Auditor and the Quarantine Manager role.
In addition, there is always the root user, which is used to perform special system administrator tasks, such as upgrading a host or changing the network configuration.
|
|
Only PAM users are able to log in via the web interface and ssh, while the users created through the web interface are not. Those users are created for Proxmox Mail Gateway administration only. |
Local user related settings are saved in /etc/pmg/user.conf.
For details on the fields, see user.conf
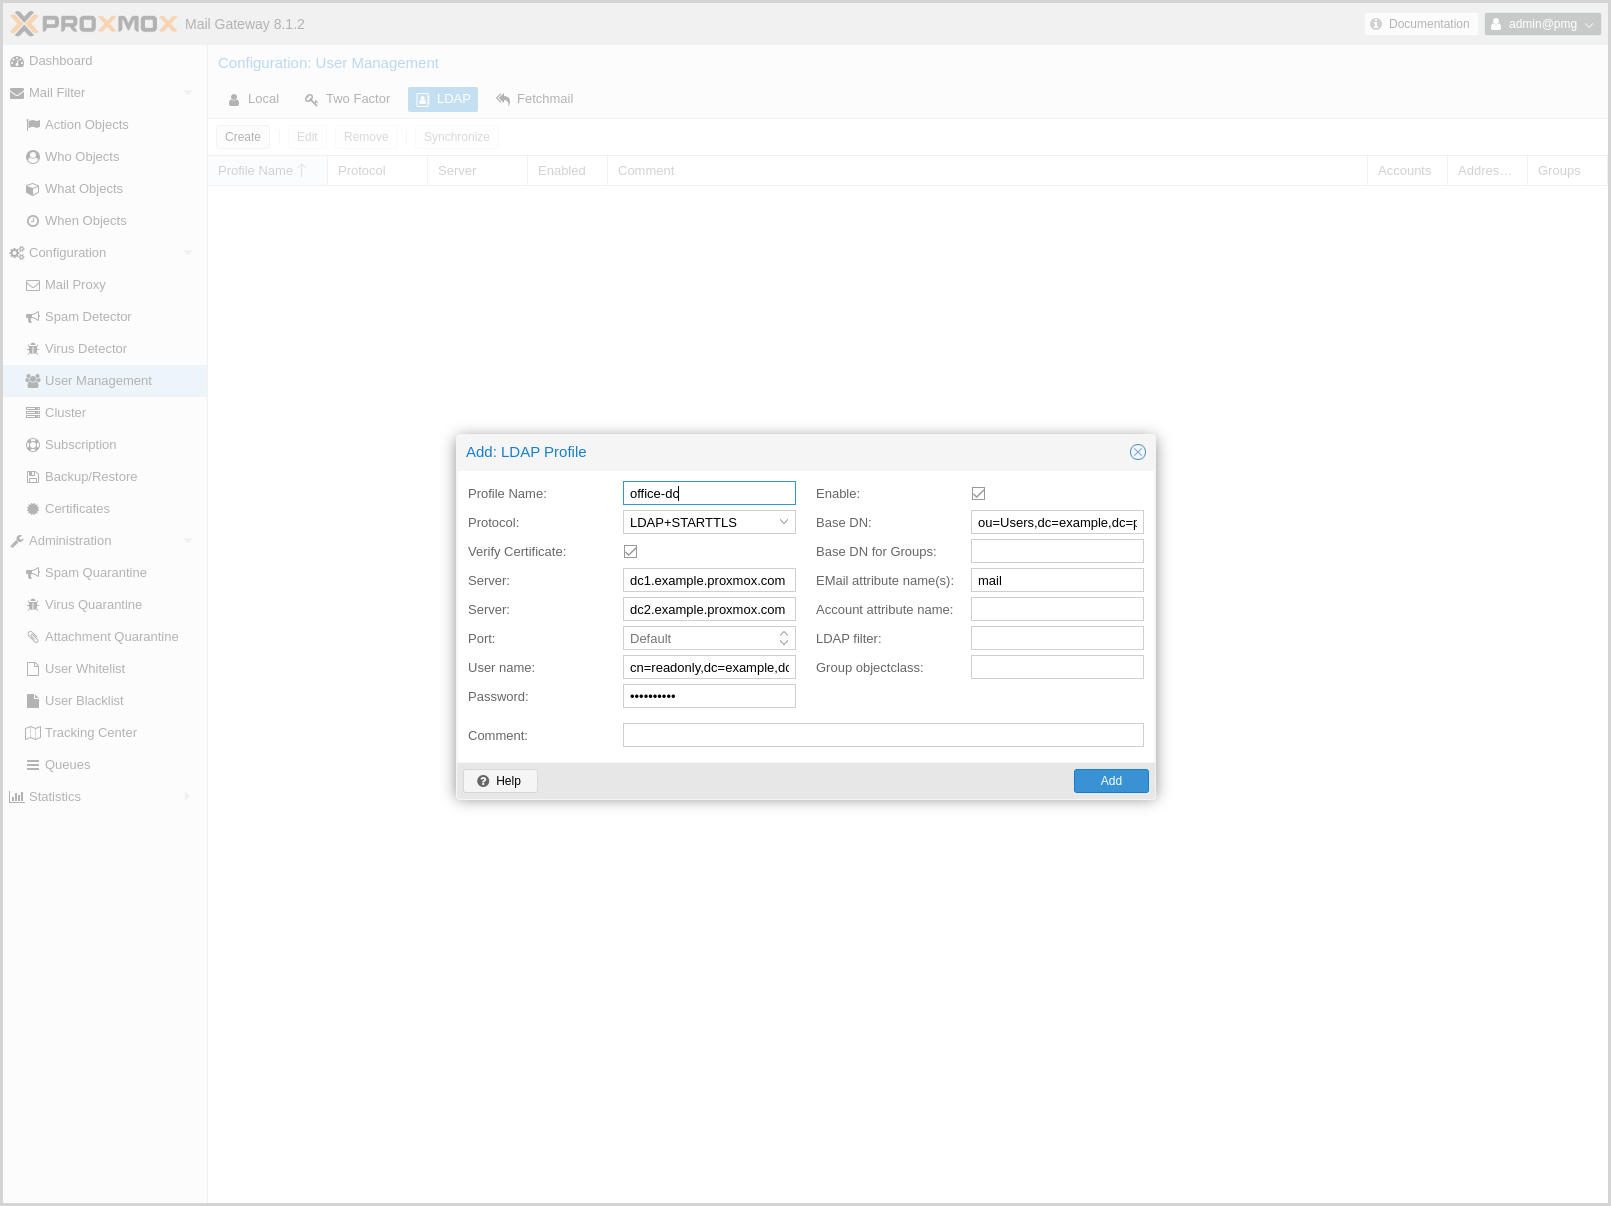
LDAP/Active Directory
With Proxmox Mail Gateway, users can use LDAP and Active directory as authentication methods to access their individual Spam Quarantine. Additionally, if users have extra email aliases defined in the LDAP directory, they will have a single spam quarantine for all of these.
|
|
Authentication via LDAP must first be enabled using the Authentication mode (authmode) parameter in the Spam Detector’s Quarantine configuration settings. |
You can specify multiple LDAP/Active Directory profiles, so that you can create rules matching particular users and groups.
Creating a profile requires (at least) the following:
-
Profile Name: The name assigned to the LDAP profile.
-
Protocol: LDAP, LDAPS, or LDAP+STARTTLS (LDAP+STARTTLS is recommended).
-
Server: The domain name/IP address of the LDAP server. A fallback can also be configured using the second field.
-
User name: The Bind DN for authentication on the LDAP server. This is required if your server does not support anonymous binds.
-
Password: Password for the Bind DN user.
-
Base DN: The directory which users are searched under.
All other fields should work with the defaults for most setups, but can be used to customize the queries.
The settings are saved to /etc/pmg/ldap.conf. Details about the options can be found here: ldap.conf
Bind user
It is highly recommended that the user which you use for connecting to the LDAP server only has permission to query the server. For LDAP servers (for example OpenLDAP or FreeIPA), the username has to be of a format like uid=username,cn=users,cn=accounts,dc=domain, where the specific fields depend on your setup. For Active Directory servers, the format should be username@domain or domain\username.
Sync
Proxmox Mail Gateway synchronizes the relevant user and group information periodically, so that the information is quickly available, even when the LDAP/AD server is temporarily inaccessible.
You can actively trigger a synchronization with pmgconfig:
# pmgconfig ldapsync
After a successful sync, the groups and users should be visible on the web interface. Following this, you can create rules targeting LDAP users and groups.
Fetchmail
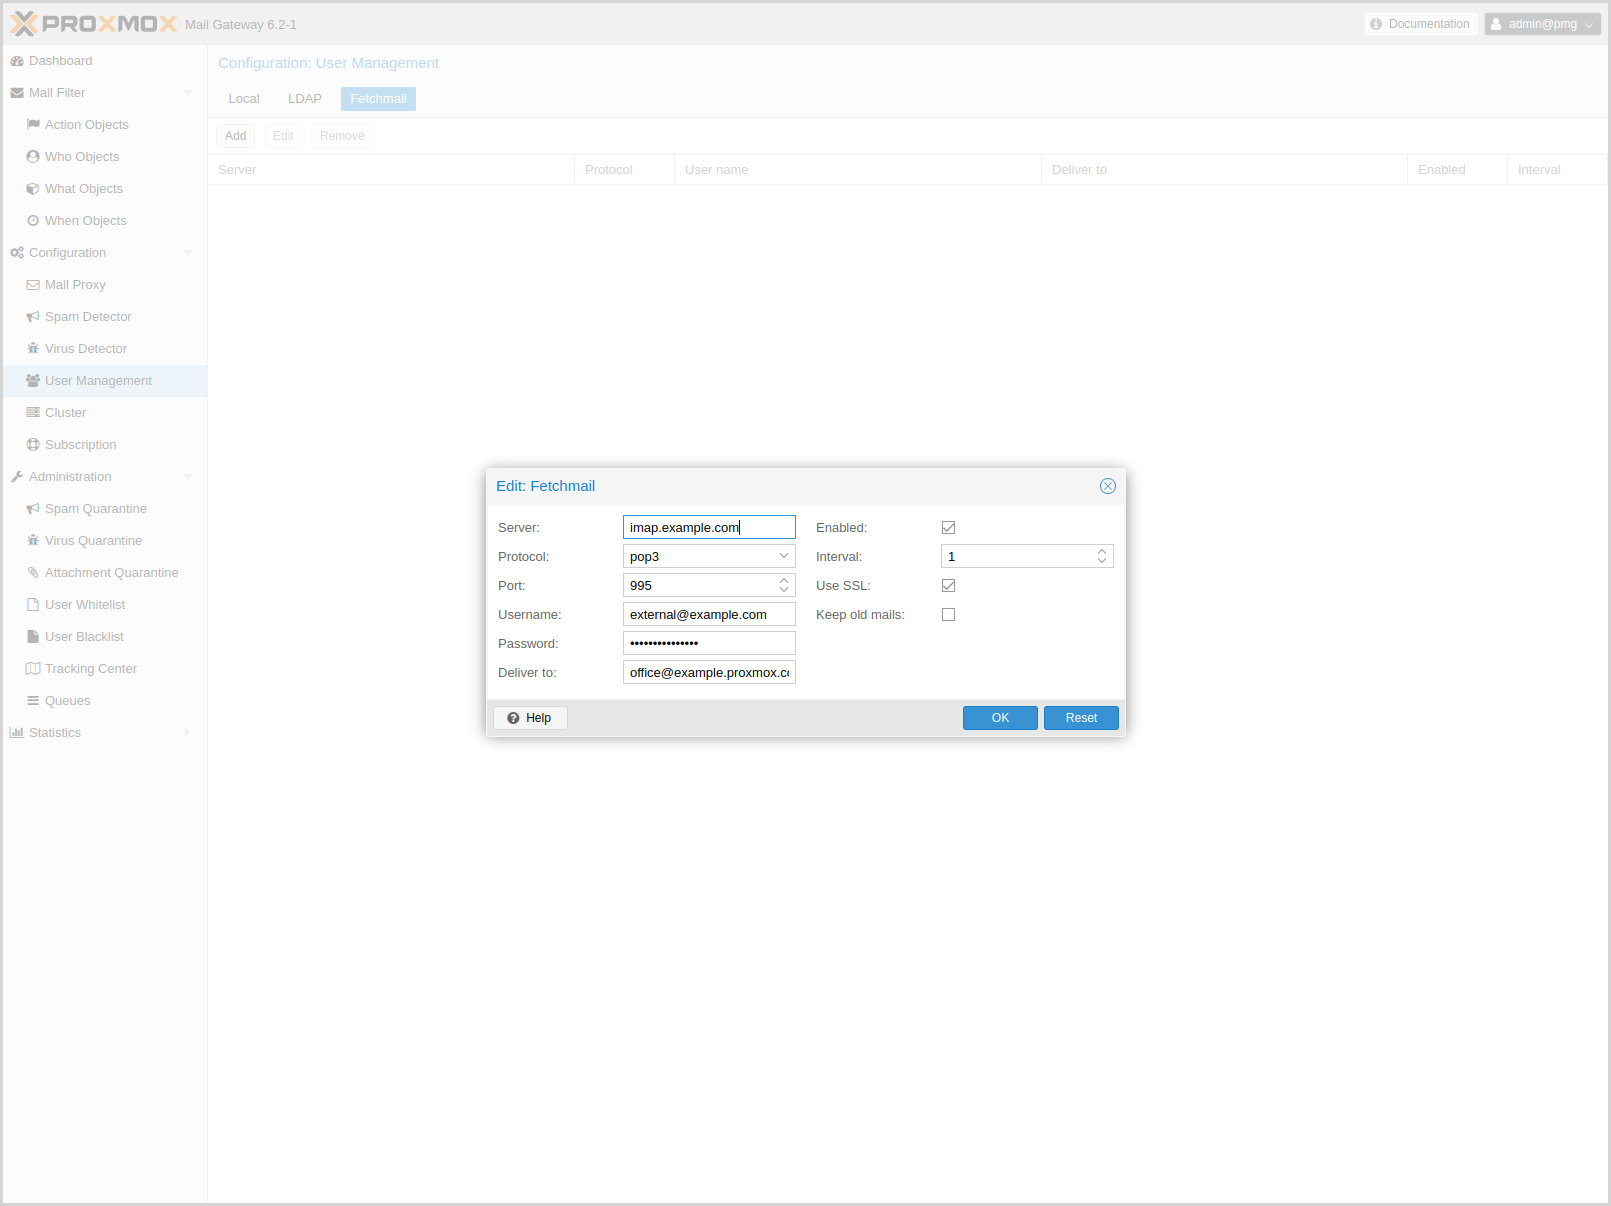
Fetchmail is a utility for polling and forwarding emails. You can define email accounts, which will then be fetched and forwarded to the email address you defined.
You have to add an entry for each account/target combination you want to fetch and forward. These will then be regularly polled and forwarded, according to your configuration.
The API and web interface offer the following configuration options:
- enable: <boolean> (default = 0)
-
Flag to enable or disable polling.
- interval: <integer> (1 - 2016)
-
Only check this site every <interval> poll cycles. A poll cycle is 5 minutes.
- keep: <boolean> (default = 0)
-
Keep retrieved messages on the remote mailserver.
- pass: <string>
-
The password used tfor server login.
- port: <integer> (1 - 65535)
-
Port number.
- protocol: <imap | pop3>
-
Specify the protocol to use when communicating with the remote mailserver
- server: <string>
-
Server address (IP or DNS name).
- ssl: <boolean> (default = 0)
-
Use SSL.
- target: (?:[^\s\\@]+\@[^\s\/\\@]+)
-
The target email address (where to deliver fetched mails).
- user: <string>
-
The user identification to be used when logging in to the server
Two-Factor Authentication
Users of the admin interface can configure two-factor authentication to increase protection of their accounts.
|
|
Joining a cluster with two-factor authentication enabled for the root user is not supported. Remove the second factor when joining the cluster. |
Available Second Factors
You can set up multiple second factors, in order to avoid a situation in which losing your smartphone or security key locks you out of your account permanently.
The following two-factor authentication methods are available:
-
User configured TOTP (Time-based One-Time Password). A short code derived from a shared secret and the current time, it changes every 30 seconds.
-
WebAuthn (Web Authentication). A general standard for authentication. It is implemented by various security devices, like hardware keys or trusted platform modules (TPM) from a computer or smart phone.
-
Single use Recovery Keys. A list of keys which should either be printed out and locked in a secure place or saved digitally in an electronic vault. Each key can be used only once. These are perfect for ensuring that you are not locked out, even if all of your other second factors are lost or corrupt.
Configuration of Two-Factor
Users can choose to enable TOTP or WebAuthn as a second factor on login, via the TFA button in the user list.
Users can always add and use one time Recovery Keys.
TOTP
There is no server setup required. Simply install a TOTP app on your smartphone (for example, andOTP) and use the Proxmox Backup Server web-interface to add a TOTP factor.
After opening the TOTP window, the user is presented with a dialog to set up TOTP authentication. The Secret field contains the key, which can be randomly generated via the Randomize button. An optional Issuer Name can be added to provide information to the TOTP app about what the key belongs to. Most TOTP apps will show the issuer name together with the corresponding OTP values. The username is also included in the QR code for the TOTP app.
After generating a key, a QR code will be displayed, which can be used with most OTP apps such as FreeOTP. The user then needs to verify the current user password (unless logged in as root), as well as the ability to correctly use the TOTP key, by typing the current OTP value into the Verification Code field and pressing the Apply button.
WebAuthn
For WebAuthn to work, you need to have two things:
-
A trusted HTTPS certificate (for example, by using Let’s Encrypt). While it probably works with an untrusted certificate, some browsers may warn or refuse WebAuthn operations if it is not trusted.
-
Setup the WebAuthn configuration (see User Management → Two Factor → WebAuthn in the Proxmox Mail Gateway web interface). This can be auto-filled in most setups.
Once you have fulfilled both of these requirements, you can add a WebAuthn configuration in the Two Factor panel under Datacenter → Permissions → Two Factor.
Recovery Keys
Recovery key codes do not need any preparation; you can simply create a set of recovery keys in the Two Factor panel under Datacenter → Permissions → Two Factor.
|
|
There can only be one set of single-use recovery keys per user at any time. |
WebAuthn Configuration
To allow users to use WebAuthn authentication, it is necessary to use a valid domain with a valid SSL certificate, otherwise some browsers may warn or refuse to authenticate altogether.
|
|
Changing the WebAuthn configuration may render all existing WebAuthn registrations unusable! |
You can configure WebAuthn directly in the Two Factor panel, there’s an auto-fill button that will set the correct values for most setups.
Authentication Realms
As Proxmox Mail Gateway users are just counterparts for users existing on some external realm, the realms have to be configured in /etc/pmg/realms.conf. The following realms (authentication methods) are available:
- Linux PAM Standard Authentication
-
Linux PAM is a framework for system-wide user authentication. These users are created on the host system with commands such as adduser.
- Proxmox Mail Gateway Authentication Server
-
This is a Unix-like password store, which stores hashed passwords directly in /etc/pmg/user.conf. Passwords are hashed using the SHA-256 hashing algorithm. This is the most convenient realm for small-scale (or even mid-scale) installations, where users do not need access to anything outside of Proxmox Mail Gateway. In this case, users are fully managed by Proxmox Mail Gateway and are able to change their own passwords via the GUI.
- OpenID Connect
-
OpenID Connect is implemented as an identity layer on top of the Oauth 2.0 protocol. It allows clients to verify the identity of the user, based on authentication performed by an external authorization server.
Linux PAM Standard Authentication
As Linux PAM corresponds to host system users, a system user must exist on each node which the user is allowed to log in on. The user authenticates with their usual system password. This realm is added by default and can’t be removed. In Proxmox Mail Gateway this realm is restricted to the root user.
Proxmox Mail Gateway Authentication Server
The Proxmox Mail Gateway authentication server realm is a simple Unix-like password store. The realm is created by default.
Unlike the other Proxmox Mail Gateway realm types, users are created and authenticated entirely through Proxmox Mail Gateway, rather than authenticating against another system. Hence, you are required to set a password for this type of user upon creation.
OpenID Connect
The main OpenID Connect configuration options are:
-
Issuer URL (issuer-url): This is the URL of the authorization server. Proxmox Mail Gateway uses the OpenID Connect Discovery protocol to automatically configure further details.
While it is possible to use unencrypted http:// URLs, we strongly recommend to use encrypted https:// connections.
-
Realm (realm): The realm identifier for Proxmox Mail Gateway users
-
Client ID (client-id): OpenID Client ID.
-
Client Key (client-key): Optional OpenID Client Key.
-
Autocreate Users (autocreate): Automatically create users if they do not exist. While authentication is done at the OpenID server, all users still need an entry in the Proxmox Mail Gateway user configuration. You can either add them manually, or use the autocreate option to automatically add new users.
-
Autocreate Users with Assigned Role (autocreate-role-assignment): By default, all autocreated users will be assigned the Audit role. You can either assign a fixed role to all autocreated users (for example, source=fixed,fixed-role=helpdesk), or set a custom claim that is used to assign users to different roles (for example, source=from-claim,role-claim=custom_role_claim).
-
Username Claim (username-claim): OpenID claim used to generate the unique username (sub or preferred_username).
Username mapping
The OpenID Connect specification defines a single unique attribute (claim in OpenID terms) named sub (Subject). By default, we use the value of this attribute to generate Proxmox Mail Gateway usernames, by simply adding @ and the realm name: ${subject}@${realm}.
Unfortunately, most OpenID servers use random strings for sub (Subject), like DGH76OKH34BNG3245SB, so a typical username would look like DGH76OKH34BNG3245SB@yourrealm. While unique, it is difficult for humans to remember such random strings, making it quite impossible to associate real users with this.
The username-claim setting allows you to use other attributes for the username mapping. Setting it to preferred_username is preferred if the OpenID Connect server provides that attribute and guarantees its uniqueness.
As Proxmox Mail Gateway currently forbids @ in usernames the option to use email is not possible.
Examples
Here is an example of creating an OpenID realm using Google. You need to replace --client-id and --client-key with the values from your Google OpenID settings.
pmgsh create /access/auth-realm --realm myrealm1 --type oidc --issuer-url https://accounts.google.com --client-id XXXX --client-key YYYY --username-claim username
The above command uses --username-claim username, so that the usernames on the Proxmox Mail Gateway side look like example.user@myrealm1.
Keycloak (https://www.keycloak.org/) is a popular open source Identity and Access Management tool, which supports OpenID Connect. In the following example, you need to replace the --issuer-url and --client-id with your information:
pmgsh create /access/auth-realm --realm myrealm2 --type oidc --issuer-url https://your.server:8080/realms/your-realm --client-id XXX --username-claim username

|
You need to ensure that the user is not allowed to edit the username setting themselves (on the Keycloak server). |
Copyright and Disclaimer
Copyright © 2007-2026 Proxmox Server Solutions GmbH
This program is free software: you can redistribute it and/or modify it under the terms of the GNU Affero General Public License as published by the Free Software Foundation, either version 3 of the License, or (at your option) any later version.
This program is distributed in the hope that it will be useful, but WITHOUT ANY WARRANTY; without even the implied warranty of MERCHANTABILITY or FITNESS FOR A PARTICULAR PURPOSE. See the GNU Affero General Public License for more details.
You should have received a copy of the GNU Affero General Public License along with this program. If not, see https://www.gnu.org/licenses/